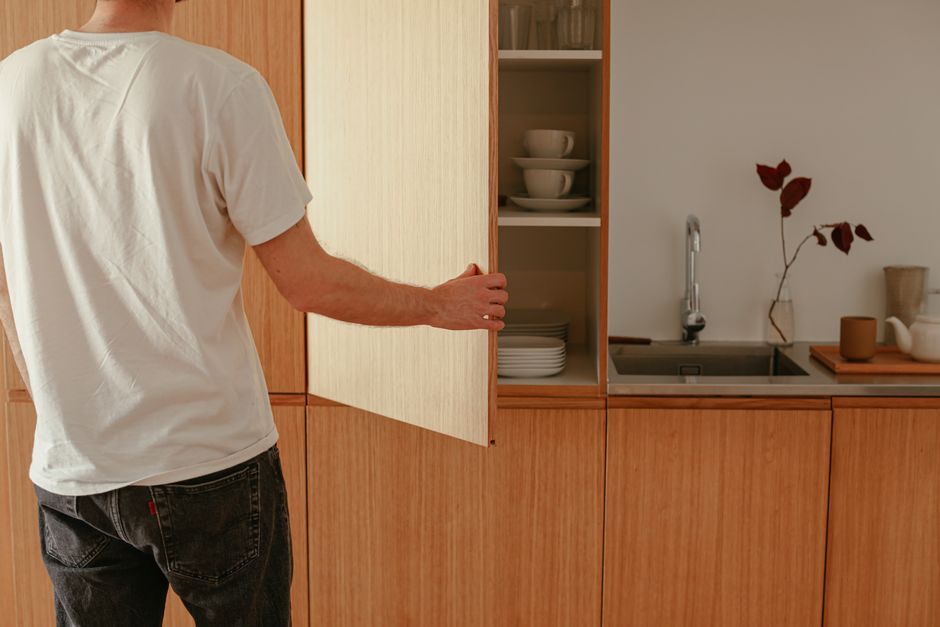
The Fastest Way to Update Kitchen Cabinets Without Replacing Them
If you’re looking at self stick veneer for kitchen cabinets, here’s what you need to know at a glance:
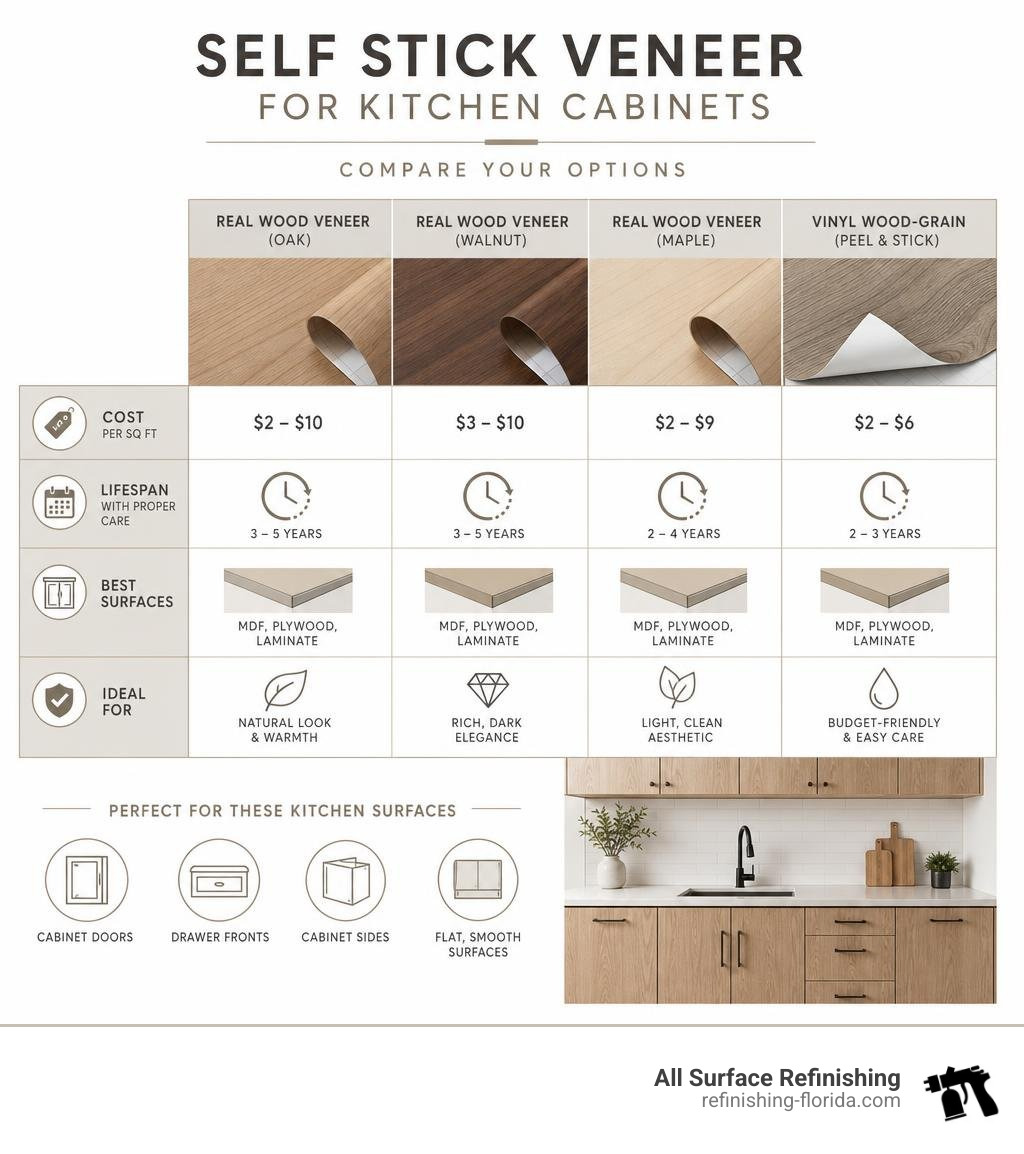
- What it is: Thin sheets of real wood or vinyl film with a pre-applied pressure-sensitive adhesive (PSA) backing
- Best for: Flat cabinet doors, drawer fronts, and cabinet box sides made from MDF, plywood, or existing laminate
- Cost: Roughly $2–$10 per square foot depending on material
- Lifespan: Typically 2–5 years with proper prep and care
- Top materials: Real wood veneer (oak, walnut, maple, cherry) or vinyl wood-grain contact paper
- Key requirement: Surfaces must be clean, smooth, and dry for the adhesive to hold
Your kitchen cabinets take up more visual space than almost anything else in the room. When they look dated or worn, the whole kitchen feels tired — even if everything else is fine.
Full cabinet replacement is expensive and disruptive. But there’s a middle ground that many South Florida homeowners are using: self-adhesive wood veneer. It’s real wood (or a convincing vinyl alternative) with a peel-and-stick backing that bonds directly to your existing cabinet surfaces.
No major tools. No professional installer required. No demolition.
This guide walks you through every material option, how to apply them correctly, and what to realistically expect from them in a humid kitchen environment.
I’m Frank Hernandez, President of All Surface Refinishing, and I’ve been working with cabinet surfaces across South Florida since 1996 — so I’ve seen how self stick veneer for kitchen cabinets performs in our hot, humid climate compared to professional-grade alternatives. That experience is what shapes the honest, practical advice throughout this guide.
What is Self Stick Veneer for Kitchen Cabinets?
To put it simply, self stick veneer for kitchen cabinets is a thin layer of decorative material backed by a factory-applied, pressure-sensitive adhesive (PSA). Unlike traditional wood veneers that require messy contact cement, heavy clamps, or hot irons, self-adhesive options are designed for immediate stick-and-stay convenience.
Most high-quality real wood veneers utilize a heavy-duty 3M PSA backing. This adhesive is engineered to create a permanent, non-repositionable bond the moment it makes firm contact with a clean substrate. The veneer itself is incredibly thin — typically ranging from 0.1mm to 0.5mm — which makes it flexible enough to wrap around slight curves or sit flush against flat cabinet boxes without adding noticeable bulk.
For DIYers looking to save time and skip the fumes of liquid glues, the Convenience of Peel-and-Stick Veneer for Quick DIY Projects cannot be overstated. It transforms what used to be a highly technical carpentry task into a straightforward afternoon project. However, because the adhesive is so powerful, you only get one real shot at aligning it correctly; once that sticky backing touches your cabinet box, it is there to stay.
Material Selection: Real Wood vs. Vinyl
When shopping for a peel-and-stick product, you will quickly find yourself choosing between two distinct categories: real wood veneer sheets and synthetic vinyl films (often sold as wood-grain contact paper or peel-and-stick wallpaper).
Here is how they compare across the board:
| Feature | Real Wood Veneer Sheets | Synthetic Vinyl Film (Contact Paper) |
|---|---|---|
| Composition | Thin slice of natural hardwood on a paper/resin backing | Printed PVC plastic with textured wood-grain finish |
| Appearance | Authentic wood grain, unique patterns, can be stained/varnished | Repeated printed pattern, flat color, slightly glossy |
| Thickness | 0.3mm to 0.5mm (stiff, sturdy) | 0.1mm to 0.2mm (highly flexible, stretchy) |
| Average Cost | $5.00 – $12.00 per sq. ft. | $1.50 – $4.00 per sq. ft. |
| Moisture Resistance | Moderate (requires a protective clear topcoat) | High (waterproof plastic surface) |
| Heat Tolerance | Moderate | Low (can shrink, warp, or melt near stoves) |
| Lifespan | 3 to 5+ years (if sealed properly) | 1 to 3 years (prone to peeling at edges) |
Real Wood Self Stick Veneer for Kitchen Cabinets vs. Synthetic Alternatives
If you want your kitchen to exude warmth and luxury, real wood is the clear winner. Because it is sliced from actual logs, real wood veneer features genuine wood grain patterns, natural knots, and an organic depth that synthetic PVC simply cannot replicate. Popular hardwood species like red oak, white oak, maple, walnut, cherry, and mahogany allow you to match almost any interior design aesthetic. Over time, real wood will even develop a beautiful natural patina.
For those interested in highly textured, rustic, or reclaimed aesthetics, products like Vandyke Wood Wall Planks | Peel & Stick | Stikwood showcase how real wood with natural weathering can elevate a space.
Synthetic vinyl films, on the other hand, are highly cost-effective and waterproof. However, they lack the tactile texture of real wood and can look artificial under bright kitchen lighting. If you are updating a temporary rental or working on a tight budget, vinyl is a fantastic tool. But if you want a high-end look that increases your home’s value, real wood is worth the extra investment.
Substrate Compatibility for Kitchen Cabinets
Before ordering your veneer, you must check what your cabinets are actually made of. Self-adhesive veneers require a perfectly smooth, stable, and non-porous substrate to form a lasting bond.
- Plywood & MDF (Medium-Density Fiberboard): These are the absolute best surfaces for self-stick veneer. They are incredibly flat, stable, and hold adhesive beautifully.
- Particle Board: Raw particle board is too porous and rough. It must be sealed, sanded, and primed first, or the veneer will lift within weeks.
- Existing Laminate or Melamine: You can apply veneer over laminate, but it requires thorough degreasing and light sanding to create a “key” (rough texture) for the adhesive to grab onto.
- Solid Wood: Existing solid wood works well, provided any old varnish, wax, or oil polish is completely stripped away.
To see what a dramatic difference a smooth, professional-grade surface upgrade can make, check out our gallery of cabinet resurfacing before and after transformations.
Step-by-Step Installation and Surface Preparation
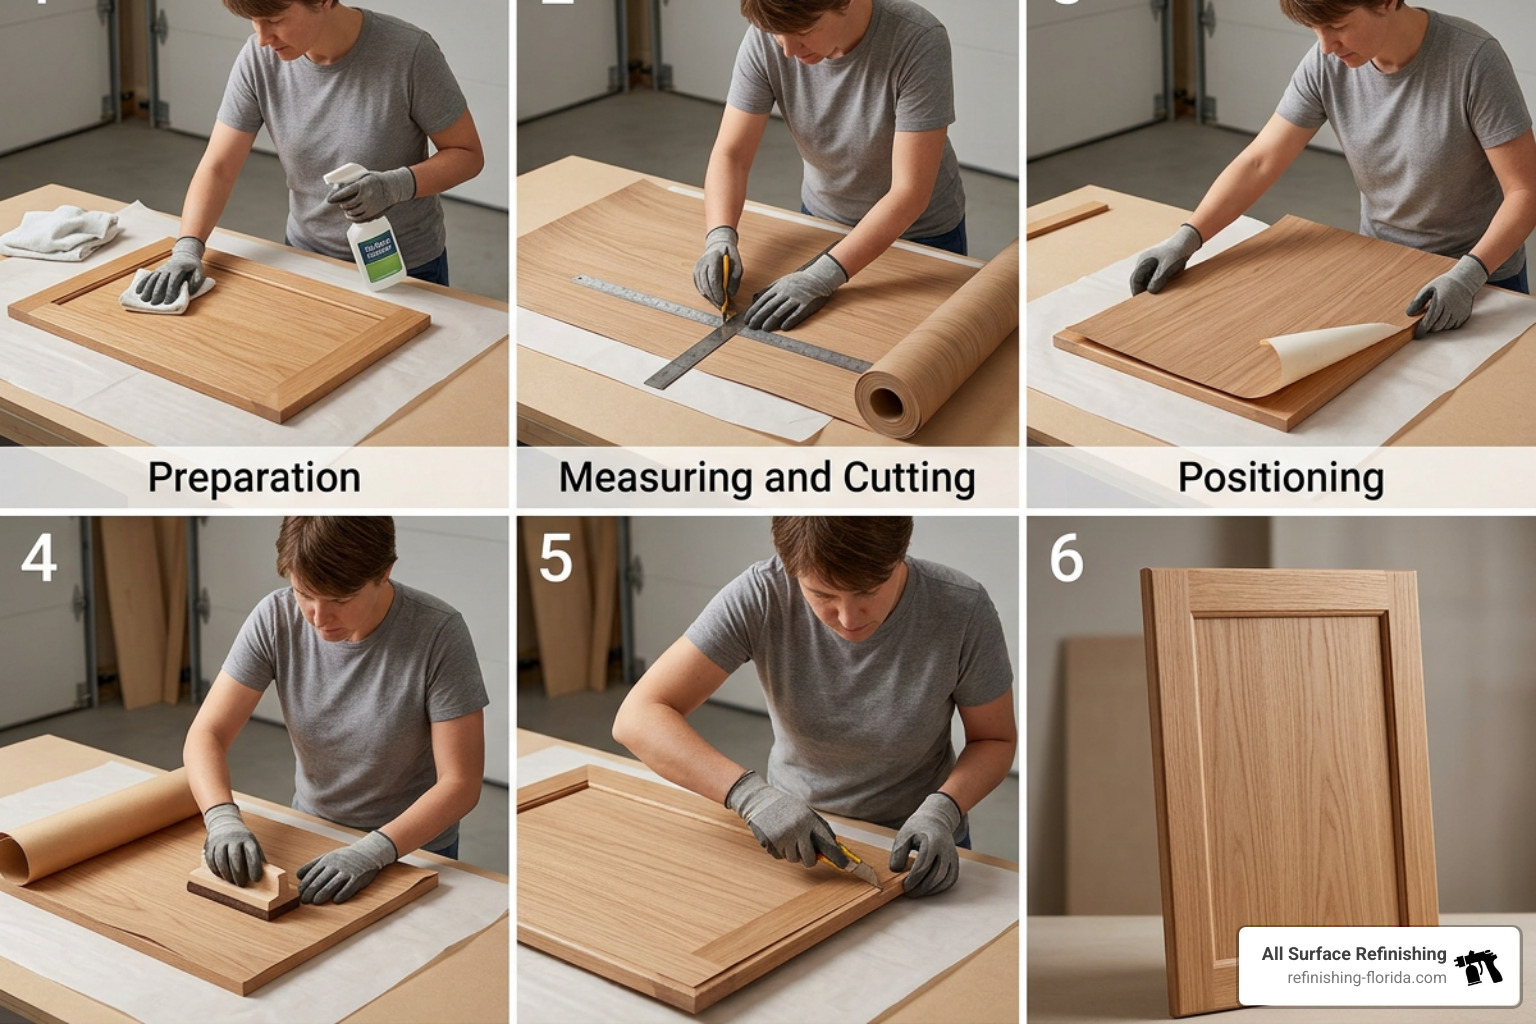
Applying self stick veneer for kitchen cabinets is a test of patience. The actual “sticking” is easy; the preparation and cutting are where the real work happens.
Preparing Cabinet Surfaces for Maximum Adhesion
We cannot emphasize this enough: 90% of veneer failures are caused by poor surface preparation. Kitchen cabinets are naturally coated in a microscopic layer of cooking grease, steam residue, food splatters, and household dust. If you try to stick veneer over this layer, it will bubble and peel.
- Remove Hardware and Doors: Take off all cabinet doors, drawer fronts, hinges, and handles. It is much easier to apply veneer to doors when they are laying flat on a workbench.
- Deep Clean: Scrub every square inch of the cabinet boxes and door frames with a heavy-duty degreaser (like TSP or a dedicated kitchen cabinet cleaner).
- Sand the Surface: Once dry, lightly sand all surfaces using 220-grit sandpaper. You aren’t trying to remove all the old paint or wood; you just want to knock off any gloss and create a smooth, slightly textured surface.
- Remove All Dust: Wipe down the cabinets with a tack cloth or a damp microfiber cloth to remove every single speck of sanding dust.
- Prime (If Necessary): If you are applying veneer over raw MDF, particle board, or heavily damaged paint, apply a high-quality, wax-free shellac primer. This seals the wood and provides an optimal bonding surface.
For a deeper dive into the prep work that goes into a professional-grade kitchen update, read our guide on kitchen cabinet refurbishing.
How to Apply Self Stick Veneer for Kitchen Cabinets
Once your surfaces are prepped, dry, and dust-free, you are ready to apply the veneer.
- Measure and Cut Oversized: Measure your cabinet stiles (vertical frames) and rails (horizontal frames). Cut your veneer strips roughly 1/2 inch wider and 2 inches longer than the actual measurements. Crucial tip: Ensure the wood grain runs lengthwise along each strip.
- Align and Peel: Start with the vertical stiles. Peel back the first 2 to 3 inches of the paper backing. Carefully align the top of the veneer strip with the top of the cabinet frame, leaving a slight overhang on the outer edge.
- Press and Smooth: Slowly peel away the remaining backing paper with one hand while using a veneer scraper, wooden smoothing block, or plastic squeegee to press the veneer down with the other. Always work from the center outward to push out any trapped air bubbles.
- Apply Firm Pressure: The “P” in PSA stands for pressure. Go over the entire strip again with a heavy roller or a wooden block wrapped in a soft cloth. Press firmly to activate the adhesive bond.
- Trim the Excess: Use a brand-new, razor-sharp utility knife to score and trim the overhanging edges. Hold the blade at a slight angle against the cabinet frame for a clean, flush cut.
- Seal the Edges: To prevent moisture from getting under the edges, apply a thin bead of waterproof clear polyurethane or edge sealant along all seams.
- Reassemble: Allow the adhesive to cure for 24 to 48 hours before reattaching your hinges, doors, and hardware.
If you want to compare this process to other professional cabinet transformation methods, take a look at our cabinet refinishing complete guide 2026.
Longevity, Maintenance, and Safe Removal
How long does self stick veneer for kitchen cabinets actually last? In a perfect environment, a high-quality real wood veneer with 3M PSA backing can last anywhere from 2 to 5 years. However, the kitchen is rarely a perfect environment.
Moisture, Heat, and Everyday Wear
Kitchens are high-traffic zones filled with steam, heat from ovens, and accidental spills.
- Moisture Tolerance: Real wood veneer is susceptible to moisture. If water sits on an unsealed edge, the wood can swell, causing the adhesive to release and the edge to curl.
- Scratch Resistance: Real wood can scratch and dent just like solid wood furniture. It is highly recommended to apply 2 to 3 coats of a protective clear polyurethane topcoat over raw wood veneers to shield them from scratches and moisture.
- Heat Exposure: Near stoves, dishwashers, and coffee makers, constant heat can soften the pressure-sensitive adhesive over time, leading to bubbling or lifting.
Cleaning and Maintenance
To keep your veneered cabinets looking their best:
- Wipe up spills immediately.
- Clean only with a slightly damp microfiber cloth and a mild, pH-neutral soap.
- Avoid harsh chemical cleaners, abrasive scrubbers, or flooding the surface with water.
Safe Removal Technique
If you ever want to remove or replace the veneer (perhaps you are renting or want to change styles), you can do so with a bit of patience. Because the adhesive is incredibly strong, trying to peel it off cold will likely rip up the underlying MDF or plywood.
To remove it safely, use a hair dryer or a heat gun on a low setting to warm up a small section of the veneer. The heat will soften the adhesive, allowing you to slowly peel the veneer back at a sharp angle. Any remaining sticky residue can be cleaned up using an adhesive remover or solvent like Goo Gone, followed by a light sanding.
Frequently Asked Questions About Cabinet Veneers
How long does peel-and-stick veneer last in a humid kitchen?
In South Florida climates — like Miami, Fort Lauderdale, or Boca Raton — indoor humidity can put self-adhesive products to the test. If your home has consistent air conditioning, you can expect a lifespan of 2 to 5 years. However, if the kitchen is frequently exposed to high humidity or outdoor air, the edges of the veneer may begin to lift within 1 to 2 years. Applying a high-quality edge sealant is essential in our tropical climate to prevent this.
Can you remove self-adhesive veneer without damaging the cabinets?
Yes, but only if you use heat. Peeling the veneer off dry will tear the fibers of MDF, plywood, or particle board underneath. By warming the veneer with a heat gun or hair dryer, you can safely release the adhesive bond and preserve the underlying cabinet box structure.
Is self-stick veneer safe to use around kitchen heat sources?
While self-stick veneer is generally safe, you must exercise caution around stoves, ovens, and toaster ovens. Prolonged exposure to temperatures above 140°F can degrade the adhesive, causing the veneer to bubble, shift, or peel away. Ensure there is adequate clearance between your cooking appliances and any veneered surfaces.
Conclusion
Using self stick veneer for kitchen cabinets is a highly accessible, budget-friendly way for DIY enthusiasts to update their kitchen’s style over a weekend. It offers beautiful, real-wood aesthetics without the high cost of a full kitchen remodel.
However, the precision required for cutting, the unforgiving nature of the adhesive, and the limited lifespan in South Florida’s humid climate mean that DIY veneering isn’t the perfect solution for everyone. If you want a flawless, factory-grade finish that will last for a decade rather than a few years, professional cabinet resurfacing is the way to go.
At All Surface Refinishing, we are South Florida’s trusted experts in cabinet, countertop, and bathtub resurfacing. With over 30 years of experience and more than 14,000 successful projects under our belt, we provide fast, cost-effective, and incredibly durable transformations for kitchens and bathrooms across Broward, Palm Beach, and Miami-Dade counties.
Why spend your weekend measuring, cutting, and fighting air bubbles? Let us give your kitchen a gorgeous, long-lasting facelift. Reach out to us today to explore our professional cabinet refinishing services and request a free quote!
