
Essential Tools and Materials Before Installing Kitchen Cabinets
Installing kitchen cabinets involves finding the room’s highest floor spot, marking reference layout lines and wall studs, mounting upper cabinets first using a temporary ledger board, and leveling and securing base cabinets with shims before installing trim and hardware. Taking on this project yourself requires the right gear to handle bowed drywall, uneven framing, or sagging subfloors with precision.
Before tackling the project, evaluate the cost of brand-new units against your overall budget so you can allocate funds for quality mounting hardware.
Gather these essential tools and materials:
- Self-Leveling Laser Level: A horizontal and vertical cross-line laser saves hours compared to standard bubble levels alone.
- Stud Finder & Marking Pencil: Essential for locating structural wall studs behind drywall.
- Cordless Drill & Impact Driver: Equipped with countersink bits and magnetic driver tips.
- Cabinet Jacks or Support Poles: Telescoping support poles hold heavy wall boxes securely while you fasten them.
- Wood Shims: Cedar shingles or composite shims provide smooth leveling adjustments beneath and behind boxes.
- Face-Frame Clamps (Cabinet Claws): Align and draw cabinet face frames completely flush before drilling.
- 2×4 Lumber: Used as a temporary ledger board to support upper wall boxes.
- Fasteners: Dedicated 2-1/2-inch washer-head cabinet screws for stud anchoring, and 1-1/4-inch to 1-1/2-inch trim screws for face-frame joining.
- Jigsaw & Scribe Tool: For cutting plumbing cutouts, notch work, and custom fillers.
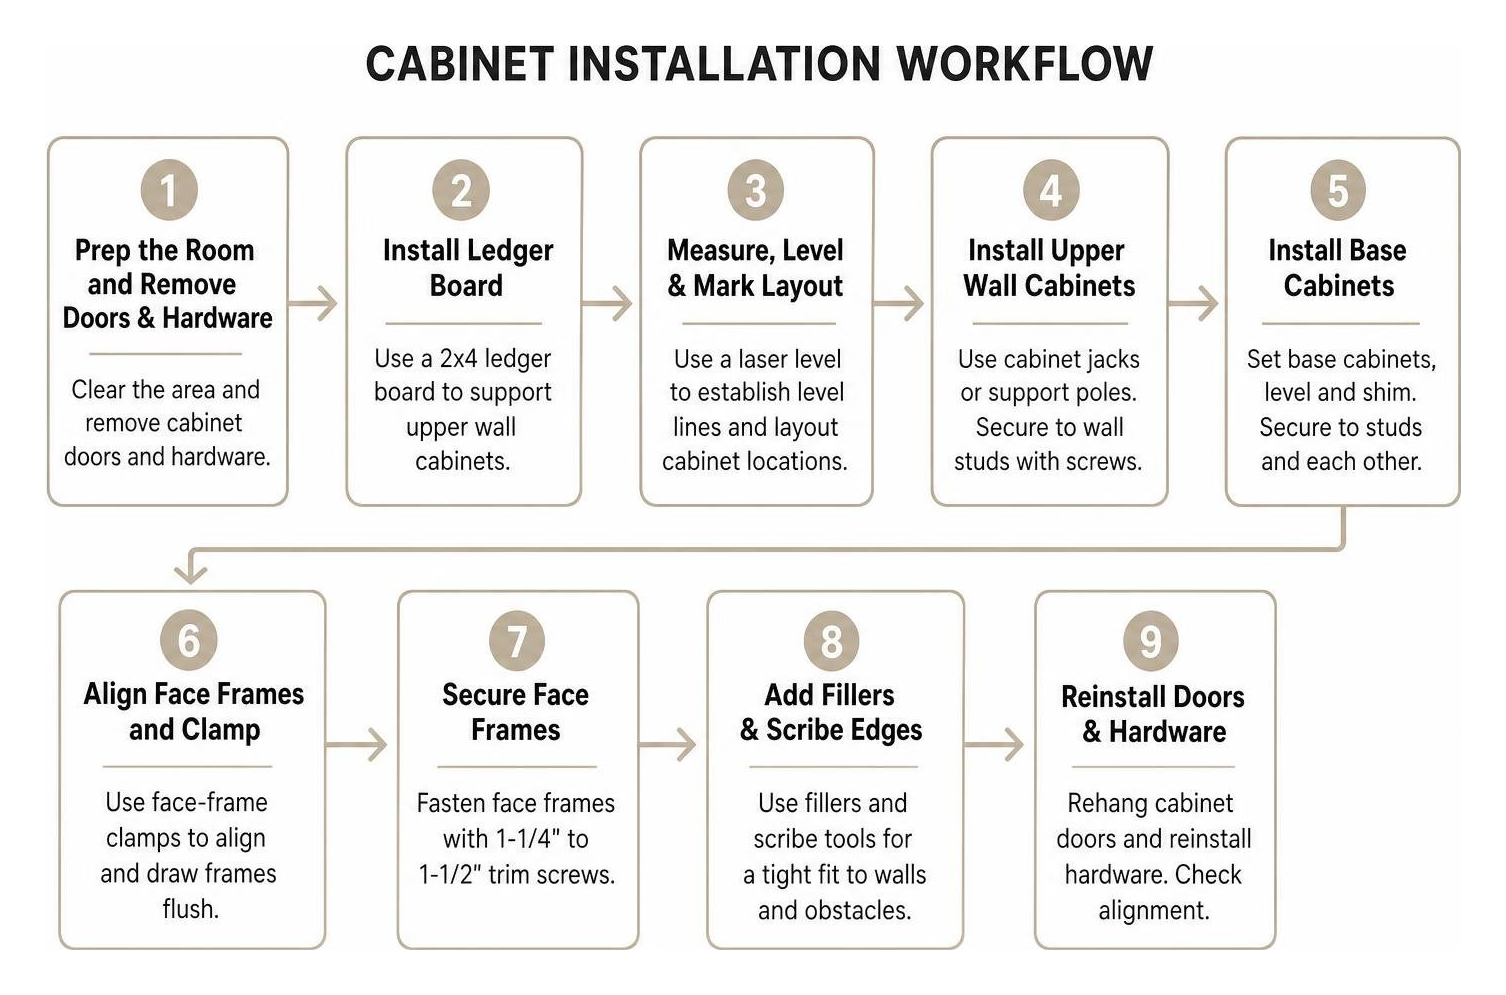
Step-by-Step Guide: How to Install Kitchen Cabinets
Step 1: Prep the Room and Remove Cabinet Doors and Hardware
Begin by clearing the entire room of appliances, old cabinetry, and debris. Shut off water supply valves and switch off circuit breakers serving kitchen outlets.
Before lifting any new cabinet boxes, unclip the European hinges or unscrew standard hinges to remove every door. Slide out all drawers. Label each door, drawer box, and hinge pair using blue painter’s tape (e.g., “U-1” for upper unit 1, “B-3” for base unit 3). Stack the doors flat on clean cardboard or moving blankets in an adjacent room. Removing these components significantly reduces the weight of each unit and protects delicate factory finishes from accidental scratches during installation.
Step 2: Map the Layout, Find Studs, and Mark High Spots on Floors
Never assume your room’s walls are plumb or the subfloor is level. Set your self-leveling laser level in the center of the room. Measure down from the laser line across the entire perimeter to locate the highest point of the floor along the cabinet footprint.
From that high spot, measure up 34-1/2 inches (standard base cabinet height) and strike your baseline. Next, measure up an additional 19-1/2 inches to establish 54 inches from the high point, which is standard for the bottom edge of your upper cabinets.
Run an electronic stud finder along the walls and verify stud centers by driving a trim nail where the holes will be hidden behind cabinet backs. Draw vertical lines showing stud locations from floor to ceiling. If you prefer a visual reference for layout planning, review a step-by-step video tutorial to confirm your layout marks before proceeding.
Step 3: Mount the Temporary Ledger Board for Upper Cabinets
A straight 2×4 ledger board serves as an extra pair of hands to support the bottom weight of upper wall cabinets.
Align the top edge of your straight 2×4 with the 54-inch reference line drawn on your wall. Fasten the ledger directly into the wall studs using 3-inch construction screws. Check it with a 4-foot spirit level to confirm it is true. This physical shelf ensures your upper cabinets rest in alignment while you focus on shimming and driving mounting screws through the back rails.
Step 4: Start Installing Kitchen Cabinets on the Upper Walls
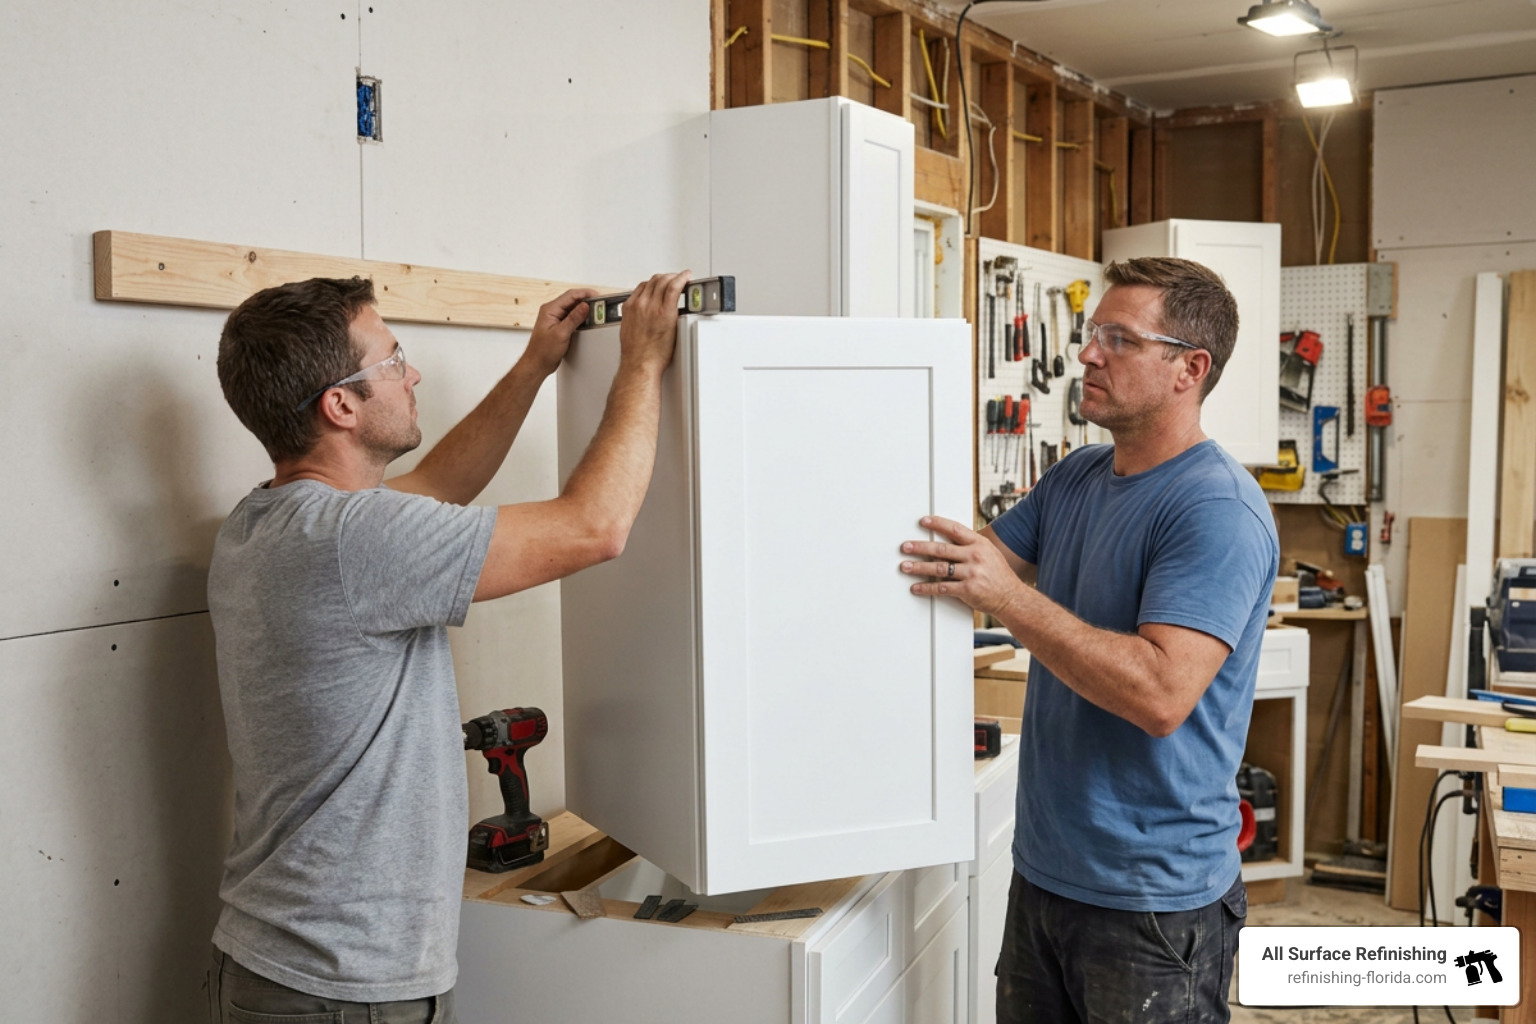
Always begin upper cabinet installation in a corner. If you are installing an open run between walls, start with the corner wall box or the first unit on the end.
Lift the corner upper cabinet onto your temporary ledger board. Support the front using cabinet jacks. While resting on the ledger, check the front face and sides for plumb. If the wall bows, slide wood shims behind the cabinet back near stud locations until the box sits square and plumb. Drive 2-1/2-inch cabinet screws through the cabinet’s structural hanging rail into the wall studs. Leave the screws slightly loose until you make your final micro-adjustments.
Step 5: Fasten Adjacent Upper Cabinets and Prevent Racking
Lift the adjacent upper cabinet onto the ledger and slide it next to the installed corner unit. Clamp the two face frames tightly together using specialized face-frame clamps until the front edges are aligned.
Pre-drill pilot holes through the sides of the face frame (behind hinge locations to conceal the holes), countersink, and drive 1-1/4-inch to 1-1/2-inch screws to lock the face frames together.
Fasten the back of the second cabinet to the wall studs. Repeat this process across the entire upper run, then remove the temporary ledger board.
Step 6: Plan Electrical Wiring and Under-Cabinet Lighting Prep
Before proceeding to base units, run rough-in wiring for task lighting. If you plan to incorporate low-voltage LED channel fixtures or direct-wire puck lights under the upper cabinets:
- Drill precise holes through the lower cabinet light rails or rear access lips to pass 12V/24V wiring unobtrusively.
- Leave sufficient low-voltage cable coiled neatly beneath the cabinet recesses.
- Ensure wiring for range hoods, microwave combinations, and garbage disposal switches lines up with the cutouts in the cabinet backs.
Step 7: Locate the High Point and Set the Corner Base Cabinet
With the upper cabinets mounted, move to the base cabinets. Start again at the highest corner of the kitchen floor identified during Step 2.
Place your corner base cabinet (or lazy susan) into position. Set a 4-foot level across the top frame in both directions (front-to-back and side-to-side). Slide cedar shims under the cabinet base until the top matches your 34-1/2-inch baseline mark on the wall. Verify that the unit is plumb on all faces. Drive 2-1/2-inch cabinet screws through the rear hanging rail into the wall studs, using shims behind the cabinet to fill any gaps between the back and the drywall.
Step 8: Complete Installing Kitchen Cabinets Across the Base Run

Work outward from the corner base unit along your walls:
- Set the next base cabinet in place and adjust its height with bottom shims to match the first cabinet.
- Clamp the two face frames flush with your cabinet claws.
- Pre-drill and fasten the face frames together.
- Check across both cabinet tops using your 4-foot level.
- Shim behind the cabinet back where it meets studs, then drive mounting screws through the rear support rail into the wall framing.
- Trim off protruding shim ends using a sharp utility knife or oscillating multi-tool.
Step 9: Install Fillers and Scribe Panels for Irregular Walls
Walls rarely form a clean 90-degree angle. Where cabinets meet an end wall, filler strips are needed to provide door clearance and conceal gaps.
Measure the distance between the last cabinet face frame and the wall at both the top and bottom. Cut a filler strip slightly wider than needed. Hold the strip against the wall, run a compass or scribing tool along the drywall contour to transfer the wall’s profile onto the wood, and cut along the line with a jigsaw beveled at a slight back-angle. Clamp the scribed filler flush to the cabinet face frame, pre-drill from inside the cabinet, and secure it with screws.
Step 10: Position Tall Cabinets and Refrigerator Enclosures
Pantry cabinets and refrigerator end panels tie the base and upper layouts together. Because of their height, any wall or floor irregularities become magnified.
To fit tall refrigerator end cover panels:
- Create a rigid template using thin luan plywood strips and a hot-glue gun, pressing the strips tightly against the floor, back wall, and ceiling.
- Transfer the exact shape of your luan template onto the finished end cover panel.
- Cut the panel carefully using a fine-finish jigsaw blade or track saw.
- Secure the panel to the side of the adjacent upper and base cabinets, anchoring the top to a ceiling cleat or wall stud for rigid support.
Step 11: Attach Finished End Panels, Toe Kicks, and Crown Moulding
Finish exposed cabinet box sides by installing matching finished skin panels using wood glue and 5/8-inch pin nails.
Next, measure and cut your continuous toe kick boards to conceal the shims and gaps under the base cabinets, securing them with 1-inch finish nails. Finally, measure, miter, and fasten your decorative crown moulding along the top edge of upper cabinets, and add light rail moulding to the bottom edge to shield under-cabinet lighting.
Step 12: Rehang Doors, Reinstall Drawers, and Adjust Hinges
Retrieve the labeled doors and drawers. Reinstall the drawer glides into their internal tracks and slide the drawer boxes into place. Reattach the cabinet doors to their matching frames.
Modern European concealed hinges feature three-way adjustment screws:
- Depth (In/Out): Adjusts the door closer to or further from the cabinet box.
- Horizontal (Left/Right): Centers the door over the opening and aligns gaps between adjacent pairs.
- Vertical (Up/Down): Levels the top and bottom edges across the entire cabinet run.
Finish by installing your knobs, pulls, and soft-close dampers.
Common Mistakes to Avoid During Cabinet Installation
Careful preparation prevents the most frequent structural and aesthetic errors:
| Installation Mistake | Resulting Problem | Practical Fix / Prevention |
|---|---|---|
| Installing Lowers Before Uppers | Awkward ergonomics, strain, potential damage to base units | Hang upper wall cabinets first using a 2×4 ledger board for support. |
| Overtightening Wall Screws | Racks cabinet boxes, causing doors to bind and gaps to widen | Insert shims behind gaps before tightening; back off screws if the box twists. |
| Skipping the Floor High Spot | Cabinets end up lower than baseline, preventing appliance clearance | Use a laser level to locate the highest point of the floor and build up from there. |
| Fastening Through Thin Backing | Cabinet pull-out or catastrophic collapse under heavy loads | Drive 2-1/2-inch washer-head screws strictly through solid structural hanging rails into studs. |
| Drilling Frames Without Clamping | Misaligned face frames, uneven door reveals, visible seams | Use dedicated face-frame clamps to align fronts flush before pre-drilling. |
Frequently Asked Questions About Kitchen Cabinet Installation
Should you install upper or lower cabinets first?
Installing the upper wall cabinets first is the preferred method for professional installers and DIYers alike. Hanging uppers first provides open, unrestricted standing space beneath the workspace without having to lean awkwardly over new base cabinets. This approach prevents accidental scratches, drops, or structural damage to your lower boxes and eliminates heavy physical strain.
How do you level cabinets on uneven floors and wonky walls?
Map your room with a self-leveling cross-line laser. Find the absolute highest floor spot along your cabinet run to establish your base height line. As you place each base cabinet, slide cedar or composite shims underneath the structural corners until the unit reaches the baseline. On bowed walls, place shims behind the rear hanging rails directly at stud points to bridge drywall hollows before driving screws, keeping the interior box square.
What is the best method to join cabinet boxes together?
The most reliable method is clamping adjacent face frames with specialized cabinet claw clamps until the joint is flush. Drill pilot holes through the inner edge of the face frame—often concealed behind hinge mounting plates—using a countersink bit. Drive 1-1/4-inch to 1-1/2-inch fine-thread trim screws to lock the face frames together. Never rely solely on wall anchors to keep adjacent cabinet fronts aligned.
Conclusion
Installing new kitchen cabinets transforms the function and style of your home. By taking the time to mark wall studs, find the room’s high points, use shims properly, and work systematically from upper corners to base runs, you can achieve a sturdy, clean installation.
If your current cabinet boxes are solid and you want to refresh your kitchen layout without the cost or hassle of a full tear-out, professional refinishing is a smart, durable alternative. All Surface Refinishing brings over 30 years of experience and more than 14,000 completed transformations across South and Southwest Florida, helping homeowners achieve modern, factory-smooth kitchen updates quickly and affordably.
Explore our professional cabinet services to see how our team can revitalize your kitchen cabinetry with premium craftsmanship and lasting finishes.
