
Understanding What a Bathtub Rust Repair Kit Can Fix
To use a bathtub rust repair kit at home, start by sanding the rusted area down to bright, bare metal with 80- to 120-grit sandpaper, then apply a two-part epoxy filler to seal the exposed surface, and finish with a color-matched enamel glaze for a smooth, water-resistant patch. A bathtub rust repair kit is formulated to address localized surface oxidation, chipped porcelain, pitted enamel, and exposed base metals. When water penetrates the factory glaze, moisture reacts with the underlying iron or stamped steel substrate, initiating corrosion. Left unchecked, small rust spots spread beneath surrounding coatings, causing extensive delamination and structural pitting.
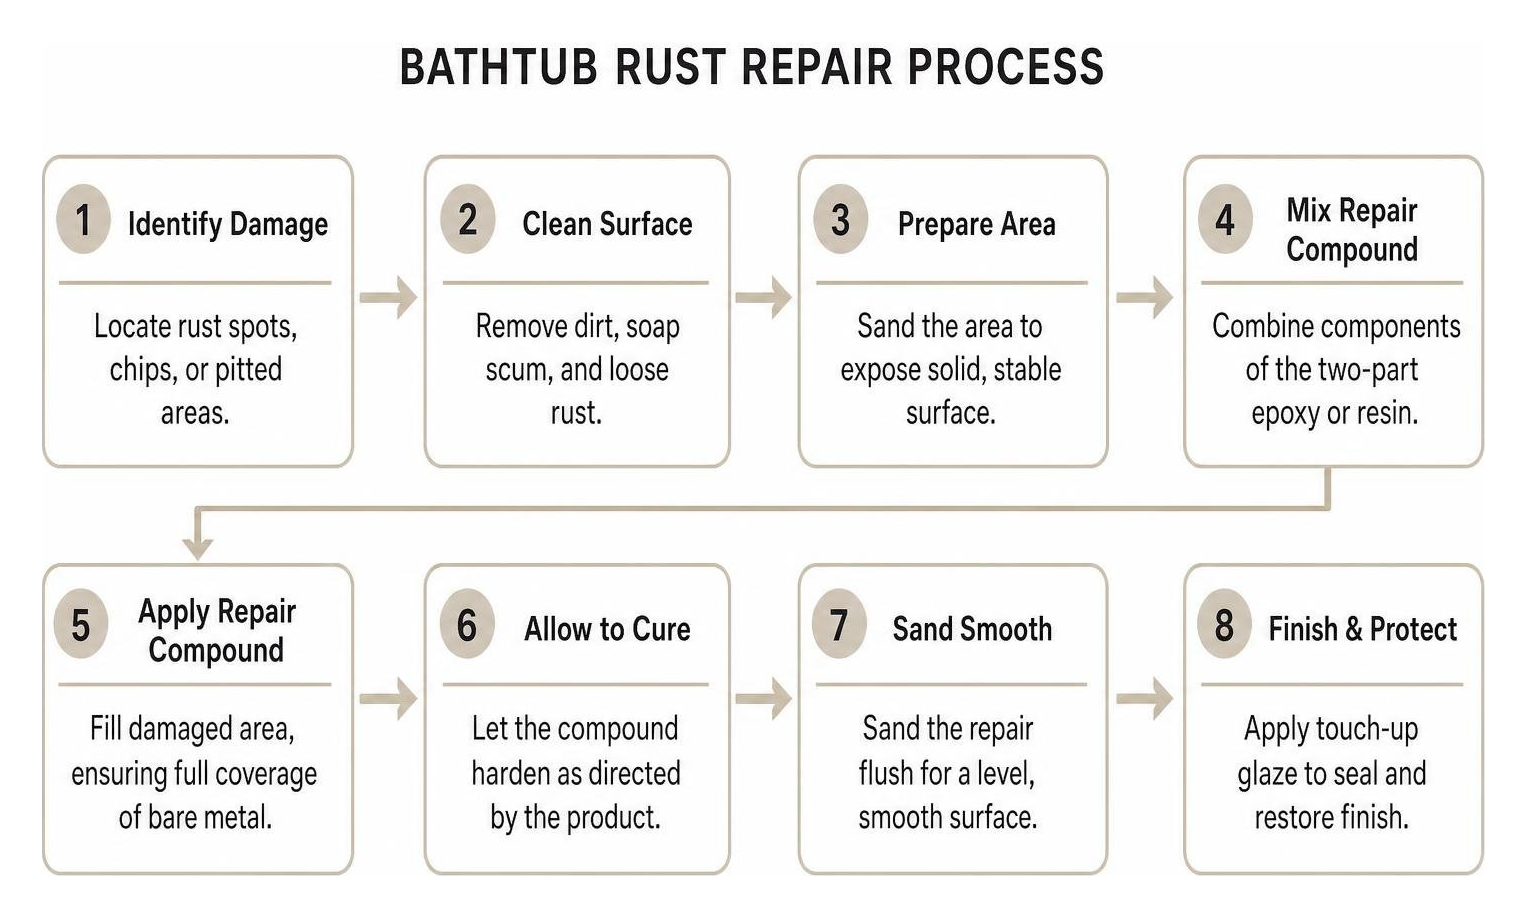
Spot repair kits contain high-adhesion compounds—primarily two-part epoxy filler pastes, polyester resins, or acrylic enamel touch-up glazes. These products seal bare metal against water intrusion while restoring a smooth, water-impervious finish. Understanding the difference between spot patching and full tub coating helps you select the correct approach for your fixture. You can find specialized products such as a patching and repair product for bathtubs and tile at major hardware retailers.
| Feature / Consideration | Spot Rust Repair Kit | Full Bathtub Refinishing System |
|---|---|---|
| Primary Scope | Isolated chips, hairline cracks, small rust spots (< 3 inches) | Widespread peeling, severe discoloration, complete tub restoration |
| Material Base | 2-part epoxy paste or polyester resin filler | High-solids aliphatic acrylic polyurethane or epoxy coating |
| Application Tool | Putty knife, plastic spreader, or small artist brush | High-volume low-pressure (HVLP) spray gun, specialized roller |
| Average Cost | $15 – $40 | $65 – $150 (DIY) / $350 – $650 (Professional) |
| Cure Time Before Use | 24 hours | 24 to 72 hours |
| Longevity | 1 to 3 years (temporary spot barrier) | 10 to 15+ years (when professionally applied) |
When deciding how to approach your fixture, patching rusty bathtub spots provides an effective stopgap measure to halt active oxidation before it eats entirely through the metal wall.
Choosing the Right Bathtub Rust Repair Kit for Your Tub Material
Bathtubs are manufactured from distinct core substrates, each reacting differently to impact and moisture:
- Cast Iron Tubs: Extremely thick, heavy, and rigid. When the porcelain enamel chips, the raw iron underneath quickly develops dark reddish-brown rust. Epoxy fillers formulated for heavy cast iron bond exceptionally well to deep chips. Learning how to fix cast iron tub damage without full fixture removal saves significant demolition costs.
- Enameled Steel: Lighter and more flexible than cast iron. Steel tubs rust rapidly around drains and overflow plates where water pools. Kits with flexible epoxy resin bases prevent cracking under thermal expansion.
- Fiberglass and Acrylic: While synthetic surfaces do not rust, metal plumbing fixtures or mineral-heavy well water can deposit tough rust stains into micro-fissures. Repair kits for these surfaces focus on polyester structural resins and gelcoat restoration rather than metal rust converters.
- Ceramic and Porcelain Tile: Tile surrounds adjacent to rusty shower rails or tub rims require waterproof bonding resins that resist mildew and hold adhesion in vertical grout lines.
Spot Repair Kit vs Full Surface Refinishing
A spot repair kit is ideal when damage is confined to one or two discrete areas, such as a dropped shampoo bottle chip or minor rust haloing near the drain flange. However, if your bathtub displays spiderweb cracking across the bottom, extensive flaking, or broad yellowing, spot touch-ups create an uneven, patchwork appearance.
If you have a chipped tub, repairing bathtub enamel on a budget with a targeted kit prevents moisture from reaching the metal core. If the tub exhibits widespread finish failure across more than 15% of the surface, a comprehensive resurfacing treatment delivers a uniform, long-lasting finish.
Essential Surface Preparation and Rust Removal Steps
The success of any bathtub repair depends entirely on surface preparation. Applying epoxy directly over existing oxidation traps moisture and active rust spores, causing the patch to lift within weeks.
For a thorough breakdown of repair diagnostics, our bathtub repair guide provides deep insights into substrate evaluation.
Removing Corrosion and Stabilizing Bare Metal
- Mechanical Abrasion: Grind away loose rust, flaking enamel, and scale using 80-grit to 120-grit wet/dry sandpaper, a rotary tool with a mini stainless-steel wire brush, or a sanding drum. Sand down to bright, bare metal across the entire damaged area, slightly beveling (feathering) the intact enamel edges.
- Chemical Neutralization: Apply a phosphoric acid-based rust converter or specialized metal etching gel to microscopic pits. Phosphoric acid chemically converts iron oxide into iron phosphate—a stable, black, corrosion-resistant barrier. Avoid hydrochloric acid near chrome fixtures, as harsh acid fumes instantly tarnish chrome plating.
- Degreasing and Solvent Cleaning: Vacuum all sanding debris. Scrub the area with an industrial degreaser or TSP alternative to remove soap scum, body oils, and mineral deposits. Rinse thoroughly with clean water.
- Moisture Elimination: Wipe the spot with 99% isopropyl alcohol or pure acetone to pull remaining moisture from microscopic metal pores. Use a clean heat gun or hairdryer on medium heat to ensure the substrate is completely bone-dry before introducing repair compounds.
Safety Precautions and Bathroom Ventilation
Epoxy patching compounds, rust converters, and resin glazes emit volatile organic compounds (VOCs). Protect your health by following strict safety standards:
- Respiratory Protection: Wear a tight-fitting NIOSH-approved respirator fitted with organic vapor/P100 particulate cartridges. Standard cloth or dust masks do not block harmful solvent vapors.
- Skin and Eye Safety: Wear heavy-duty nitrile gloves to prevent resin-hardener contact with skin, alongside splash-proof safety goggles.
- Ventilation Controls: Open bathroom windows and activate the mechanical exhaust fan. Position an oscillating fan pointing out toward open exterior exits to establish continuous cross-ventilation.
- Masking and Containment: Apply high-grade painter’s tape and plastic masking film around surrounding tiles, chrome drains, and bathroom fixtures to catch accidental drips.
How to Apply the Coating and Restore Damaged Enamel
Once the metal is stabilized and cleaned, apply the patch compound methodically to achieve a durable, flat finish.

Many property owners use proven DIY formulations like the Rust-Oleum Tub & Tile Refinishing Kit or specialized two-part epoxy paste systems to seal these exposed areas.
Applying the Bathtub Rust Repair Kit for a Smooth Finish
- Proportional Mixing: Dispense equal parts of resin base (Part A) and catalyst/hardener (Part B) onto a clean, non-porous mixing board. Mix thoroughly with a flat wooden stick for a full 2 to 3 minutes until the color and viscosity are completely uniform.
- Color Customization: If your kit includes liquid tint pigments, add micro-droplets using the tip of a toothpick. Blend slowly to match your tub’s specific shade—whether plumbing white, biscuit, almond, or bone.
- Application and Compacting: Using a flexible plastic spreader or putty knife, press the epoxy paste firmly into the rusted cavity to eliminate trapped air pockets. Build the repair slightly higher than the surrounding enamel surface (approximately 1/32 inch) to account for settling.
- The Cling-Wrap Smoothing Technique: Place a small piece of clear polyethylene cling wrap directly over the wet epoxy patch. Gently smooth the film flat with your thumb, pressing the edges flush against the original tub contour. Leave the wrap in place during initial curing to minimize surface irregularities and eliminate sanding dust contamination.
Curing Times, Sanding, and Final Topcoat Blending
Allow the epoxy filler to cure undisturbed for 3 to 4 hours (or overnight per manufacturer guidelines). Peel away the plastic film.
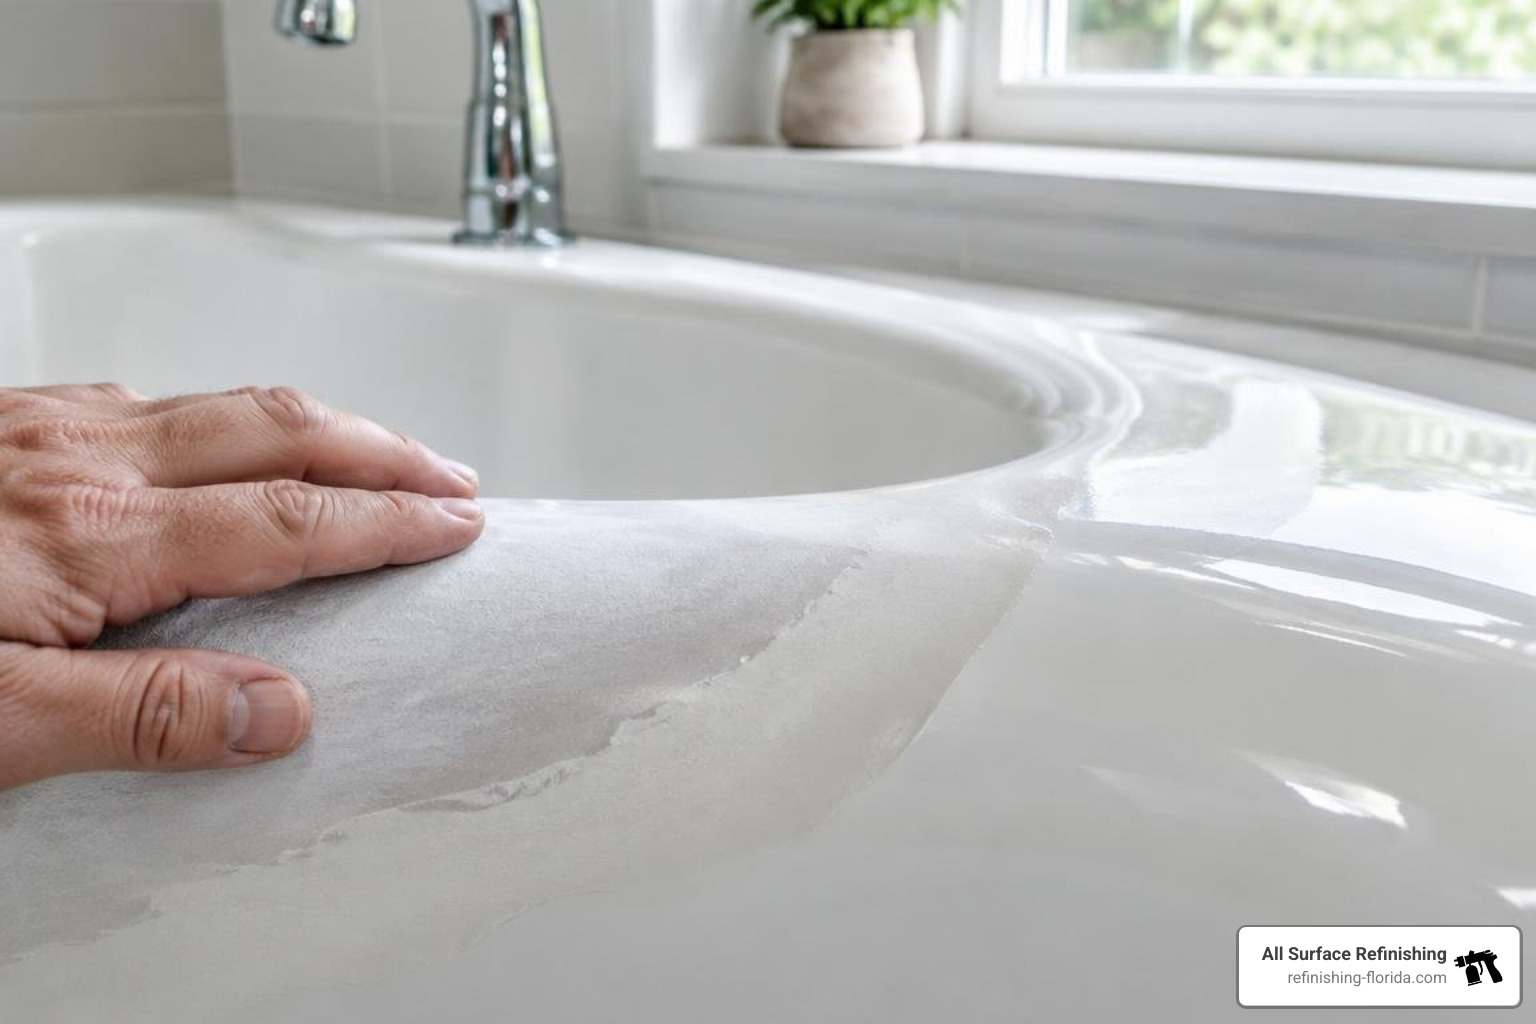
Wrap 400-grit wet/dry sandpaper around a flat rubber sanding block and lubricate the patch with clean water. Sand the repair in smooth circular motions until the patch sits perfectly level with the surrounding tub enamel. Transition to 600-grit and finally 1000-grit ultra-fine sandpaper to polish out fine sanding scratches.
Wipe the area clean and apply a thin, feathered layer of acrylic glaze or color-matched enamel topcoat over the patch using an artist brush or mini aerosol spray. Allow the final repair to cure for a minimum of 24 to 48 hours before exposing the bathtub to running water, soap, or cleaning products.
Common Mistakes to Avoid When Patching Bathtub Rust
- Leaving Microscopic Rust Behind: Painting over active iron oxide seals the corrosion in a warm, moist environment, causing it to bubble up within months.
- Skipping Proper Degreasing: Household soap scum and invisible bath oil films prevent epoxy resins from bonding to bare metal and porcelain.
- Applying Thick, Heavy Paint Layers: Applying one thick coat of finish enamel leads to sags, runs, wrinkling, and extended interior dry times. Always apply multiple light coats.
- Using Abrasive Scrubbing Cleaners Too Soon: Cleaning a new patch with scouring powders, bleach, or stiff bristle brushes will scratch and dull the fresh resin finish. Stick to mild dish soap and microfiber cloths.
- Rushing Water Exposure: Exposing the patch to moisture before the resin has reached full chemical cure permanently compromises tensile adhesion and water resistance.
Frequently Asked Questions About Bathtub Rust Repair
How long does a bathtub rust repair kit last?
A carefully applied two-part epoxy patch generally lasts between 1 and 3 years on high-impact areas like the tub bottom or drain rim. In lower-wear areas, such as the tub walls or backrest, patches can remain intact for up to 5 years with gentle cleaning.
Can a bathtub rust repair kit be used on bathroom tile and sinks?
Yes. Epoxy-based rust and chip repair kits bond securely to vitreous china bathroom sinks, porcelain washbasins, ceramic wall tiles, and fiberglass shower pans. Ensure the damaged area is thoroughly sanded and etched before application.
Can you paint over a rust repair patch during future refinishing?
Yes. Properly cured epoxy fillers serve as an excellent stable base for future complete tub refinishing. When your entire tub is professionally resurfaced down the road, technicians scuff-sand the patch, treat it with an epoxy bonding agent, and spray a commercial topcoat seamlessly over the whole fixture.
Professional Bathtub Refinishing in South Florida
While a DIY patch solves minor cosmetic rust spots, extensive pitting, structural erosion, and widespread peeling require heavy-duty, long-term restoration. At All Surface Refinishing, we bring over 30 years of industry experience and have completed more than 14,000 successful transformations across South and Southwest Florida.
We do not sell paint—instead, our certified technicians apply commercial-grade, multi-stage resurfacing systems that chemically fuse to cast iron, enameled steel, acrylic, and fiberglass fixtures. Our process eliminates rust at the source, levels out deep damage, and produces a non-porous, high-gloss finish that looks and performs like a brand-new fixture for well over a decade.
We proudly serve homeowners, condominium communities, and commercial properties throughout South Florida, including Miami, Fort Lauderdale, West Palm Beach, Boca Raton, Coral Gables, Boynton Beach, Hollywood, FL, Delray Beach, Jupiter, and surrounding areas.
Contact us today to schedule your bathroom transformation with our professional bathtub refinishing services and restore lasting beauty to your home.
