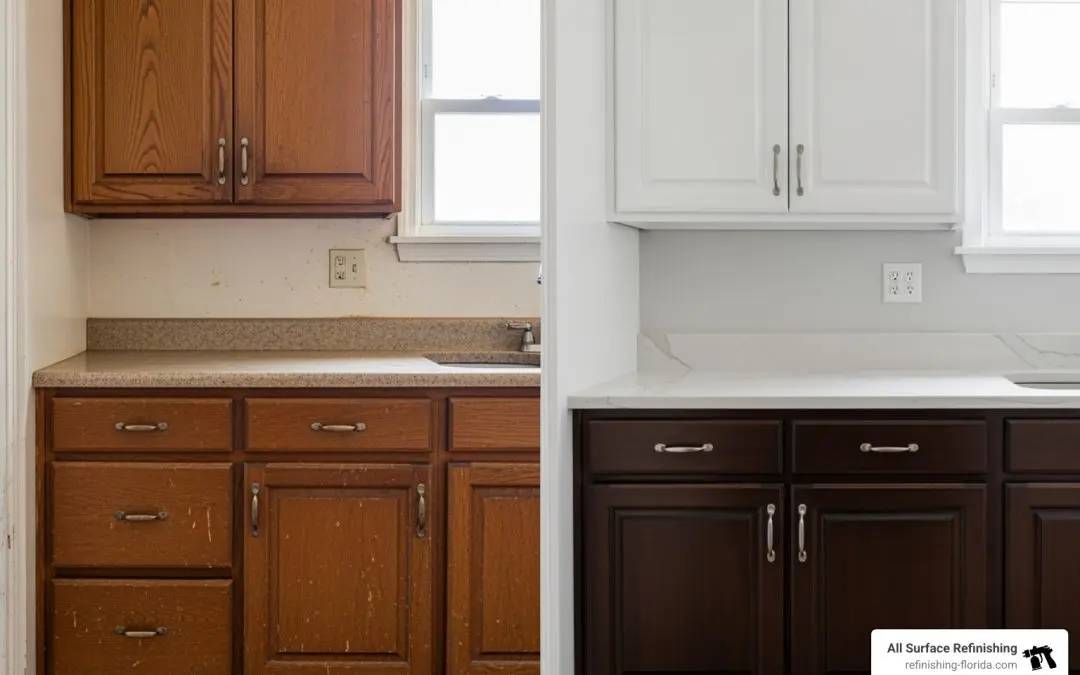
Transform Your Kitchen on a Budget
Refinish old kitchen cabinets is a smart, cost-effective way to transform your kitchen without the expense of a full remodel. Here’s what you need to know:
Quick Steps to Refinish Your Kitchen Cabinets:
- Remove cabinet doors, drawers, and hardware
- Clean all surfaces thoroughly with a degreaser
- Sand using 120-grit, then 220-grit sandpaper
- Prime with a high-quality stain-blocking primer
- Paint or Stain in thin, even coats (2-3 coats)
- Reassemble and install new hardware
Key Benefits:
- Save up to 75% compared to professional services
- Complete your project in 4-7 days
- Increase your home’s value
- Eco-friendly alternative to replacement
Feeling disappointed by dated, worn-out kitchen cabinets? You don’t need to spend thousands on new cabinetry. Cabinet refinishing can save you up to $20,000 compared to a full replacement, delivering professional-looking results with the right approach.
Whether you’re dealing with water-stained wood or outdated colors, refinishing breathes new life into your existing structure. The process works best when your cabinet boxes are still in good shape—no major water damage or structural issues.
Why refinish instead of replace?
- Refinishing costs just $200-$600 for DIY materials (or $1,800-$4,000 with professional labor)
- Your kitchen stays functional during most of the process
- You’re making an eco-conscious choice by keeping materials out of landfills
- You can achieve any look you want, from light and bright to rich and dark
The change can be dramatic—even cabinets over 30 years old can look brand new. While it requires patience and proper prep, the payoff is immense.
I’m Frank Hernandez of All Surface Refinishing. Since 2011, I’ve helped South Florida homeowners refinish old kitchen cabinets, from the Florida Keys to Sebastian. We know how proper refinishing can revitalize a space and save homeowners thousands.

Before You Begin: Planning Your Cabinet Makeover
Before you refinish old kitchen cabinets, it’s crucial to determine if it’s the right choice for your home. We guide clients in Miami, Fort Lauderdale, and West Palm Beach through this decision.
When to Refinish vs. Replace
The golden rule: if your cabinet boxes are structurally sound, refinishing is the most cost-effective and eco-friendly choice. A DIY project can save up to 75% compared to replacement, with total savings reaching up to $20,000.
However, replacement is the better long-term solution for severely damaged cabinets with issues like extensive water damage, irreparable joints, or warped boxes. Refinishing fixes cosmetic issues like dings and scratches, not structural flaws.
Assessing Cabinet Condition
Take a close look at your existing cabinets.
- Structural Integrity: Are the boxes sturdy? Do the doors and drawers open and close smoothly? Check for sagging, bowing, or major cracks.
- Water Damage: Check under the sink for any swelling, discoloration, or softness in the wood. Minor water stains can be fixed, but extensive damage may mean the core is compromised.
- Suitability for Refinishing: Most solid wood cabinets are excellent candidates for refinishing. Be cautious with older medium-density fiberboard (MDF) cabinets, as they can contain hazardous chemicals and may require special prep or professional handling.
Considerations for Wood Types
Different wood types respond uniquely to refinishing:
- Oak: Known for its prominent grain, oak can be beautifully stained or painted. When painted, the grain may remain subtly visible, adding character.
- Maple/Cherry: These woods have a finer grain, making them ideal for a sleek, painted finish or a rich, even stain.
- Laminate: If you have laminate cabinets, painting is the preferred method. It requires a specific adhesion-promoting primer to ensure the paint sticks properly.
- Fiberboard Doors and Drawer Fronts: Fiberboard doors and drawer fronts don’t absorb stain like solid wood, so painting is the best option.
Project Timeline Estimation
Refinishing kitchen cabinets isn’t a weekend project, but it’s faster than a full remodel. A DIY project typically takes 4 to 7 days, including crucial drying and curing times. Rushing these steps compromises the durability and professional look of your finished cabinets.
For a more detailed look at the entire process and what to expect, we invite you to explore our Cabinet Refinishing Complete Guide 2025.
The Ultimate Guide to Refinish Old Kitchen Cabinets
Ready to transform your kitchen? This guide details the meticulous process we use to refinish old kitchen cabinets for a durable, professional finish. The DIY process requires patience, as every step from cleaning to painting contributes to the final outcome. Homeowners in Coral Springs, Pembroke Pines, and Miami Lakes expect a professional finish, and this guide will help you achieve it.

For an even deeper dive into achieving that perfect finish, check out our Cabinet Painting Services Complete Guide.
Step 1: Preparation is Key for a Flawless Finish
Preparation is the most critical stage when you refinish old kitchen cabinets. Skimping here will lead to a finish that won’t last.
Tools & Materials You’ll Need:
- Safety Gear: Respirator, chemical-resistant rubber gloves, eye protection. Proper ventilation and personal protection are essential.
- Removal Tools: Electric drill/driver, screwdriver.
- Cleaning Supplies: Degreaser (like Trisodium Phosphate (TSP) or a substitute), clean rags, buckets, sponge, synthetic steel wool.
- Sanding Supplies: Sandpaper (100-grit, 120-grit, 180-grit, 220-grit), sanding block, orbital sander (optional), tack cloth.
- Repair Supplies: Wood filler, putty knife.
- Masking & Protection: Painter’s tape, drop cloths, plastic sheeting.
- Priming: High-quality primer (e.g., KILZ 3® Premium Primer).
- Application Tools: High-quality paintbrushes, small foam rollers (4″ or 6″), roller trays, painter stands.
Removing Doors and Hardware
- Empty Cabinets: Clear out everything from your cabinets and drawers.
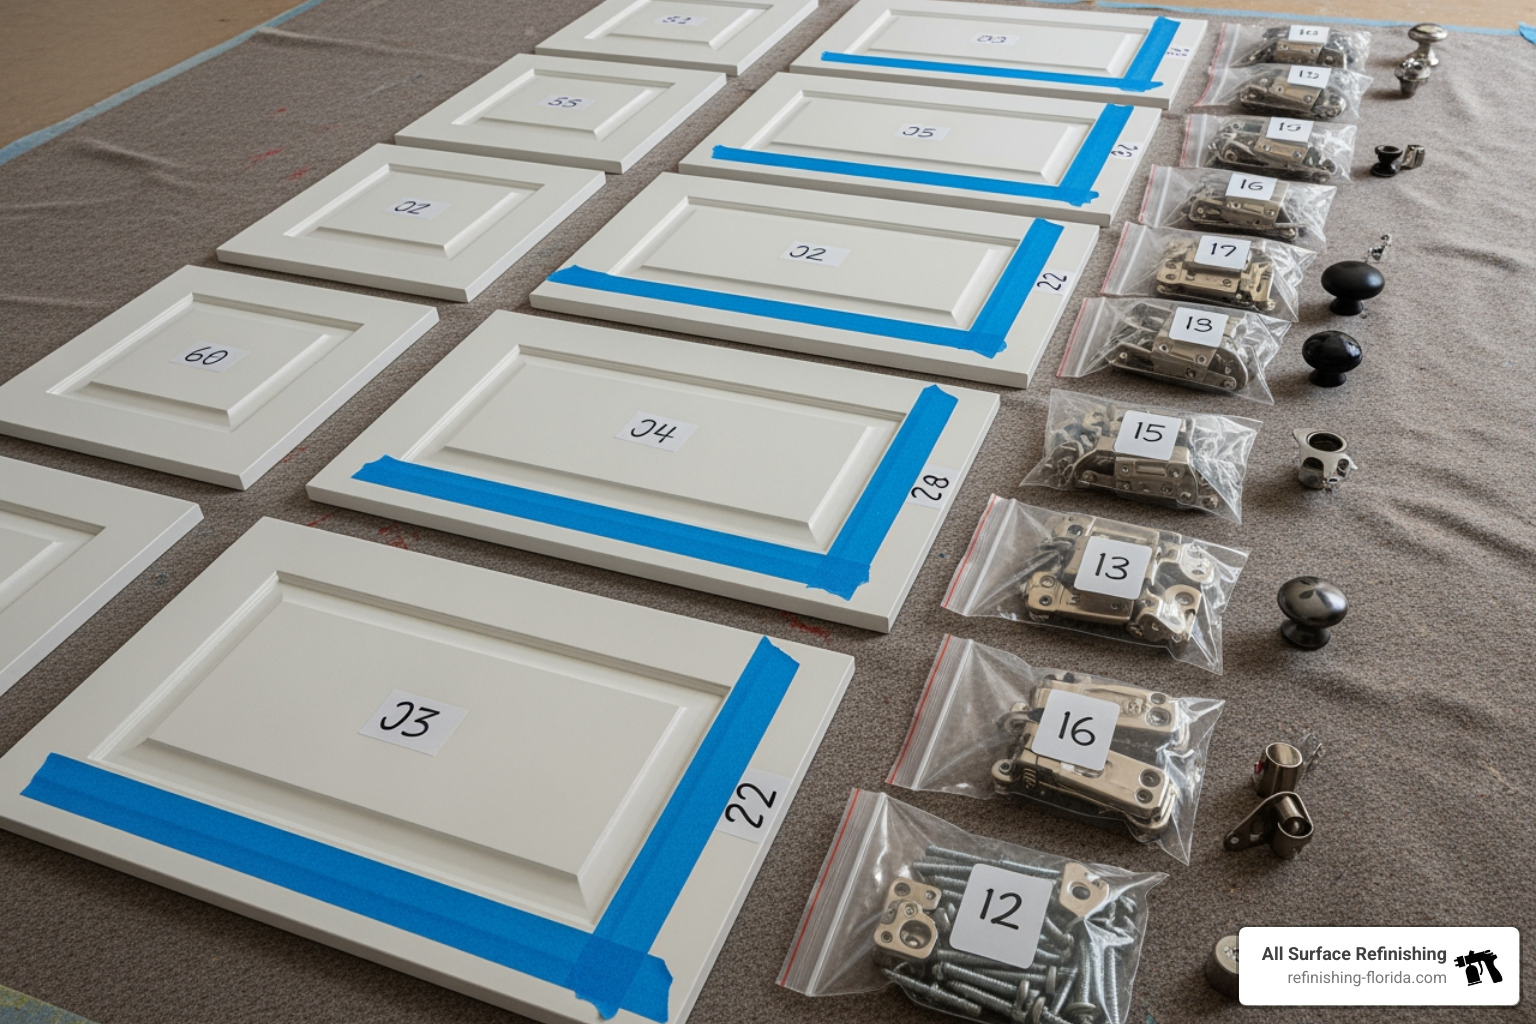
- Label Everything: Use painter’s tape to number each door, its corresponding opening, and all hardware. Put screws back into the hardware and tape them together to save frustration during reassembly.
- Remove Hardware: Unscrew all doors and drawer fronts. Remove hinges, knobs, and pulls, organizing them in labeled bags.
- Protect Your Space: Cover countertops, floors, and appliances with drop cloths. Use painter’s tape to mask off areas you don’t want paint on. Ensure good ventilation.
Cleaning and Degreasing
Proper cleaning is non-negotiable for paint adhesion, as kitchen cabinets are grease magnets.
- Initial Wipe Down: Use a degreaser like TSP mixed with water. Use synthetic steel wool with the cleaner for stubborn grease.
- Scrub Thoroughly: Pay extra attention to areas around the stove and oven.
- Rinse and Dry: Rinse all surfaces with clean water and let them dry completely, which may take several hours.
Sanding Techniques
Sanding creates a “tooth” for primer and paint to grip, ensuring a durable finish.
- Scuff Sanding: For cabinets in good condition, a light scuff sand is sufficient. Start with 120-grit sandpaper to dull the shine, then smooth with 180- or 220-grit. Always sand with the wood grain to avoid scratches.
- Heavy Sanding/Stripping (if necessary): For thick, peeling, or damaged finishes, you may need to strip the finish or sand down to bare wood using progressively finer grits, starting with 80-grit.
- Dust Removal: After sanding, vacuum the dust with a brush attachment, then use a tack cloth to remove fine particles. This “sand, vac, and tack” process is crucial.
Filling Imperfections
Now is the time to address any dings, dents, or holes.
- Wood Filler: Apply wood filler to small imperfections with a putty knife, slightly overfilling.
- Sand Smooth: Once dry, sand smooth with 220-grit sandpaper.
- Dust Again: Remove dust with a tack cloth.
Priming for Durability
Priming is a non-negotiable step. It ensures adhesion, blocks stains, and creates a uniform base for paint.
- Choose the Right Primer: A high-quality, stain-blocking primer like KILZ 3® Premium Primer is essential. For better coverage with drastic color changes, have your primer tinted toward your final paint color.
- Apply Thin Coats: Apply a thin, even coat of primer with a brush and foam roller, working with the grain.
- Dry and Sand: Let the primer dry completely (check instructions). Lightly sand the primed surface with 220-grit sandpaper to smooth it, then wipe with a tack cloth.
- Consider Second Coat: A second coat of primer may be needed for dark wood or heavy stains.
For more insights specifically on rejuvenating your cabinet doors, explore our guide on Cabinet Doors Refinishing.
Step 2: How to Properly Apply Paint or Stain to Refinish Old Kitchen Cabinets
With prep complete, it’s time to apply the new finish and bring your refinish old kitchen cabinets project to life.
Painting Techniques
A smooth, professional finish requires good technique and patience.
- Choose Your Paint: Use a high-quality water-based latex paint formulated for cabinets, like Sherwin-Williams Emerald Urethane Trim Enamel or Benjamin Moore Advance. A satin or semi-gloss finish is recommended for its durability and wipeable surface.
- Apply Thin, Even Coats: Apply two to three thin coats instead of one thick coat to prevent drips and ensure a durable finish.
- Brush and Roller Combo: Use an angled brush for details and corners, then immediately use a small foam roller on flat surfaces to smooth out brush marks.
- Maintain a Wet Edge: Work in sections and overlap slightly to prevent lap marks.
- Paint Order: Paint the back of doors first, let them dry, then paint the fronts. For cabinet boxes, paint interior edges before face frames.
- Drying Time: Follow the manufacturer’s instructions for drying time between coats (usually 2-4 hours). Paint needs more time to cure and harden fully.
For specific advice on color and finish choices, check out our insights on Cabinet Painting Palm Beach.
Staining Techniques
Staining is a fantastic option to improve the natural beauty of wood cabinets.
- Choose Your Stain: Stains are available in oil-based (deeper penetration, richer color) and water-based (faster drying, lower VOCs) formulas. You can also use a clear or tinted polyurethane varnish.
- Test First: Always test the stain on a hidden area first.
- Apply Evenly: Apply stain with a rag or brush in the direction of the wood grain.
- Wipe Away Excess: Follow product instructions for how long to let the stain sit before wiping off the excess with a clean rag. This prevents blotchiness and controls the color depth.
- Multiple Coats: For a deeper color, apply additional thin coats, wiping off the excess each time.
- Topcoat: Once dry, apply 2-3 thin coats of a clear protective finish like polyurethane for durability.
Step 3: Reassembly and Finishing Touches
This final stage completes your refinish old kitchen cabinets project.
Reattaching Doors and Drawers
- Patience is a Virtue: Be patient. Ensure the finish is fully cured (this can take up to a week) before reassembly to avoid scratches.
- Follow Your Labels: Use your labels from Step 1 to reattach doors and drawers to their original spots, ensuring a proper fit.
- Hand Tools: Use hand tools instead of a power drill to avoid stripping screws.
Installing New Hardware
New hardware is a simple way to dramatically update your cabinets.
- Hardware Selection Considerations:
- Style: Choose a style that fits your kitchen: sleek pulls for modern, ornate hardware for traditional, or a blend for transitional.
- Finish: Popular finishes include brushed nickel, matte black, and brass. Match them to your cabinet color and other kitchen fixtures.
- Using a Hardware Template: Use a hardware template for drilling new holes if you’re changing hardware styles (e.g., knobs to pulls). This ensures consistent placement. Remember to patch old holes with wood filler before painting.
- Install Carefully: Attach your chosen knobs and pulls, making sure they are straight and secure.
For homeowners in South Florida looking for cutting-edge styles, our Modern Cabinet Refinishing services can guide you through the latest trends and hardware options.
Adding Decorative Molding
Adding decorative molding can lift the look of your cabinets.
- Crown Molding: Crown molding on top of upper cabinets creates a custom, built-in look and adds height.
- Trim: Trim on flat panel doors can mimic a raised panel style for more architectural interest.
- Paint/Stain to Match: Paint or stain new molding to match the cabinets.
Final Cleanup and Inspection
- Remove Protection: Remove painter’s tape and drop cloths.
- Touch-Ups: Do a final inspection for any touch-ups. Use a small artist’s brush for precision. Dried drips can be carefully scraped off, sanded smooth, and repainted.
- Rubber Bumpers: Add new rubber bumpers to the inside corners of doors and drawers to protect the finish and reduce noise.
Choosing Your New Look: Painting vs. Staining
Deciding whether to paint or stain is a key choice when you refinish old kitchen cabinets. Both offer unique aesthetics and benefits. We help clients in Jupiter, Boca Raton, and Fort Lauderdale make this decision.
| Feature | Painting Kitchen Cabinets | Staining Kitchen Cabinets |
|---|---|---|
| Aesthetic | Uniform, opaque color; Modern, contemporary, or classic looks | Highlights natural wood grain; Rich, traditional, rustic |
| Material Suitability | Excellent for most wood types, MDF, previously painted surfaces | Best for real wood with attractive grain; Requires stripping to bare wood |
| Color Options | Unlimited color palette; Can easily change kitchen’s mood | Limited to wood tones; Improves existing wood color |
| Prep Complexity | Requires thorough cleaning, sanding, and priming; Less forgiving on surface imperfections | Requires stripping to bare wood; More forgiving on minor surface imperfections (if stained darker) |
| Durability | Very durable with high-quality cabinet enamel paint | Durable with a protective topcoat (polyurethane) |
| Maintenance | Easy to clean; Touch-ups can be noticeable | Easy to clean; Scratches can be less noticeable if wood shows through |
| Cost (DIY) | $200-$300 (paint, primer, supplies) | $150-$250 (stain, stripper, topcoat, supplies) |
Factors to Consider:
- Desired Aesthetic: Consider your desired aesthetic: a uniform, modern look (paint) or the natural beauty of wood (stain). Light paint colors can make a kitchen feel larger, a popular choice in Florida.
- Cabinet Material: Staining is ideal for beautiful wood grain (oak, cherry), while paint is better for mixed materials, MDF, or less attractive grain.
- Durability and Maintenance: Both finishes are durable if applied correctly. Improperly prepped paint can chip, while scratches on stained cabinets may be less noticeable.
Best Paint for Cabinets
For painting cabinets, we recommend:
- Water-based Enamel Paint: These provide a hard, durable finish with easy cleanup. Look for products specifically labeled for “cabinets” or “trim.”
- Satin or Semi-Gloss Finish: These sheens are durable, wipeable, and look great. Avoid matte finishes, which are harder to clean in kitchens.
Best Stain for Cabinets
Your stain choice depends on the desired look and ease of use:
- Oil-Based Stain: Offers rich color and improves grain but dries slowly.
- Water-Based Stain: Dries faster with less odor, making it user-friendly.
- Gel Stain: Has a thick consistency that’s easy to control and prevents blotching. It can sometimes be used to darken a finish without full stripping.
The best choice for your kitchen in Lighthouse Point, Cooper City, or Wilton Manors depends on your vision and cabinet condition. For more insights, see our Cabinet Painting Jupiter guide.
Frequently Asked Questions about Cabinet Refinishing
Here are common questions we get from South Florida homeowners about how to refinish old kitchen cabinets:
How long does it take to refinish kitchen cabinets?
A typical DIY refinish old kitchen cabinets project takes 4 to 7 days. This timeline accounts for:
- Preparation (1-2 days): Removing hardware, cleaning, sanding, and priming. This is the most time-consuming part.
- Drying and Curing Time: This is the biggest factor. Each coat needs time to dry and cure (harden to maximum durability). Rushing this step leads to a tacky, easily damaged finish.
- Application (2-3 days): Applying multiple thin coats of paint or stain, with drying time in between.
- Reassembly (1 day): Reattaching everything after the finish is fully cured.
What are common problems when you refinish old kitchen cabinets?
Problems can arise when you refinish old kitchen cabinets. Here are common issues we see in areas like Oakland Park and North Lauderdale, and how to fix them:
- Drips and Runs:
- Cause: Applying too much paint or stain at once.
- Fix: If wet, brush it out. If dry, carefully scrape it off, sand the area smooth with 220-grit sandpaper, and reapply a thin coat.
- Blotchy Stain:
- Cause: Uneven absorption on woods like pine, or failing to wipe off excess stain.
- Fix: If caught early, reapply stain and wipe quickly. For dried blotches, you may need to sand down to bare wood and restart. A pre-stain wood conditioner can prevent this.
- Peeling Paint:
- Cause: Almost always due to improper prep (poor cleaning, sanding, or skipping primer).
- Fix: Scrape off all peeling paint, then sand, clean, re-prime, and repaint the area. This highlights the importance of proper prep.
- Visible Brush Strokes/Roller Marks:
- Cause: Using low-quality tools, thick paint, or over-brushing.
- Fix: Use high-quality brushes and foam rollers. Thin paint slightly if the manufacturer recommends it. Avoid over-brushing. Lightly sand any dried imperfections and reapply a thin coat.
For more troubleshooting tips, check out our Cabinet Painting Near Me Tips.
How much does it cost to refinish cabinets?
The cost to refinish old kitchen cabinets varies significantly between DIY and professional projects.
- DIY Costs: Expect to spend $200 – $600 on materials like paint, primer, and sandpaper. This is a budget-friendly option, though power tools may add to the cost if you don’t own them.
- Professional Costs: Hiring a professional in Miami-Dade, Broward, or Palm Beach County typically costs $1,800 to $4,000, depending on kitchen size and job complexity.
Compared to replacing your cabinets entirely, which can cost anywhere from $10,000 to $20,000 or more, refinishing offers significant savings. It’s a smart investment that adds value and beauty to your home without breaking the bank. For a comprehensive breakdown of costs, visit our Cabinet Refinishing Miami Complete Guide.
Conclusion: Enjoy Your Revitalized Kitchen
Refinishing your old kitchen cabinets is one of the most impactful and rewarding home improvement projects. We’ve seen the dramatic changes it brings to homes across Florida, from Miami to Fort Pierce.
The benefits are clear:
- A Fresh New Look for Less: Achieve a completely updated look—from modern white to classic stain—without the high cost of replacement.
- Increased Home Value: An updated kitchen is a major selling point that boosts your home’s value.
- Eco-Conscious Choice: It’s a sustainable choice that reduces waste.
- The Satisfaction of a Successful Project: Enjoy the satisfaction of changing your space with your own hands.
While a DIY approach to refinish old kitchen cabinets is achievable, we understand it’s a detailed undertaking. For a guaranteed, durable, and fast change in South Florida, trust the experts.
At All Surface Refinishing, we bring over 30 years of experience and 14,000+ successful projects to your kitchen. We specialize in delivering high-quality, long-lasting changes for homes and businesses across our service areas, including Aventura, Boca Raton, Coral Springs, Fort Lauderdale, Jupiter, Miami, Palm Beach, and West Palm Beach.
Contact us today for a consultation to achieve the kitchen of your dreams. Let us show you the difference professional cabinet refinishing can make. Your beautiful, revitalized kitchen awaits!
