A Budget Kitchen Cabinet Makeover That Lasts
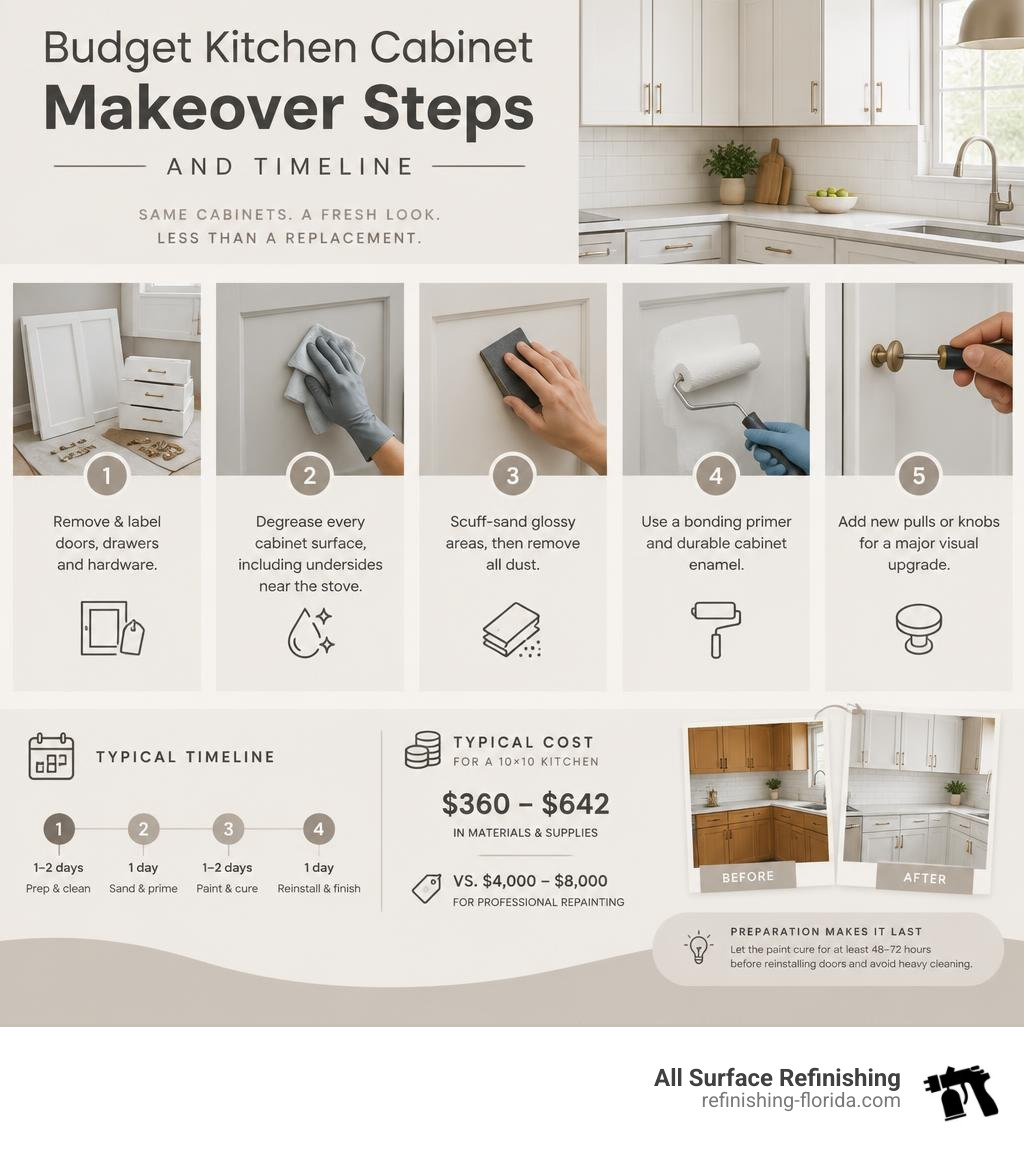
The most affordable way to update kitchen cabinets without replacing them is to repair small flaws, clean and scuff-sand the surfaces, apply a bonding primer and durable cabinet enamel, then install updated hardware. For a typical 10-by-10 kitchen, a careful DIY cabinet makeover can cost roughly $360 to $642 in materials and supplies, far less than the $4,000 to $8,000 often charged for professional repainting.
For anyone researching how to redo kitchen cabinets on a budget, focus your spending on the steps that prevent peeling and chipping:
- Remove and label doors, drawers, and hardware.
- Degrease every cabinet surface, including undersides near the stove.
- Scuff-sand glossy areas, then remove all dust.
- Use a high-adhesion bonding primer and water-borne alkyd cabinet paint.
- Add new pulls or knobs, bought in bulk when possible, for a major visual upgrade.
Fresh paint and hardware can change the whole kitchen, but preparation is what makes the result durable. Paint may feel dry within hours, yet it needs time to harden; wait at least 48 to 72 hours before reinstalling doors and avoid heavy cleaning while the finish fully cures.
I am Frank Hernandez, President of All Surface Refinishing, and I have worked in surface refinishing for more than a decade, helping Florida property owners update worn kitchen surfaces without the cost and disruption of replacement. In this guide to how to redo kitchen cabinets on a budget, I will walk through the practical choices that help a cabinet update look polished and hold up to daily use.
Proven Methods on How to Redo Kitchen Cabinets on a Budget
A full kitchen remodel can easily run $50,000, with brand-new custom cabinetry consuming nearly half of that amount. When your cabinet boxes are structurally solid, gutting your layout makes very little financial sense. Smart remodeling is about being intentional with your money, targeting high-impact visual zones while keeping sound underlying woodwork intact.
Many homeowners lean into practical budget-conscious kitchen refresh tips to achieve a designer aesthetic for pennies on the dollar. Beyond refreshing the front surfaces, you can modify cabinet functionality. Removing a few upper cabinet doors to create curated open shelving instantly creates an airy, modern feel. Adding peel-and-stick decorative patterns or a warm accent color to the interior backs of glass-front boxes adds bespoke charm without construction debris.
The Core DIY Strategy: How to Redo Kitchen Cabinets on a Budget with Paint
Applying high-performance paint is the ultimate budget equalizer. It provides a complete aesthetic reset while preserving your existing layout. However, standard latex wall paint will likely peel within a year because it lacks the hardness required to resist grease, scrubbing, and skin oils.
Achieving lasting results comes down to painting kitchen cabinets the right way. We recommend water-borne alkyd enamels. These formulas provide the self-leveling smoothness and rock-hard cure of classic oil paints, but clean up easily with water and emit low VOCs. For timeless appeal and strong resale value, clean whites, warm off-whites, and soft grays remain unbeatable. If you want subtle drama, consider a two-tone “tuxedo” kitchen—pairing deep navy or charcoal lower cabinets with crisp white upper cabinets.
Updating Details: How to Redo Kitchen Cabinets on a Budget with Hardware and Accents

Cabinet pulls and knobs serve as the jewelry of your kitchen. Replacing dated brass swirls or worn wooden knobs with matte black, brushed brass, or satin nickel handles creates an instant upgrade.
To keep costs down:
- Shop in bulk: Buying hardware in builder sets of 10 or 25 online can save you 40% to 60% compared to purchasing individual loose pieces at retail stores.
- Measure center-to-center: If you want to avoid patching and drilling, measure the exact distance between the screw holes on your existing drawer pulls before buying replacements.
- Use an alignment template: A $5 plastic mounting guide ensures every pull is installed at the exact same height and angle, preventing crooked handles.
You can also explore creative cabinet renovation techniques like adding slim picture-frame molding to plain slab doors to mimic custom Shaker millwork. Finish the project with under-cabinet LED light strips. Illuminating your countertops makes the new finish pop while adding functional task lighting for late-night cooking.
Step-by-Step Cabinet Painting and Preparation Process
Skipping prep work is why many DIY projects fail. Skipping the degreaser is like trying to stick a note onto a greasy pizza slice—nothing adheres. Follow our flawless DIY painting guide steps to keep your project organized and ensure your paint bonds permanently.

Deep Cleaning and Proper De-Glossing
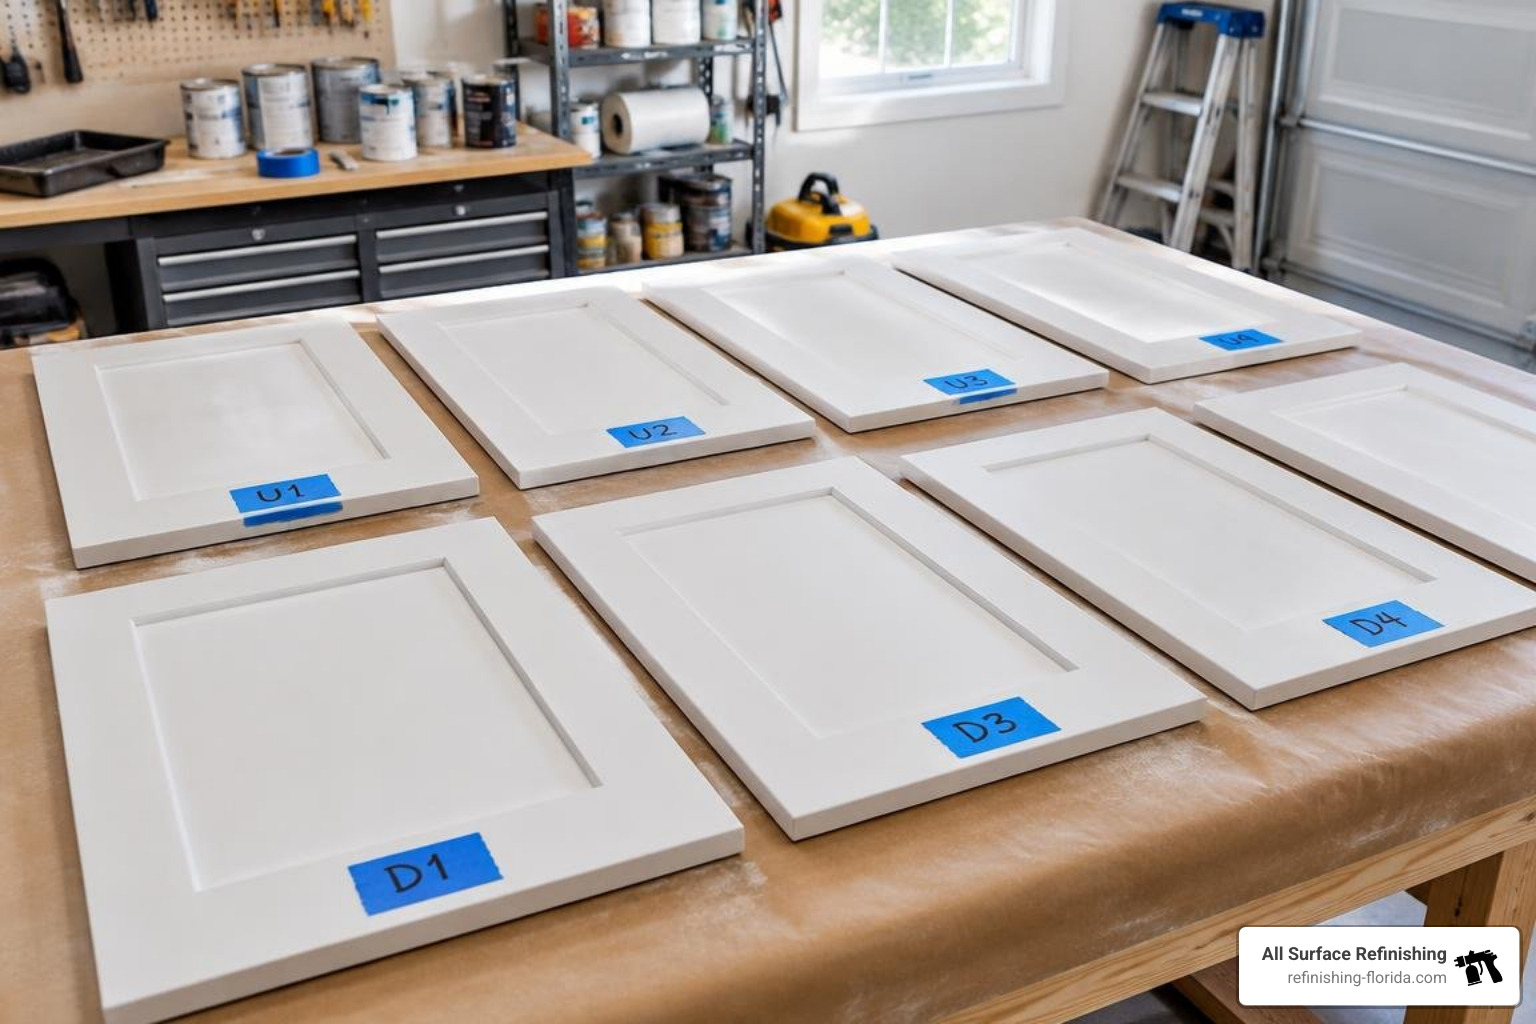
Begin by setting up a dedicated, ventilated workspace. Remove all doors, drawer fronts, and hardware. Number every single door and its matching opening using painter’s tape (for example, “U1” for Upper 1). Store the screws and hinges in labeled plastic bags.
- Degrease thoroughly: Wash every door and cabinet frame using trisodium phosphate (TSP) or a heavy-duty degreasing cleaner. Pay close attention to cabinet undersides and panels adjacent to the range where airborne cooking grease accumulates. Rinse thoroughly with clean water and let dry.
- Scuff-sand: Lightly sand every surface using 180- to 220-grit sandpaper or a sanding sponge. You do not need to strip the wood down to bare timber; your goal is simply to knock down the factory gloss so the primer has tooth to grip.
- Capture the dust: Vacuum the cabinet boxes and wipe all surfaces down with a tack cloth. Even microscopic dust specks will cause rough bumps in your final finish.
- Lead safety note: If your home was constructed before 1978, the existing cabinet finish may contain lead paint. Avoid dry sanding and follow EPA lead-safe guidelines to protect your household.
Primer Selection and Paint Application Techniques
Apply a dedicated bonding primer designed specifically for smooth, non-porous surfaces. For stubborn wood species that bleed natural tannins (like oak or cherry), or when covering slick thermofoil, use a shellac-based primer or an extreme-bond primer.
Once the primer has dried for at least 16 hours, run a 220-grit sanding block lightly across the surfaces to knock down any raised grain, then tack-cloth the dust away. When applying your paint:
- Brush and Roller: Cut in detailed profile edges using a high-quality angled sash brush, then immediately smooth large flat panels using a high-density foam mini roller. Applying two to three thin coats yields a vastly smoother, more durable surface than one heavy, dripping layer.
- Paint Sprayer: If you have spraying equipment, you can achieve a factory-like finish in a fraction of the time. Review our tips on professional cabinet spray painting methods to balance paint viscosity and overspray protection.
- Drying Setup: Lay doors flat across painter’s pyramids or build a simple 2×4 drying rack to work on multiple doors simultaneously without accidental contact.
Budget Breakdown: DIY Costs vs. Professional Refinishing
Understanding your true material expenses helps keep your project on budget. While a DIY project requires your personal labor, it saves thousands compared to full custom replacements. Reviewing our realistic cabinet refinishing cost breakdown highlights the clear savings of restoring what you have.
| Expense Category | DIY Makeover (10×10 Kitchen) | Professional Cabinet Refinishing |
|---|---|---|
| Bonding Primer (1 Gallon) | $50 – $70 | Included in service contract |
| Cabinet Paint (2 Gallons) | $140 – $180 | Commercial-grade coatings included |
| Applicators, Tape & Cleaners | $70 – $110 | Professional equipment supplied |
| Bulk Hardware (25–30 Pulls) | $100 – $150 | Client choice / installation included |
| Estimated Contingency Buffer | $50 – $100 | N/A (Fixed project quote) |
| Total Estimated Expense | $410 – $610 | $3,500 – $7,000 |
| Labor Investment | 15–25 Active DIY Hours | 0 Hours (Turnkey professional execution) |
(Note: We do not sell paint; these material estimates represent average costs at local home improvement centers).
Frequently Asked Questions About Budget Cabinet Makeovers
How long does a budget cabinet refresh take from start to finish?
A standard DIY cabinet painting project generally spans 4 to 7 calendar days. You will spend roughly 15 to 20 hours in active labor—cleaning, labeling, sanding, and applying paint. Most of the overall timeline involves waiting for primer and paint coats to dry completely. While waterborne alkyd paint feels dry to the touch within 2 to 4 hours, it requires 48 to 72 hours before reinstallation, and roughly 30 days to reach maximum scratch resistance and cure.
Can you paint over laminate or thermofoil kitchen cabinets?
Yes, provided the underlying laminate or thermofoil is firmly bonded to the substrate. If vinyl coating is peeling, remove the loose film entirely before proceeding. Clean the surface with a degreaser, scuff-sand thoroughly with 220-grit abrasives to eliminate the sheen, and apply a specialized bonding primer (such as a shellac-based or high-adhesion bonding formula). Once the primer has cured, apply your cabinet enamel as normal.
Do cabinet doors and hinges need to be completely removed before painting?
Yes, absolutely. Painting doors while they are hanging from the cabinet boxes leads to paint runs, drips around hinge edges, missed inner lip areas, and stuck hardware. Removing the doors allows you to paint horizontally on a flat surface, encouraging the paint to self-level into a smooth finish. Labeling every hinge and screw location ensures hassle-free reassembly.
Conclusion
Redoing your kitchen cabinets on a budget does not require cutting corners on quality. By pairing high-adhesion bonding primers with self-leveling enamels, thoroughly degreasing your surfaces, and upgrading hardware, you can achieve a kitchen transformation that rivals brand-new cabinetry for a fraction of the cost.
When time constraints, intricate cabinet details, or specialized spray requirements make a DIY project impractical, our professional team is here to assist. For over 30 years and across more than 14,000 projects, All Surface Refinishing has delivered reliable kitchen cabinet resurfacing and painting. Explore our expert kitchen cabinet refinishing guide to discover how we revitalize kitchen spaces across Miami, Fort Lauderdale, West Palm Beach, Boca Raton, Coral Gables, Hollywood, FL, and surrounding South Florida communities.
