Planning Your 70’s Old Kitchen Cabinets Makeover: Identify Your Cabinet Construction
Before spending a dollar on supplies or scheduling work, you need to know exactly what materials were used to build your kitchen. In the 1970s, manufacturing shifted rapidly. A kitchen built in 1972 might feature solid red oak face frames with thick plywood shelving, while a 1978 build could rely heavily on vinyl-wrapped particleboard boxes and printed faux-wood laminate doors.
Knowing what your cabinets are made of dictates whether you should strip and restain the wood, apply a professional paint coating, or replace compromised sections. To understand the baseline techniques for revitalizing older cabinetry, reviewing cabinet resurfacing 101 will help you evaluate your core surfaces.
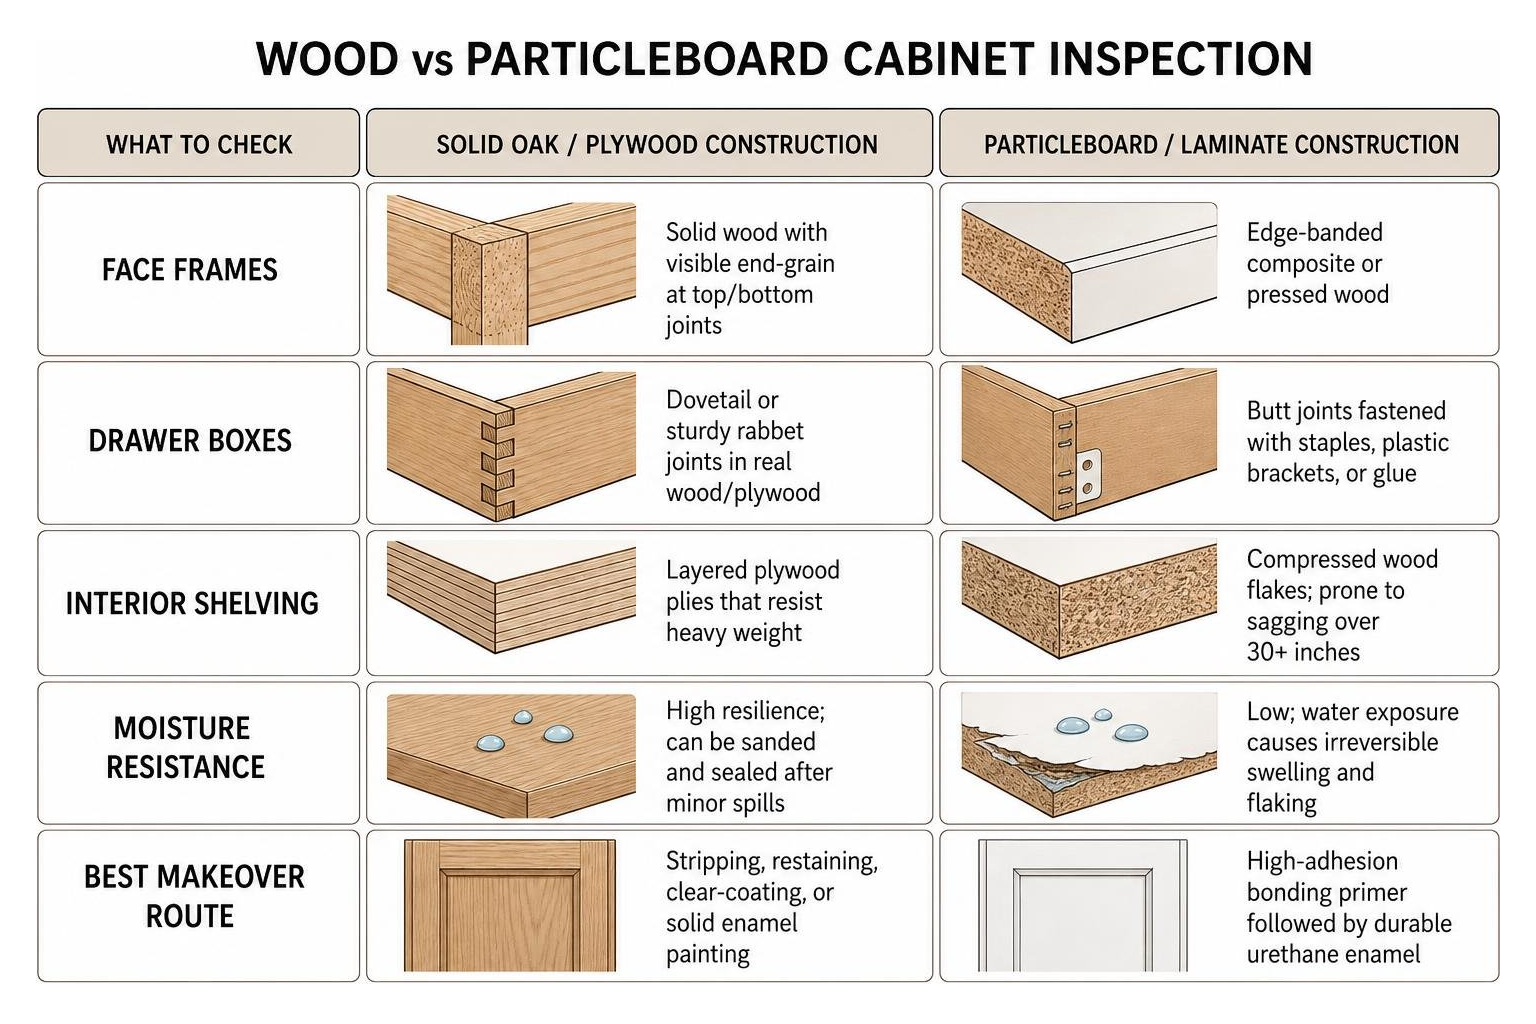
| Cabinet Component | Solid Oak / Plywood Construction | Particleboard / Laminate Construction |
|---|---|---|
| Face Frames | Solid wood with visible end-grain at top/bottom joints | Edge-banded composite or pressed wood |
| Drawer Boxes | Dovetail or sturdy rabbet joints in real wood/plywood | Butt joints fastened with staples, plastic brackets, or glue |
| Interior Shelving | Layered plywood plies that resist heavy weight | Compressed wood flakes; prone to sagging over 30+ inches |
| Moisture Resistance | High resilience; can be sanded and sealed after minor spills | Low; water exposure causes irreversible swelling and flaking |
| Best Makeover Route | Stripping, restaining, clear-coating, or solid enamel painting | High-adhesion bonding primer followed by durable urethane enamel |
Inspecting Box Materials, Shelving, and Joinery
Start your inspection at the drawers and upper boxes. Remove a drawer completely and look at the corners:
- Joinery: Dovetail joints (interlocking wedge shapes) or sturdy wooden rabbet joints indicate solid build quality. If the drawer sides are thin composite board stapled together with plastic corner braces, you are dealing with budget-grade 1970s production.
- Face Frames: Look closely at the cut ends of the front frame. Real wood displays distinct end-grain pores where the vertical stiles meet horizontal rails. Particleboard shows a smooth, flat edge tape or a uniform, crumbly composite core beneath a thin veneer sheet.
- Shelves and Box Walls: Examine the interior core. Plywood shows thin, stacked veneer layers along the cut edge. Particleboard displays a dense, speckled aggregate of wood chips. Look closely beneath the kitchen sink and near the dishwasher for signs of moisture damage, such as bubbling laminate, crumbly edges, or swollen bottom panels.
Deciding Between Refinishing or Painting
Once you confirm the structural integrity of your boxes, decide whether to refinish the natural wood or apply a full painted finish.
Refinishing solid oak cabinets returns approximately 80 percent of the value of a full replacement at only 15 percent of the cost. If your kitchen has authentic solid oak or walnut with attractive natural grain, stripping the orange, ambered 1970s lacquer and applying a fresh, modern stain preserves that organic warmth. For a 10-by-12 foot kitchen, materials typically run between $400 and $800, requiring 40 to 60 hours of labor.
If your cabinets are constructed with dark walnut vinyl veneer, flat flat-panel laminate, or heavily patched composite materials, painting is your most reliable path. Applying a professional-grade enamel gives you complete control over color and conceals mismatched grain patterns. For a deeper breakdown of material costs and labor investments, explore our cabinet refinishing cost guide.
Design and Color Strategies to Modernize 1970s Wood Cabinets
You do not always have to hide original wood to bring a 1970s kitchen into the modern era. Rich wood tones are timeless when balanced properly against clean, contemporary surroundings. For design inspiration on working with existing timber, see Apartment Therapy’s guide on modernizing brown wood cabinets.
If you choose to coat over dark veneer, shifting to a tailored color scheme transforms the room’s atmosphere. Soft, warm neutrals like greige, muted taupe, warm linen white, and subtle earthy greens (such as sage or olive) bridge the gap between vintage charm and modern design. When you are ready to update your space, give your kitchen a facelift by changing your cabinet color to dramatically brighten the entire layout.
Budget-Friendly Strategies for a 70’s Old Kitchen Cabinets Makeover
You can completely transform the aesthetic of a dated kitchen on a budget under $1,500 by making selective, high-impact changes while keeping the original cabinetry in place:
- Swap Cabinet Hardware: Replacing dated 1970s scrollwork, antiqued brass plates, or faux-copper handles with sleek matte black, champagne bronze, or brushed brass hardware delivers immediate modern appeal. Standard 1970s pulls typically feature 3-inch center-to-center hole spacing. Measure your existing screw spacing accurately to install new pulls into original holes, or fill the old holes before painting to accommodate longer modern handles.
- Install Modern Lighting: Fluorescent ceiling troffers (the infamous flush-mount ceiling light box) pull ceilings downward visually. Replacing them with recessed ceiling cans, slim flush mounts, and under-cabinet LED light strips brightens workspaces and eliminates dark shadows under upper cabinets.
- Refresh the Countertops and Backsplash: Pair existing brown wood cabinets with bright white or off-white quartz-style countertops and a crisp white subway tile backsplash to make vintage woodwork look intentional and rich.
Balancing Retro Wood with Modern Kitchen Design
If you choose to retain your wood grain, apply the 60-30-10 color balance rule:
- 60% Dominant Base: Clean, light-reflective wall paint (such as soft warm white) and lighter flooring to bounce natural light.
- 30% Secondary Texture: The deep, warm wood tones of your refinished 1970s lower cabinets or accent island.
- 10% Metallic Accents: Modern plumbing fixtures, sleek cabinet pulls, and contemporary pendant lights.
Using glass-front inserts on select upper cabinet doors or converting a dark corner cabinet into open wood shelving breaks up heavy runs of dark wood, making low-ceiling kitchens feel expansive and open.
Step-by-Step Cabinet Transformation: Refinishing vs. Painting
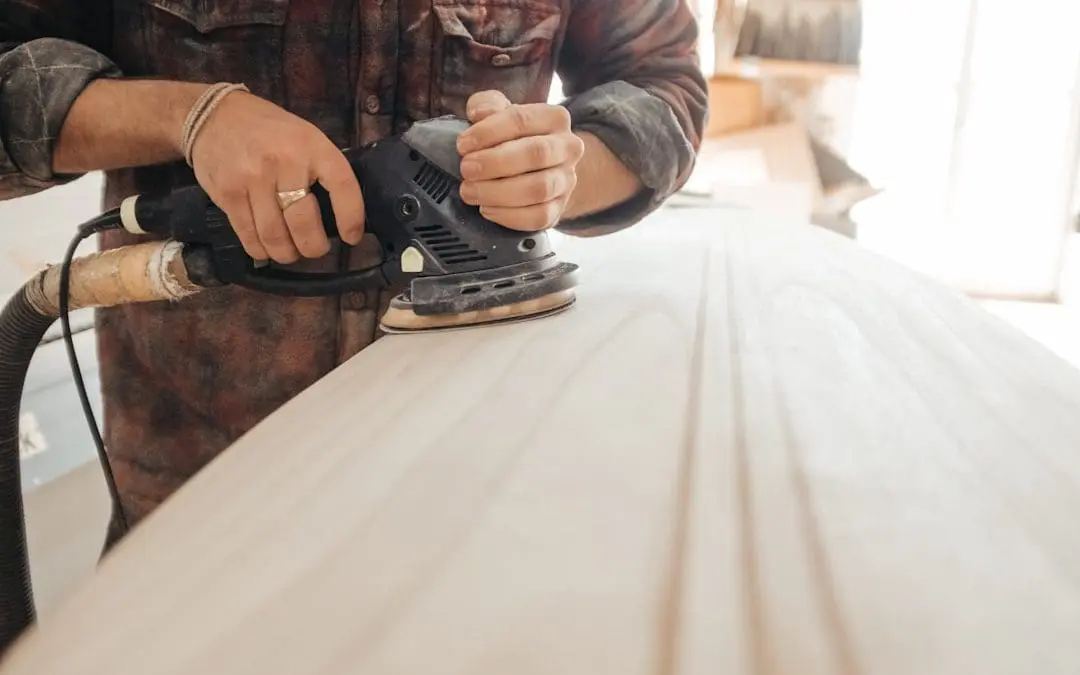
A lasting cabinet transformation requires meticulous surface preparation. Skipping prep work leads to peeling, flaking, or chipping within months. To learn the professional sequence from cleaning to final curing, see how to paint kitchen cabinets the right way.
Painting and Refinishing Steps for a 70’s Old Kitchen Cabinets Makeover
Whether you are refinishing solid wood or painting composite boxes, follow this proven step-by-step workflow:
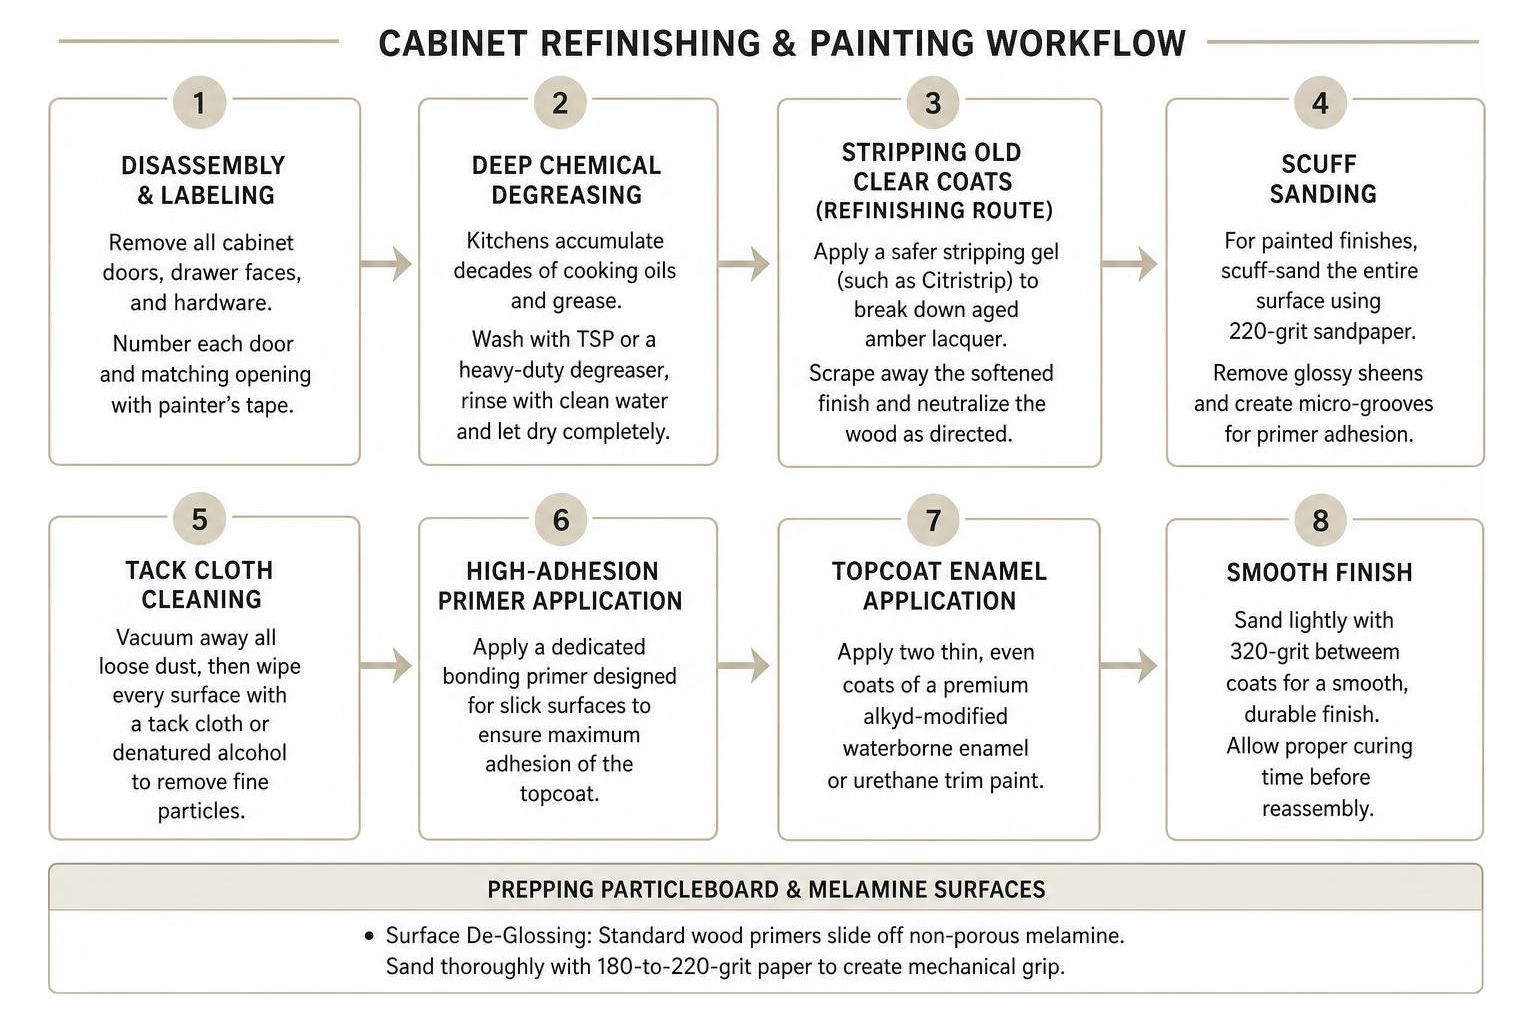
- Disassembly and Labeling: Remove all cabinet doors, drawer faces, and hardware. Number each door and matching opening using painter’s tape to ensure everything fits seamlessly upon reassembly.
- Deep Chemical Degreasing: Kitchens accumulate decades of cooking oils and grease. Wash all surfaces thoroughly with Trisodium Phosphate (TSP) or a heavy-duty degreaser, then rinse with clean water and let dry completely.
- Stripping Old Clear Coats (Refinishing Route): Apply a safer stripping gel (such as Citristrip) to break down aged amber lacquer on solid wood. Scrape away the softened finish with a plastic putty knife, neutralizing the wood according to product directions.
- Scuff Sanding: For painted finishes, scuff-sand the entire surface using 220-grit sandpaper. You do not need to sand down to bare wood; your goal is to remove glossy sheens and create micro-grooves so the primer locks onto the surface.
- Tack Cloth Cleaning: Vacuum away all loose dust, then wipe every corner with a tack cloth or denatured alcohol to remove fine particles.
- High-Adhesion Primer Application: Apply a dedicated bonding primer designed for slick surfaces.
- Topcoat Enamel Application: Apply two thin, even coats of a premium alkyd-modified waterborne enamel or urethane trim paint (such as Sherwin-Williams Emerald Urethane or Benjamin Moore Advance). Sand lightly with 320-grit between coats for a smooth finish.
Prepping and Priming Particleboard and Melamine
Painting smooth laminate, melamine interiors, or slick particleboard veneer requires special care:
- Surface De-Glossing: Standard wood primers slide off non-porous melamine. Sand thoroughly with 180-to-220-grit paper to create mechanical grip.
- Solvent-Based Bonding Primer: Apply a shellac-based primer (such as Zinsser B-I-N) or a high-performance bonding primer (such as Sherwin-Williams Extreme Bond Primer). Shellac sticks firmly to synthetic surfaces and blocks dark wood tannins from bleeding through light paint.
- Edge Sealing: Particleboard edges absorb moisture rapidly. Seal exposed raw edges with paintable wood filler or exterior-grade spackle, sand flush, and prime thoroughly before applying your finish enamel.
Structural and Functional Upgrades for Retro Kitchens
A 1970s kitchen remodel should improve how your space functions every day, not just how it looks. Many 1970s layouts are structurally sound, allowing you to maximize workflow while keeping the existing footprint intact. To see modern ways to balance retro layouts with contemporary design, check out modern cabinet refinishing and read The Kitchn’s space-maximizing retro kitchen makeover.
Upgrading Cabinet Interiors with Modern Hardware
Original 1970s drawers often glide on center-mounted metal or plastic tracks that stick, squeak, or drop off their rails when loaded. You can upgrade existing drawer boxes without replacing your cabinetry:
- Soft-Close Ball-Bearing Slides: Retrofit side-mount or undermount soft-close glides into existing boxes to handle modern cookware weights effortlessly.
- Full-Extension Pull-Out Trays: Deep 24-inch base cabinets from the 70s often turn into dark catch-alls. Installing heavy-duty wooden or chrome roll-out shelving brings pots and small appliances into clear view.
- Corner Cabinet Carousel Replacements: Upgrade flimsy plastic lazy Susans with two-tier solid wood or heavy-duty wire revolving pull-outs.
These interior hardware improvements typically cost less than $1,500 for an entire kitchen and deliver exceptional everyday convenience and resale value.
Opening Up Space with Cabinet Design Updates
1970s layouts often feel closed off due to unnecessary overhead bulkheads and heavy perimeter cabinets.
- Dealing with the Soffit: The sheetrock box hanging 12 to 14 inches below the ceiling above your upper cabinets is often purely decorative. Removing it allows you to extend cabinetry upward or add crown molding, making the room feel taller. Always cut an inspection access hole first to ensure the soffit does not hide main plumbing vents, electrical conduits, or HVAC supply trunks. Removing a non-structural soffit typically adds $400 to $1,200 to a kitchen refresh.
- Preserving the Plumbing Footprint: Keeping your sink, dishwasher, and cooking range in their established positions saves thousands of dollars in rough-in plumbing and electrical permits.
- Creating Island Storage: If space permits, removing a non-load-bearing partition wall between the kitchen and dining room lets you introduce a functional island, adding food prep space and casual seating without expanding your home’s square footage.
Frequently Asked Questions About 70s Kitchen Cabinet Makeovers
How can I tell if my 1970s cabinets are solid wood or particleboard?
Check the back corners of your face frames and drawer fronts. Solid wood shows natural end-grain pores where vertical and horizontal boards meet. Particleboard features edge banding over a uniform, speckled composite core. Drawer boxes built with dovetail joinery are almost always solid wood or sturdy plywood, whereas stapled butt joints indicate particleboard construction.
What is the most cost-effective way to update dark 70s wood cabinets?
The most cost-effective strategy is a targeted refresh: thoroughly clean the boxes with a heavy-duty degreaser, apply modern cabinet hardware (such as matte black or warm brass pulls), paint the surrounding walls a bright neutral white, and install under-cabinet LED lighting. This combination modernizes dark wood while keeping total project costs low.
Can I remove the bulky soffit above my 1970s upper cabinets?
Yes, provided it is empty. Cut a small exploratory opening in the drywall and inspect the cavity with a flashlight. If the soffit is hollow framing, you can safely remove it, repair the drywall, and run your upper cabinets or crown molding directly to the ceiling. If it contains HVAC ductwork, main plumbing stacks, or wiring runs, it is often more cost-effective to leave the structure in place and paint it to match the ceiling.
Conclusion
A dated 1970s kitchen does not require an expensive, down-to-the-studs demolition. By identifying your cabinet materials, assessing the box joinery, and applying durable surface finishes, you can eliminate dark, worn veneers and create a bright, functional space you love.
At All Surface Refinishing, we bring over 30 years of hands-on experience and more than 14,000 completed kitchen and bathroom transformations to homeowners across South and Southwest Florida. We do not sell paint—we provide high-quality refinishing, resurfacing, and specialized coating solutions that restore cabinets, countertops, bathtubs, and tiles quickly and affordably.
Whether you want to revive natural wood grain or modernize your cabinetry with a durable enamel finish, explore our expert cabinet refinishing and resurfacing services to transform your kitchen cabinets today.
