Why Cabinet Painting Is the Smartest Kitchen Upgrade You Can Make
Cabinet painting is one of the most cost-effective ways to transform a kitchen or bathroom without tearing anything out. Here’s a quick overview of what you need to know:
Cabinet Painting at a Glance:
- What it is: Cleaning, priming, and applying a durable finish to your existing cabinet surfaces
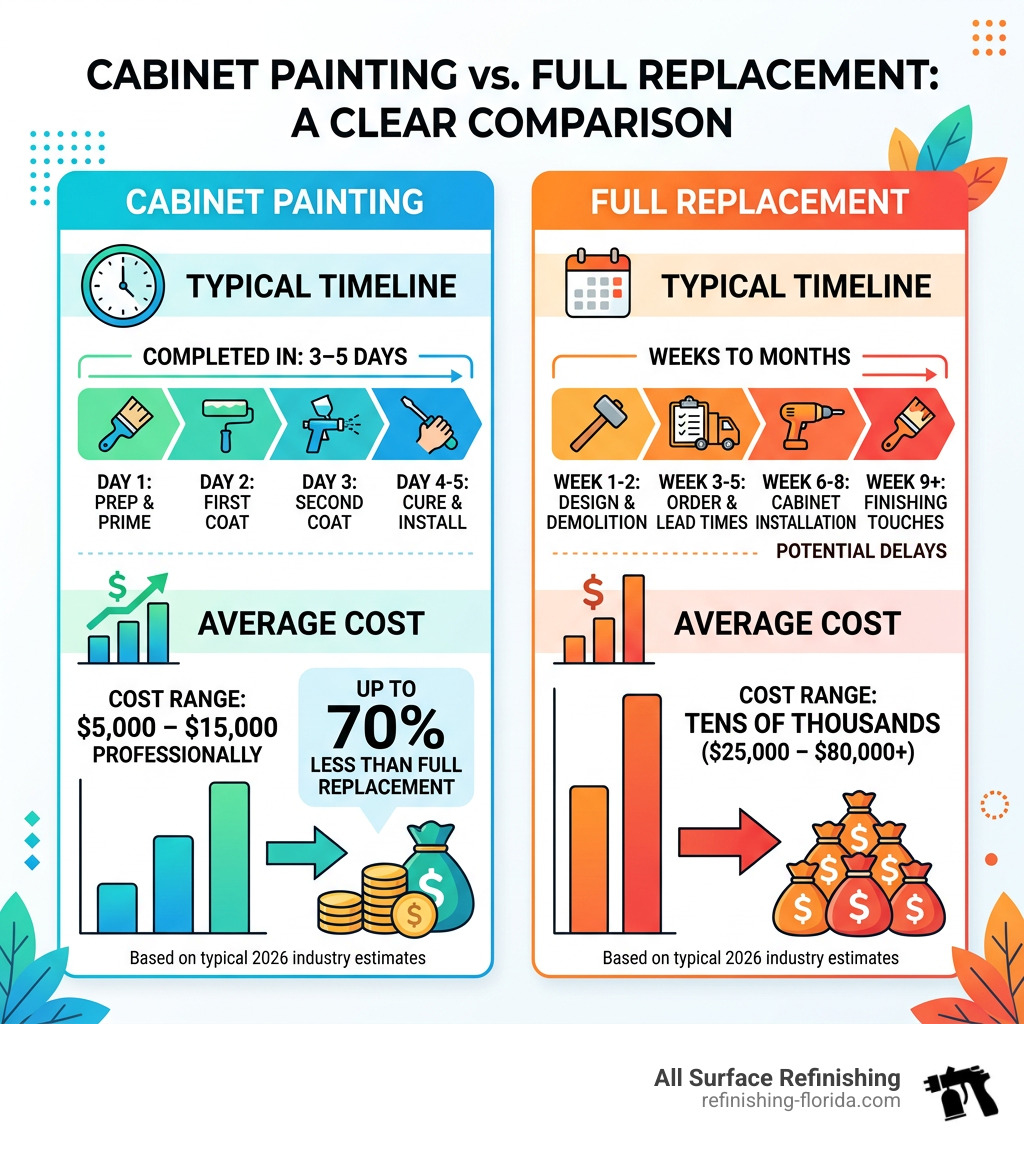
- Cost: Typically $5,000–$15,000 professionally — up to 70% less than full replacement
- Time: Most projects are completed in 3–5 days
- Best for: Structurally sound cabinets that look outdated, worn, or just need a fresh color
- Result: A smooth, factory-like finish that can last for years with proper care
Your cabinets are probably fine. They’re solid. They open and close. The boxes are intact. The only problem? They look dated.
A full kitchen remodel can cost tens of thousands of dollars. But if the structure is sound, you don’t need to replace a thing. A professional cabinet paint job gives you the same fresh look — at a fraction of the price.
This guide walks you through the process step by step, from prep to final inspection.
I’m Frank Hernandez, President of All Surface Refinishing, and I’ve spent decades helping South Florida homeowners refresh their spaces through professional cabinet painting and surface refinishing — without the cost or chaos of a full renovation. Let’s get into exactly how it’s done.
Cabinet Painting glossary:
Why Choose Painting Over Replacement?
When you look at your kitchen, you might see honey-oak cabinets from 1994 and think, “I need to rip these out.” But before you call the demolition crew, consider the math. Replacing cabinets is an invasive, messy, and incredibly expensive process that can easily climb into the $30,000 to $50,000 range for a standard South Florida kitchen.
Cabinet Painting, on the other hand, is the ultimate “home hack.” If your cabinet boxes are structurally sound, there is no reason to throw them in a landfill. By choosing to paint, you are opting for a more eco-friendly renovation that keeps high-quality wood out of the trash while achieving a factory-like look that is indistinguishable from brand-new millwork.
The return on investment (ROI) is also significantly higher. Because you aren’t paying for new materials, demolition, or plumbing reconfiguration, you can save up to 70% compared to the cost of replacement. This makes it a primary choice for homeowners in areas like Boca Raton or Fort Lauderdale who want a high-end look on a realistic budget.
| Service Type | Average Cost | Timeline | Disruption Level |
|---|---|---|---|
| Professional Painting | $5k – $15k | 3-5 Days | Low |
| Full Replacement | $25k – $50k+ | 3-6 Weeks | Very High |
Beyond the savings, professional painting allows for total customization. You aren’t limited to the five colors a manufacturer has in stock. You can choose any hue under the sun, from the crisp whites popular in Miami Beach to the deep navy blues trending in Jupiter. For more details on the financial benefits, check out this guide to cabinet painting refinishing expenses.
Essential Preparation and Materials
If you want a finish that doesn’t chip or peel three months down the road, you cannot skip the prep work. In South Florida’s humid climate, the bond between the paint and the wood must be absolute.

Here is the professional-grade toolkit we recommend for a durable job:
- Degreasers: Kitchens are magnets for grease, oils, and cooking splatters. We use heavy-duty cleaners like Krud Kutter or a TSP degreaser to strip away every trace of residue. If you don’t remove the grease, the paint will literally slide off the surface.
- Primers: For most wood surfaces, we recommend Zinsser BIN Advanced Primer. It is a shellac-based or high-adhesion synthetic primer that blocks tannins from bleeding through and provides a “bridge” for the new paint to stick to.
- Sandpaper: You’ll need 120-grit for the initial scuffing and 320-grit for smoothing between coats.
- Wood Filler: To repair those inevitable nicks, scuffs, and old hardware holes.
- Safety Gear: If your home was built before 1978, you must be aware of potential lead paint. Always wear a high-quality sanding mask and follow EPA lead-safe protocols.
The Professional Cabinet Painting Process in 5 Steps
At All Surface Refinishing, we’ve refined our process over 30 years and 14,000 projects. Whether you are doing this yourself or hiring a kitchen cabinet painting service, these five steps are the industry standard for excellence.
Step 1: Deconstruction and Labeling
The biggest mistake DIYers make is trying to paint the doors while they are still hanging. To get a professional result, you must remove every door, drawer front, and piece of hardware.
We use a numbering system—often placing a small piece of tape with a number inside the hinge cup and a corresponding number inside the cabinet box. This ensures that when we return from our professional spray booth, every door fits perfectly back into its original spot. We also take care to protect hinges and screws, often storing them in labeled bags so nothing goes missing during the 3-to-5-day process.
Step 2: Deep Cleaning and Surface Repair
Once the doors are off, the real work begins. Every square inch of the cabinet frames and doors is scrubbed with a degreaser. Even if your kitchen looks clean, years of cooking oils create a microscopic film.
After cleaning, we inspect for damage. We use high-quality wood filler to repair deep scratches or dents. If you are changing your hardware to a different size (like moving from knobs to pulls), this is the time to fill the old holes. Once the filler is dry, we sand it flush to create a seamless surface.
Step 3: Sanding and Priming for Adhesion
We don’t sand to remove the old finish entirely; we sand to “scuff” it. This creates a mechanical bond by opening the grain of the wood or roughening the sheen of the old paint.
After sanding, we wipe everything down with a tack cloth to remove every speck of dust. Then comes the primer. A bonding primer like Zinsser BIN acts as the glue for your project. It prevents “bleed-through”—where the orange or red tones of old oak or cherry wood try to seep through your beautiful new white paint. This step is vital for a practical guide to painting kitchen cabinets professionally.
Step 4: Applying the Cabinet Painting Finish
This is where the magic happens. While some people use brushes or mohair rollers, we prefer a high-volume, low-pressure (HVLP) sprayer for a true factory-like finish.
We typically use industrial-grade coatings like 2K polyurethane or high-end urethane enamels. These paints are designed to be “self-leveling,” meaning they lay down flat as they dry, eliminating brush marks. We apply multiple thin coats rather than one thick one. This ensures durability and prevents drips or “runs” in the finish. The result is a rock-hard surface that can withstand the daily wear and tear of a busy South Florida household.
Step 5: Reassembly and Final Inspection
Once the finish has cured, we bring the doors and drawers back for installation. We reattach the hinges, align the doors so they hang perfectly straight, and install the hardware.
We also add small rubber bumper pads to the corners of the doors to prevent them from “clanking” against the frames. Finally, we perform a thorough walkthrough to ensure every edge is crisp and every surface is smooth. This attention to detail is why there are 3 important benefits of hiring cabinet painting experts rather than attempting a weekend DIY that might leave you with sticky doors.
Selecting the Best Paint and Finishes
Not all paint is created equal. If you walk into a big-box store and buy standard wall latex, your cabinets will be peeling within a year. Cabinets are “high-touch” surfaces—they deal with hands, grease, steam, and cleaning chemicals.
For a long-lasting Cabinet Painting project, we recommend:
- Urethane Alkyd Enamels: These offer the durability of old-school oil paint but with the easy cleanup of water-based paint. They dry very hard and are highly resistant to staining.
- 2K Polyurethane: Often used in the automotive industry, this is the gold standard for durability. It requires a hardener to be mixed in and provides a finish that is almost impossible to chip.
- Satin Finish: This is the most popular sheen for cabinets. It has a soft glow that hides fingerprints and minor imperfections better than high-gloss, but it is still very easy to wipe clean.
- Semi-Gloss: If you want a more modern, “shiny” look, semi-gloss is a great choice. It’s incredibly durable and moisture-resistant, making it perfect for bathrooms in humid areas like Miami or Coral Springs.
Popular Cabinet Painting Color Trends
The “all-white” kitchen is a timeless classic that will always help a home sell in Palm Beach County. However, we are seeing a shift toward more personality. Navy blue islands paired with white perimeter cabinets (the “two-tone” look) are very popular right now. Sage greens and charcoal greys are also making a big splash, providing a sophisticated, earthy feel that complements Florida’s natural light.
Choosing Between Spray and Brush Finishes
If you want that “factory” look—smooth, glass-like, and free of texture—spraying is the only way to go. Brushing and rolling are fine for a “shabby chic” or farmhouse look, but they will always leave behind some level of texture or brush marks. For most modern South Florida homes, an HVLP spray finish is the preferred choice to maintain a high property value.
Frequently Asked Questions
Do I need to sand my cabinets before painting?
Yes. Even if you use a “no-sand” paint, we always recommend at least a light scuff-sanding. You need to break the “sheen” of the existing finish to give the primer something to grab onto. Without this mechanical bond, the paint is simply sitting on top of the wood and can easily be scratched off with a fingernail.
How long does the professional painting process take?
For a standard kitchen, the process usually takes 3 to 5 days. We typically spend the first day on-site doing prep and painting the frames. The doors and drawers are then taken to our specialized shop to be sprayed in a controlled, dust-free environment. We return a few days later to reinstall everything. Your kitchen remains mostly functional during this time—you just won’t have door fronts for a few days!
Can you paint over laminate or veneer cabinets?
Absolutely. Many homes in areas like Hialeah or Pembroke Pines have laminate or thermofoil cabinets. While these surfaces are non-porous, a high-adhesion bonding primer (like Zinsser BIN) will “bite” into the laminate, allowing the topcoat to stick perfectly. The key is in the preparation and using the right chemical bond.
Conclusion
Cabinet Painting is more than just a fresh coat of color; it’s a complete kitchen transformation that respects your budget and your time. By choosing to refinish rather than replace, you can enjoy a designer-magazine kitchen for a fraction of the cost of a traditional remodel.
At All Surface Refinishing, we’ve spent over 30 years perfecting the art of the finish. From Aventura to Jupiter, and everywhere in between like Boca Raton, Davie, and Weston, we provide South Florida homeowners with durable, beautiful results backed by 14,000 successful projects.
If you’re ready to fall in love with your kitchen again, don’t wait for a six-month renovation. Let us give your cabinets the professional facelift they deserve. For more information, check out our cabinet painting services complete guide and start your journey toward a brand-new look today.
