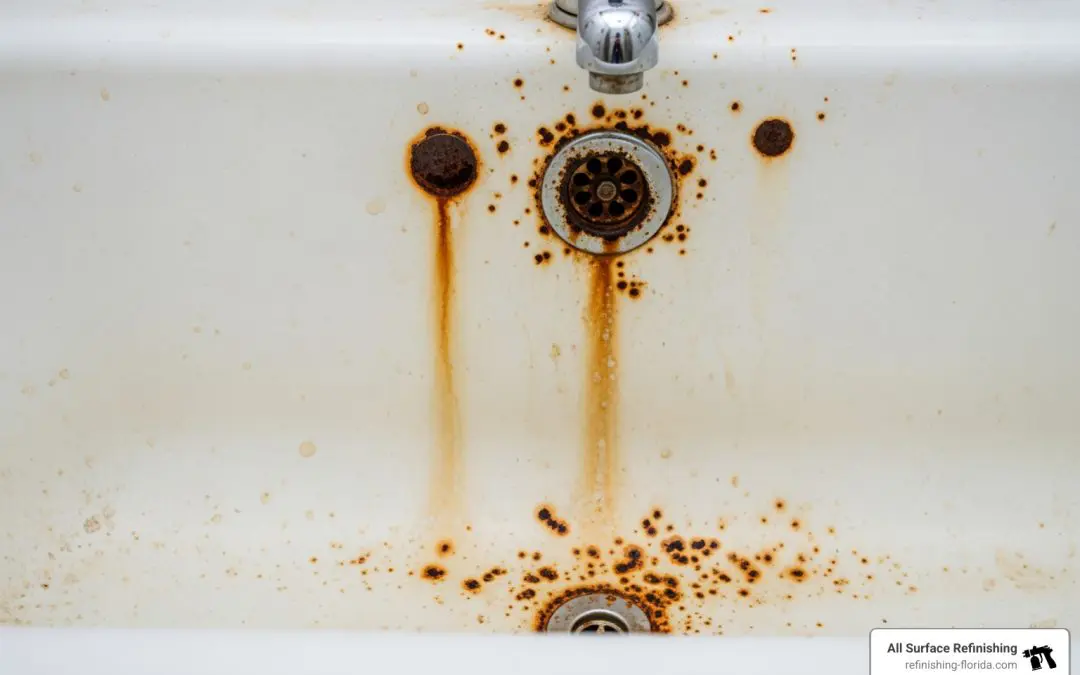
Why Rusty Bathtub Repair Matters for South Florida Property Owners
Rusty bathtub repair is essential for maintaining your property’s value and preventing costly full replacements. Whether you’re dealing with small rust spots around the drain or more extensive pitting and corrosion, addressing these issues quickly can save you thousands of dollars and extend your tub’s life by decades.
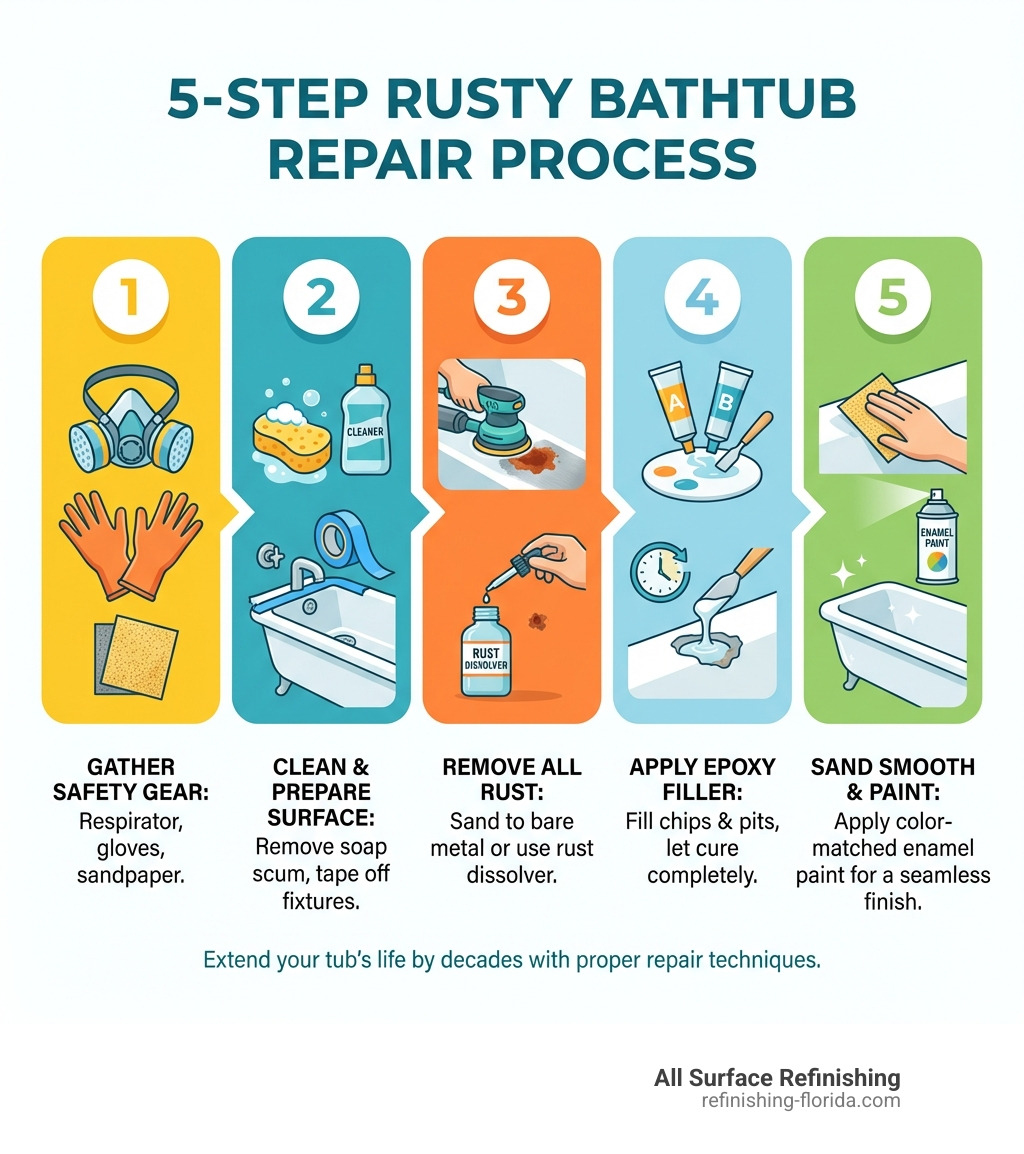
Quick Answer: How to Fix Rust Spots in Your Bathtub
- Remove all rust – Sand down to bare metal using fine-grit sandpaper or apply a rust dissolver
- Clean and dry – Ensure the surface is completely clean and moisture-free
- Fill the damage – Apply a two-part epoxy filler designed for bathtubs
- Sand smooth – Let cure, then sand until level with the surrounding surface
- Paint and seal – Apply color-matched enamel touch-up paint for protection
According to industry data, professional refinishing costs between $350 and $500, while a new cast iron or steel tub installation can run $1,200 to $5,000. For property owners in South Florida’s humid climate, rust is a common issue that affects porcelain-coated cast iron and steel tubs when the protective enamel chips or wears away, exposing the metal underneath to moisture.
The good news? Most rust spots can be repaired with basic tools and a weekend of work. Small chips and surface rust respond well to DIY methods, while more extensive damage may benefit from professional refinishing that can last 15 to 20 years.
I’m Frank Hernandez, President of All Surface Refinishing, and I’ve been helping South Florida homeowners and businesses restore their bathtubs since 2011. Through thousands of rusty bathtub repair projects across Miami-Dade, Broward, and Palm Beach counties, I’ve seen how proper repair techniques can transform a worn, rusty tub into a like-new fixture without the disruption of replacement.
Essential rusty bathtub repair terms:
What Causes Bathtub Rust and How Does it Affect Different Tubs?
Rust spots in a bathtub can be a real eyesore, changing a pristine bathing area into something less inviting. Understanding what causes these unsightly blemishes is the first step in effective rusty bathtub repair. At its core, rust is an electrochemical process where iron reacts with oxygen and water, forming iron oxides. For bathtubs, this usually happens when the protective barrier of the tub’s surface is compromised.
Most bathtubs are made from various materials, but the ones most susceptible to rust are those with a metal core, primarily cast iron and steel. These tubs are typically coated with a layer of porcelain enamel, which is a glass-like finish that provides both aesthetic appeal and a crucial protective barrier.
Bathtub Materials and Rust Susceptibility:
Cast Iron Tubs: These are known for their incredible durability and heat retention. Cast iron bathtubs are heavy and robust, often lasting for decades, even a century or more, as we’ve seen in many older homes across South Florida. However, their porcelain enamel coating, while tough, can chip or scratch if heavy objects are dropped into the tub. Once this enamel is breached, the underlying cast iron is exposed to water and air, leading to rust formation. This rust can quickly spread if left untreated. For more detailed information on repairing these classic fixtures, check out our guide on More info about Cast Iron Tub Repair.
Steel Tubs (Enameled Steel): Lighter and typically less expensive than cast iron, steel bathtubs also feature a porcelain enamel finish. Like cast iron, they are prone to rust if the enamel chips or wears away, exposing the steel underneath. Americast tubs, for example, are a type of steel tub with a porcelain enamel finish that offers a lighter alternative to cast iron while still providing good durability. However, any breach in this protective layer will invite rust.
Acrylic and Fiberglass Tubs: These modern bathtubs are made from plastic composites and generally do not rust themselves. However, they can develop stains that mimic rust if exposed to rust-laden water (e.g., from rusty pipes or metal containers left in the tub). While the material itself won’t rust, the stains can be tough to remove and might indicate a plumbing issue that needs addressing.
Common Causes of Rust in Your Bathtub:
- Scratches and Chips: This is the most frequent culprit. Dropping a heavy shampoo bottle, a metal toy, or even abrasive cleaning tools can chip the enamel. These tiny vulnerabilities expose the metal core to moisture, kickstarting the rust process.
- Leaky Faucets: A constant drip, even a slow one, can wear down the enamel over time, especially around the drain or faucet area. The continuous presence of water, combined with oxygen, creates ideal conditions for rust once the enamel is compromised.
- High Iron Content in Water: In some areas, particularly with well water, the water itself might contain high levels of iron. While this usually leads to orange or reddish stains (surface rust stains) rather than actual rust of the tub, these stains can be mistaken for tub rust and are often a sign that the enamel is porous or damaged.
- Standing Water: Allowing water to sit in the tub for extended periods, especially around the drain or in chipped areas, accelerates rust formation. That’s why we always recommend wiping your tub dry after use.
- Abrasive Cleaners: Harsh, abrasive cleaners or scrubbing pads can gradually wear down the enamel over time, making it thinner and more susceptible to chipping and eventually, rust.
When rust begins, it often appears as small, reddish-brown spots. If left untreated, these can grow into larger patches, weakening the enamel and even leading to pitting and corrosion of the underlying metal. Early detection and prompt rusty bathtub repair are crucial to prevent these minor issues from becoming major, costly problems.
A Step-by-Step Guide to DIY Rusty Bathtub Repair
Tackling a rusty bathtub repair yourself can be a rewarding project, saving you money and giving your tub a new lease on life. Whether you’re in Miami, Fort Lauderdale, or West Palm Beach, the principles of DIY repair remain the same. However, it’s crucial to approach this task with caution, especially when dealing with chemicals. Always prioritize safety!

Step 1: Gather Your Tools, Materials, and Safety Gear
Preparation is key to a successful and safe DIY rusty bathtub repair. We recommend having all your tools and materials ready before you begin.
Safety Gear (Non-Negotiable!): According to the Safety guidelines from the CDC, DIYers should wear closed-toe shoes, long pants, a long-sleeve shirt, protective gloves, and breathing protection, like a full-face respirator. Safety glasses or goggles are also useful for protecting your eyes while you work. Do not undertake this project without using appropriate personal protective equipment.
- Safety glasses
- Respirator (specifically rated for organic vapors, if using epoxy or paint)
- Chemical-resistant gloves (nitrile or similar)
- Ventilation fan (a box fan to blow air out of the bathroom)
- Closed-toe shoes, long pants, long-sleeve shirt
Tools and Materials:
- Screwdriver (to remove drain hardware)
- Putty knife or utility knife (for scraping caulk)
- Abrasive pad (for initial cleaning and etching)
- Heavy-duty bathroom cleaner (e.g., bleach-based or alkaline emulsifier)
- Sponge and clean cloths
- Painter’s tape (high-quality, blue painter’s tape)
- Drop cloth or plastic sheeting
- Fine-grit wet/dry sandpaper (#220, #320, #400, #600)
- Rust dissolver (e.g., Bar Keepers Friend, CLR, or a rust converter like OSPHO)
- Paper towels
- Two-part epoxy repair kit (specifically designed for bathtubs)
- Touch-up enamel paint (color-matched to your tub, if possible)
- Paintbrush or small foam roller (for touch-up paint)
- Shower caulk (mildew-resistant, for resealing)
- Plumber’s putty (if reinstalling drain flange)
Step 2: Prepare the Surface for a Lasting Rusty Bathtub Repair
This step is critical for ensuring the repair adheres properly and lasts.
- Clean the Tub Thoroughly: Start by cleaning the entire tub with a heavy-duty bathroom cleaner and an abrasive pad. We need to remove all soap scum, body oils, and grime. Rinse thoroughly with water. For stubborn stains, an alkaline emulsifier followed by an acid-based citric cleanser, as used in professional settings, can be very effective.
- Remove Drain Hardware: Use a screwdriver to remove the drain cover and stopper. If the rust is around the drain flange, you may need to remove that as well. Instructions for removing drain stoppers and flanges are available online.
- Scrape Old Caulk: Use a putty knife or utility knife to scrape off all old caulk around the tub’s edges. This prevents new caulk from looking messy and ensures a clean seal later. If we find any hidden dampness or damage in the walls, this is the time to address it.
- Tape Off Fixtures: Use painter’s tape and a drop cloth to protect all surrounding areas, including faucets, walls, and flooring, from chemicals and paint.
- Ensure a Dry Surface: The tub must be completely dry before proceeding. We recommend allowing it to air dry for at least 24 hours, or using a fan to speed up the process. Any trapped moisture can lead to future rust and repair failure.
Step 3: How to Effectively Remove Rust from the Bathtub Surface
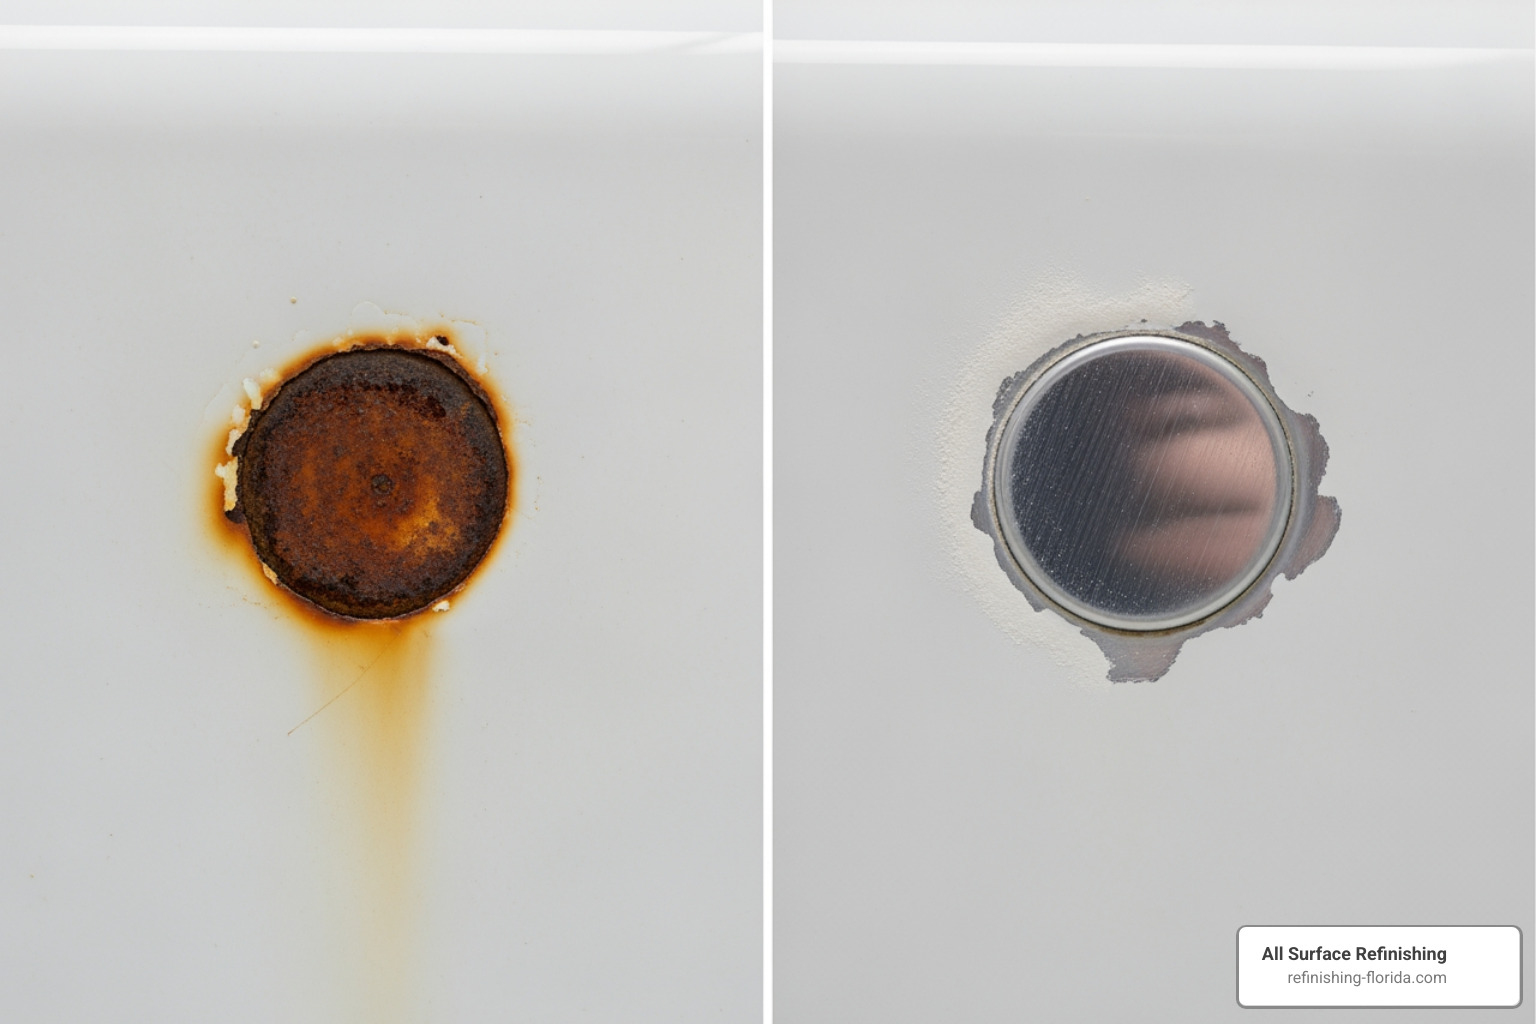
This is the most crucial step for a successful rusty bathtub repair. You must remove all traces of rust down to the bare, clean metal.
Mechanical Removal:
- For small, superficial rust spots, start with Bar Keepers Friend or a similar rust remover. Apply, let it sit for 10-15 minutes, then gently scrub with a non-abrasive pad. Rinse and dry.
- For deeper rust or chips where the metal is exposed, we need to sand. Using #220 or #320 grit wet/dry sandpaper, sand the rusty area thoroughly. The goal is to reach shiny bare metal. Continue sanding until all visible rust and oxidation are gone. If you have a small wire brush, you can use it gently for stubborn areas, but follow up with sandpaper.
- Wipe away all sanding dust and debris with a clean cloth.
Chemical Rust Removers (Optional, for stubborn rust):
- Products like CLR can be effective for dissolving rust stains. Apply as directed, let it work, then scrub and rinse.
- For persistent rust, a rust converter like OSPHO can be used. This product chemically converts rust into a stable, black metal, effectively “killing” it. If using, apply sparingly to the rust spot, let it cure for 24 hours (it will turn black), then proceed to the next step.
- A natural alternative is a paste of salt and white vinegar. Apply, let sit for a few hours, then scrub with a stainless steel scrubby.
Neutralizing and Final Clean: After rust removal, rinse the area thoroughly with water and then wipe it down with denatured alcohol to ensure no residues remain. This also helps to degrease the surface. Let the area dry completely before moving on.
Step 4: Applying Epoxy to Patch Chips and Pits
Once the rust is completely removed and the surface is clean and dry, it’s time to fill the damaged area.
- Prepare the Epoxy: Most bathtub repair kits come with a two-part epoxy filler. Carefully follow the manufacturer’s instructions for mixing the compound. It’s essential to mix the two parts thoroughly in the correct proportions to ensure proper curing. Work quickly, as epoxy typically has a limited working time.
- Apply the Filler: Using a clean putty knife or the applicator provided in the kit, apply the mixed epoxy to the chipped or pitted area. We want to fill the damage completely, building it up slightly higher than the surrounding tub surface.
- Smooth the Surface: Carefully smooth the epoxy with the putty knife, trying to make it as level as possible with the surrounding enamel. Don’t worry about perfection at this stage; we’ll sand it smooth later.
- Curing Time: Allow the epoxy to cure fully. This is critical. Curing times vary by product, but it can range from several hours to 24 hours or more. Rushing this step can lead to a soft, ineffective repair. Ensure proper ventilation during this time. For more comprehensive details on repairing chips and other damages, explore our guide on Details on Tub Repair.
Step 5: Finishing the Patch for a Seamless Look
The final steps are all about blending the repair for a smooth, practically invisible finish.
- Sand the Cured Epoxy: Once the epoxy is completely hardened, use fine-grit wet/dry sandpaper (#400 or #600) to gently sand the repaired area. Keep the sandpaper wet to prevent scratching and achieve a smoother finish.
- Blending the Repair: Sand in a circular motion, gradually feathering the edges of the repair into the surrounding original enamel. The goal is to make the filled area perfectly flush and smooth with the rest of the tub’s surface.
- Clean and Prepare for Paint: Wipe away all sanding residue with a damp cloth, then dry the area thoroughly.
- Apply Touch-Up Enamel: Apply thin coats of color-matched touch-up enamel paint over the repaired area. Use a small paintbrush or foam roller. Allow each coat to dry completely before applying the next. Multiple thin coats are always better than one thick coat for a durable and aesthetically pleasing finish.
- Achieving a Smooth Finish: Once the paint is dry, you can gently wet sand with very fine grit sandpaper (#1000 or higher) if needed, to further smooth the painted area. Finish by buffing with a soft cloth for a glossy sheen.
- Re-caulk and Reinstall: Once everything is dry and cured, re-caulk the edges of your tub with mildew-resistant shower caulk. Reinstall the drain hardware. Allow the caulk to cure for at least 24 hours before using the bathtub.
Extensive Damage: When to Refinish Your Entire Bathtub
While DIY spot repairs are excellent for small chips and isolated rust spots, there comes a point where the damage is simply too extensive for a localized fix. If your bathtub exhibits widespread rust, multiple large chips, significant pitting, or a generally dull, worn, and stained finish, a full bathtub refinishing becomes a far more practical and cost-effective solution.
Imagine a beautiful old cast iron tub in a historic home in Coral Gables or a porcelain tub in a busy Fort Lauderdale apartment that has seen years of use. Patching every single imperfection might be a never-ending task, and the end result could look like a patchwork quilt rather than a cohesive, appealing surface. This is when we recommend considering a complete refinishing.
Cost of Replacement vs. Refinishing
The financial argument for refinishing over replacement is compelling. According to statistics, the cost to professionally refinish a bathtub typically ranges from $350 to $500. This is a mere fraction of the expense involved in replacing an entire tub, which can cost anywhere from $1,200 to $5,000 for a new cast-iron or steel tub, not including demolition, plumbing, and tile work. For our clients in South Florida, especially those with unique or vintage tubs, refinishing preserves the character of their bathrooms while providing a like-new surface at a fraction of the cost.
Why a full bathtub refinishing is a better option for your rusty bathtub repair
Professional bathtub refinishing offers a comprehensive solution that goes far beyond a simple patch. It addresses the entire tub surface, ensuring a uniform, durable, and beautiful finish.
- Professional Process: Our process involves extensive preparation, specialized cleaners, and proprietary bonding agents that ensure maximum adhesion. We don’t just paint over problems; we carefully prepare the surface, fill all chips and pits, and then apply multiple coats of a high-tech acrylic urethane resin. This is a far cry from the thin coatings found in many DIY kits, which often peel and don’t achieve a professional, glossy finish. In fact, a significant portion of our work involves redoing failed DIY attempts, underscoring the complexity and skill required for a truly lasting finish.
- Durability and Longevity: A professionally refinished tub, with proper care and maintenance, can last anywhere from 10 to 20 years. This is a significant lifespan, offering excellent value for your investment. Compare this to a DIY spot repair, which might last a few years, or a full DIY refinishing kit, which often lasts much less due to improper application or inferior materials.
- Uniform, Glossy Finish: Our skilled technicians in locations like Boca Raton, Miami Beach, and Pembroke Pines can achieve a smooth, glossy, and uniform finish that makes your tub look brand new. This aesthetic consistency is difficult to achieve with DIY methods, especially across an entire tub.
- Cost-Effectiveness: As mentioned, the cost savings are substantial. For a few hundred dollars, you can extend the life of your bathtub by years, avoiding the massive expense and disruption of a full bathroom renovation. This makes refinishing an incredibly smart choice for homeowners and property managers alike.
For a deeper dive into what professional refinishing entails and how it can transform your bathroom, please refer to our Professional Bathtub Resurfacing Complete Guide.
Here’s a quick comparison to help you decide:
| Feature | DIY Spot Repair | Professional Bathtub Refinishing |
|---|---|---|
| Cost | Low (approx. $30-$50 for materials) | Moderate ($350-$629) |
| Longevity | A few years (depends on severity & technique) | 10-20 years (with proper care) |
| Appearance | Noticeable patch, may not perfectly match | Seamless, uniform, glossy, like-new finish |
| Scope | Small chips, isolated rust spots | Entire tub surface, widespread rust, multiple chips, dull finish |
| Effort | Moderate DIY effort, weekend project | Minimal effort for homeowner, completed by pros in a day or two |
| Warranty | None | Often includes a warranty on adhesion and finish |
| Best For | Minor cosmetic flaws, temporary fixes | Restoring heavily worn, rusty, or discolored tubs; long-term solution |
Frequently Asked Questions about Bathtub Rust
We often hear many questions from our clients in areas like Coral Springs, Miramar, and Jupiter regarding rust in their bathtubs. Here are some of the most common ones:
How long does a bathtub rust repair last?
The longevity of a rusty bathtub repair depends heavily on the method used and the extent of the original damage. A properly executed DIY spot repair, where all rust is completely removed and the area is sealed correctly, can last for many years. However, these are typically for minor, isolated spots. The key is thorough preparation and high-quality materials.
For a professional refinish, which covers the entire tub surface, you can expect the new finish to last an impressive 10 to 20 years with proper care and maintenance. This durability makes professional refinishing a highly valuable investment for property owners in South Florida.
How can I prevent my bathtub from rusting in the future?
Prevention is always better than cure, especially when it comes to rust. Here are our best practices for maintaining your bathtub and preventing future rust formation:
- Wipe the Tub Dry After Use: This is one of the simplest yet most effective steps. Excess moisture is rust’s best friend. Wiping down your tub after every bath or shower significantly reduces the chances of water sitting in tiny chips or porous areas.
- Immediately Fix Leaky Faucets: A constant drip, even a slow one, can erode enamel over time and introduce continuous moisture to potential rust spots. Address leaky faucets promptly.
- Use Non-Abrasive Cleaners: Harsh, abrasive cleaners and scrubbing pads can scratch and wear down the protective enamel, making it more susceptible to damage. Opt for gentle, non-abrasive bathroom cleaners.
- Inspect Regularly for Chips: Make it a habit to periodically inspect your bathtub for any new chips or scratches, no matter how small. Repairing these tiny breaches promptly prevents water from reaching the metal underneath and starting the rust process.
- Avoid Metal Objects: Don’t store metal cans (like shaving cream or hairspray) directly on the tub surface, especially when wet, as they can leave rust rings. Use a caddy or a rust-proof holder.
Can I just paint over the rust on my tub?
No, you should never paint directly over rust in your tub. While it might seem like a quick fix, it’s a temporary solution that will inevitably lead to bigger problems. Rust is an active corrosion process. If you paint over it, the rust will continue to grow and spread underneath the paint, causing the new paint to bubble, crack, and peel prematurely. This creates a much more unsightly and difficult repair down the line.
For any successful rusty bathtub repair, whether DIY or professional, it is absolutely crucial to completely remove all traces of rust down to the bare metal before applying any primer, filler, or topcoat. This ensures proper adhesion and a lasting, durable repair.
Conclusion: Restore Your Bathtub’s Shine in South Florida
Dealing with rust in your bathtub doesn’t have to be a headache. Whether you opt for a meticulous DIY spot repair or choose the comprehensive solution of professional refinishing, addressing these issues promptly is key to preserving your tub and enhancing your bathroom’s appeal. From the busy streets of Miami-Dade County to the serene communities of Broward and Palm Beach Counties, we’ve seen countless tubs brought back to life.
DIY rusty bathtub repair offers a cost-effective way to tackle minor blemishes, empowering you to maintain your home’s value with your own hands. However, for more extensive damage, or if you simply desire a flawless, long-lasting finish without the hassle, professional bathtub refinishing is an investment that truly pays off. Our expertise ensures a durable, beautiful result that will make your tub look brand new for years to come.
At All Surface Refinishing, we are Florida’s trusted experts in bathtub refinishing. With over 30 years of experience and 14,000+ projects completed, we offer cost-effective, fast, and high-quality changes for bathrooms across South and Southwest Florida. We proudly serve homeowners and businesses in Aventura, Bal Harbor, Boca Raton, Boynton Beach, Broward County, Carol City, Coconut Creek, Coconut Grove, Cooper City, Coral Gables, Coral Springs, Cutler Ridge, Dade County, Dania Beach, Davie, Deerfield Beach, Delray Beach, Fisher Island, Fort Lauderdale, Fort Pierce, Golden Beach, Greenacres, Hallandale Beach, Hialeah, Hillsboro Beach, Hobe Sound, Hollywood, FL, Homestead, Indian River County, Indiantown, Islamorada, Ives Estates, Jensen Beach, Jupiter, Kendall, Key Biscayne, Key Largo, Key West, Lake Worth, Lauderdale By The Sea, Lauderdale Lakes, Lauderhill, Lazy Lake, Lighthouse Point, Loxahatchee, Marathon, Margate, Martin County, Miami, Miami Beach, Miami Lakes, Miami Shores, Miami Springs, Miami-Dade County, Miramar, North Bay Village, North Lauderdale, North Miami, North Miami Beach, North Palm Beach, Oakland Park, Palm Beach, Palm Beach County, Palm Beach Gardens, Palm City, Parkland, Pembroke Pines, Perrine, Port Saint Lucie, Port Salerno, Saint Lucie County, Sebastian, Stuart, Sweetwater, Tamarac, Vero Beach, Wellington, FL, West Miami, West Palm Beach, Weston, and Wilton Manors.
Don’t let rust diminish the beauty and value of your home. Get a free estimate for your Tub Repair today!
