Your Bathtub Doesn’t Need to Be Replaced — It Needs to Be Resurfaced
Following a DIY bathtub resurfacing tutorial can save you thousands of dollars compared to a full tub replacement — and the process is more straightforward than most people expect.
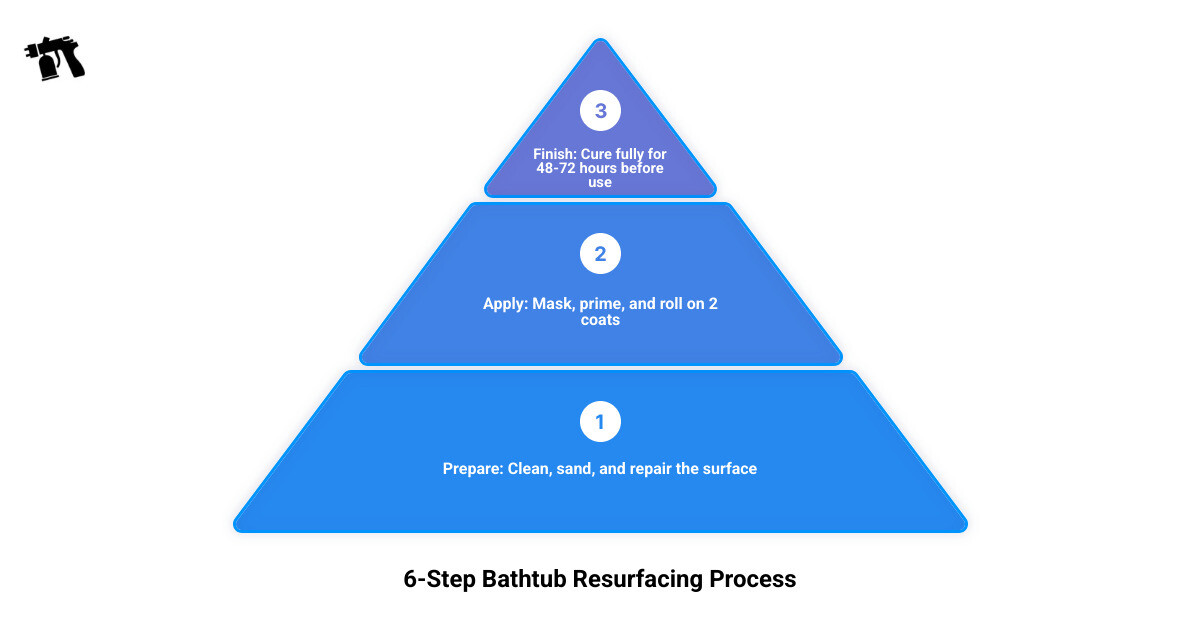
Here’s a quick overview of how to resurface a bathtub yourself:
- Remove hardware, old caulk, and any failing finish
- Clean, degrease, and sand the surface for adhesion
- Repair chips, cracks, and pitted areas
- Mask the bathroom and set up ventilation
- Apply primer and two coats of epoxy or resin coating
- Let the finish cure fully before use (48–72 hours)
Bathtub replacement costs anywhere from $4,100 to $10,600 on average. A DIY resurfacing project, by contrast, typically costs $50 to $200 in supplies — and a properly applied finish can last 5 to 10 years with the right care.
This guide is for property owners with a structurally sound tub that has surface-level problems: stains, dullness, chips, or an outdated color. If your tub has leaks, rust-through, or deep cracks, resurfacing won’t fix that. But if it’s cosmetically worn, resurfacing is one of the smartest upgrades you can make.
One important note before you start: the fumes from refinishing products are strong. Proper ventilation and a respirator aren’t optional — they’re essential. Florida’s humidity can also affect drying times, so timing your project matters.
I’m Frank Hernandez, President of All Surface Refinishing, and I’ve been refinishing bathtubs and surfaces across South Florida since 1996 — so I know exactly where DIY projects succeed and where they go wrong. Whether you’re tackling this yourself or want to know what a professional approach looks like, this DIY bathtub resurfacing tutorial will walk you through every step with the same attention to detail we bring to every job.
Is Bathtub Resurfacing Worth It Before You Start?
In most bathrooms, yes, bathtub resurfacing is absolutely worth it if the tub is still solid and the problem is cosmetic.
People use the terms bathtub refinishing, reglazing, and resurfacing almost interchangeably. In everyday use, that is fine. The small technical difference is this:
- Refinishing usually means the whole project from prep to final cure
- Reglazing often refers specifically to the new coating layer
- Resurfacing is another general term for restoring the tub surface
So, is refinishing better than replacing? Usually, if your bathtub has:
- Stains that will not scrub out
- A dull or rough finish
- Light scratches
- Minor chips
- An outdated color
- A worn factory surface
It is usually not the best choice if the tub has structural problems. A shiny coating cannot solve a leaking drain shoe, rusted-through metal, or a soft fiberglass base. Sadly, epoxy is talented, but not that talented.
| Option | Typical Cost | Typical Lifespan | Best For |
|---|---|---|---|
| DIY resurfacing | $50-$200 | 4-10 years | Budget bathroom refresh, handy homeowners |
| Professional refinishing | $330-$630 | Often longer than DIY | Better finish quality, less risk, less downtime |
| Full bathtub replacement | $4,100-$10,600 | Long-term replacement | Major damage, plumbing issues, remodels |
If you want a deeper breakdown of whether the project makes sense for your bathroom, here is more info about bathtub services.
When a Tub Is a Good Candidate for This DIY Bathtub Resurfacing Tutorial
A tub is a strong DIY candidate when the surface looks bad but the body of the tub is still sound.
Good candidates include:
- Porcelain tubs with stains, small chips, or worn gloss
- Cast iron tubs with dull enamel or cosmetic wear
- Steel tubs with light surface damage
- Fiberglass tubs with discoloration or minor scratches
- Acrylic tubs with surface-level wear
DIY resurfacing also makes sense when:
- You want to avoid demolition
- You need a budget-friendly bathroom upgrade
- You want to preserve an older or heavy bathtub
- You are updating color without replacing the whole tub
That last point matters a lot with older cast iron bathtubs in South Florida homes. These tubs can be extremely heavy, and removal can turn into a much bigger bathroom project than expected.
When You Should Replace Instead of Refinish
Skip this tutorial and consider replacement if you have:
- Active leaks
- Soft spots or flexing in the tub floor
- Deep structural cracks
- Rust-through or holes
- Ongoing mold caused by moisture behind walls
- Major plumbing damage
- Multiple old coatings that are peeling badly
Also be careful with tubs that have been painted before. One previous successful refinishing job does not automatically rule out another, but every added layer increases the risk of unevenness and adhesion problems.
DIY vs Pro Cost Breakdown
Here is the short version:
- DIY supplies usually cost about $50 to $200
- Professional bathtub refinishing often costs about $330 to $630
- Bathtub replacement averages $4,100 to $10,600
Professional refinishing is still much cheaper than replacement, but DIY is the lowest upfront cost. The tradeoff is time, labor, smell, and risk. A professional job is often smoother and more durable. A DIY job can still hold up well when prep is done carefully and the tub is maintained properly.
Tools, Supplies, and Safety Gear for a DIY Bathtub Resurfacing Tutorial
Before you open the kit, gather everything. Running to the store halfway through your coating window is a terrible hobby.

Basic tools and materials:
- Bathtub refinishing kit with epoxy or resin coating
- Primer, if your system requires it
- Foam roller or short-nap roller
- Foam brush for corners and edges
- Paint tray
- Painter’s tape
- Plastic sheeting
- Drop cloths
- Putty knife
- Razor scraper
- Caulk remover
- Sandpaper in 120-, 400-, and 600-grit ranges as needed
- Abrasive pads
- Epoxy putty or polyester filler for chips
- Cleaner or degreaser
- Tack cloth or lint-free rags
- Non-silicone caulk for re-caulking after cure
A few helpful related reads:
Safety Equipment You Should Not Skip
This is the non-negotiable category.
Use:
- Organic vapor respirator, not a simple dust mask
- Nitrile gloves
- Safety goggles
- Long sleeves and old clothes
- Ventilation fan
- Open windows if possible
Keep children, pets, and anyone sensitive to fumes out of the area until the product has fully dried and the smell has cleared.
For enclosed bathrooms, create negative pressure if possible by exhausting air out of the room. In plain English: set up the fan so fumes leave the bathroom instead of drifting into the rest of the house.
Prep Supplies That Prevent Peeling Later
The supplies that matter most are often the boring prep items:
- Degreaser
- Abrasive cleanser
- Bleach-based cleaner for mildew staining, used carefully and rinsed fully
- Solvent wipe recommended by your kit
- Drain removal tools if needed
- Extra masking supplies
- Extra roller covers or foam brushes
Two expert tips matter a lot in Florida:
- Choose a lower-humidity day if you can
- Plan for longer curing time in humid coastal areas like Miami Beach, Fort Lauderdale, Boca Raton, West Palm Beach, and the Keys
Warm weather helps, but high humidity can slow drying. Good airflow is your friend.
DIY Bathtub Resurfacing Tutorial: How to Prepare the Tub the Right Way
If coating is 20% of the job, prep is the other 80%. Most failures happen here, not during painting.

Step 1: Remove Hardware, Old Caulk, and Any Failing Finish
Start by removing what you can:
- Overflow plate
- Drain trim if possible
- Soap dishes or accessories that interfere with coating lines
Next, remove all old caulk. Use a razor blade, putty knife, or caulk removal tool. This is especially important around the tub-to-tile joint.
Why this matters:
- Coating does not bond well to silicone residue
- Old caulk traps dirt and moisture
- Edge adhesion often fails first
If there is any peeling old paint or failed coating, scrape and sand it off thoroughly. Do not coat over loose material and hope for the best. Hope is not a bonding agent.
Step 2: Clean, Degrease, and Sand for Adhesion
Your tub must be surgically clean. Not “looks fine.” Clean.
Do this in stages:
- Scrub with an abrasive cleanser to remove soap scum and mineral buildup.
- Rinse thoroughly.
- Degrease the surface using the cleaner or solvent recommended by your kit.
- Sand or etch according to the tub material and product instructions.
- Rinse again if required.
- Let the tub dry completely.
A useful check some refinishers use is the squeak test. When a clean wet finger or cloth drags across the surface and squeaks, that usually means soap residue is gone.
For sanding:
- Use coarser grit like 120 only where the instructions allow or where repairs need blending
- Use 400- to 600-grit wet/dry sandpaper for general scuffing on many kits
- If your kit includes etching powder, follow that step exactly and rinse well
Do not mix random cleaners together. Clean thoroughly, rinse between products, and dry the tub fully before moving on.
Step 3: Repair Chips, Cracks, and Pitted Areas
Now fix surface defects so they do not show through the new finish.
Use:
- Epoxy putty for small chips
- Polyester filler for pitted or damaged areas if your system allows it
Focus on:
- Chips on the rim
- Wear around the drain
- Pitted spots in old porcelain
- Small non-structural cracks in appropriate materials
After the filler cures:
- Sand it flush
- Feather the edges so the repair disappears into the surrounding surface
- Wipe away all dust
If a crack goes deep, flexes, or looks structural, stop. That is replacement territory.
Step 4: Mask the Bathroom and Set Up Ventilation
Before mixing any coating, protect everything nearby:
- Tape off tile edges
- Cover faucets and handles
- Protect floors with drop cloths
- Hang plastic on walls, vanity edges, and nearby bathroom surfaces
Ventilation setup:
- Open windows if available
- Turn on the bathroom exhaust fan
- Use an additional fan to push fumes outside
- Keep the bathroom door mostly closed to control odor spread
- Make sure there is no open flame nearby
If you want an outside visual reference for prep steps, this Beginner’s Guide to Bathtub Refinishing: 9 Simple Steps is helpful. We also cover more prep details in The Ultimate DIY Bathtub Reglazing Guide From Worn-Out to Wow.
DIY Bathtub Resurfacing Tutorial: Apply the Coating in 6 Simple Steps
Once prep is done, work steadily. Most tub coatings have a limited pot life after mixing.
Step 1: Read the Kit Directions and Mix Only What You Can Use
Every coating system is a little different. Read the full instructions before opening Part A or Part B.
Pay attention to:
- Mixing ratio
- Mixing time
- Induction time, if required
- Pot life
- Ideal room temperature
Many two-part products only stay usable for 2 to 6 hours after mixing, sometimes less in warm conditions. South Florida heat can shorten working time, so do not mix until the tub is fully prepped and masked.
Step 2: Prime the Tub if Your Coating System Requires It
Some kits are self-priming. Others require a bonding primer first.
If primer is required:
- Use a foam brush around tight edges first
- Apply with a clean roller for flat areas
- Keep the coat thin and even
- Let it flash or dry according to the instructions
Do not substitute ordinary wall primer. Bathtub coatings need products designed for wet, slick surfaces.
Step 3: Cut In Around Edges, Drain, and Corners First
Before rolling large areas, coat the places a roller cannot reach well:
- Corners
- Around the drain opening
- Around the overflow
- Along the tub-to-wall lines
- Under the lip where accessible
Use a foam brush and apply a thin film. Watch for drips. Heavy buildup around metal edges is a common starting point for peeling later.
Step 4: Roll on the First Coat Evenly
Pour the mixed coating into the tray and load the roller lightly.
Apply the first coat using:
- Vertical strokes first
- Then light horizontal passes to even it out
- Slight overlap to maintain a wet edge
Tips for a smoother finish:
- Remove lint from roller covers before starting
- Do not press too hard
- Do not keep re-rolling areas that are already starting to tack
- Work methodically from one end of the tub to the other
Most quality coatings self-level to some extent, so your job is to apply a thin, even layer and then leave it alone.
Step 5: Apply the Second Coat and Touch Up Light Spots
After waiting the time recommended by the manufacturer, apply the second coat.
This coat improves:
- Color consistency
- Gloss
- Scratch resistance
- Overall durability
If the first coat still looks patchy, a third light coat may be appropriate if the product instructions allow it. Thin coats are better than one thick coat. Thick coats are how you get runs, sags, and regret.
Step 6: Let It Cure Fully Before Water, Caulk, or Use
This part is where many DIY jobs get ruined.
Typical timing:
- Application time: about 3 to 5 hours
- Light dry time: varies by product
- No water use: usually 24 to 72 hours
- Better cure target: 48 hours minimum
- Often safest in Florida humidity: 2 to 3 days
Do not reinstall hardware or apply fresh caulk until the coating has cured enough for the manufacturer to allow it. When you do recaulk, use a non-silicone product if recommended for refinished surfaces.
Here is a useful outside video walkthrough: DIY Tub and Shower Refinishing for Under $100 – Full Instructional
Drying and curing milestones:
- 0-6 hours: coating is fresh and vulnerable to dust, drips, and bugs
- 6-24 hours: surface may look dry but is not ready for use
- 24-48 hours: some kits approach light cure, but caution is still wise
- 48-72 hours: safer window for recaulk, reinstall, and normal bathroom use
- After full cure: begin gentle cleaning only
Common Mistakes to Avoid and How to Make the Finish Last
A nice-looking tub can fail early if one or two key details are missed.
Top DIY Mistakes That Ruin Adhesion
The biggest troublemakers are:
- Silicone contamination from old caulk
- Trapped moisture around the drain or seams
- Incomplete cleaning
- Skipped sanding or weak scuffing
- Poor ventilation
- Applying coating too thick
- Working in very humid conditions
- Using the tub too soon
- Coating over peeling old finish
Other common issues include fish eyes, bubbles, runs, and dust nibs. Most of these trace back to prep, dirty surfaces, or overworking the coating.
How Long a DIY Refinished Bathtub Lasts
A DIY refinished bathtub can last:
- Around 4 or more years in busy family use in some real-world cases
- About 5 to 10 years when the prep, product, and maintenance are all solid
Professional results often last longer, but a careful DIY job can still give excellent value. Lifespan depends on:
- Surface preparation quality
- Tub material
- Product type
- Number of coats
- Cure time
- Cleaning habits
- How heavily the tub is used
Can you refinish the same tub more than once? Yes, sometimes. But results become less predictable with each additional coating layer, especially if earlier finishes are failing.
Best Cleaning and Maintenance for a Refinished Tub
To help the finish last as long as possible:
- Clean with a non-abrasive cleaner
- Use mild dish soap or a gentle liquid bathroom cleaner
- Wipe with a soft sponge or microfiber cloth
- Rinse after use
- Wipe dry when possible
- Keep caulk joints in good condition
Avoid:
- Steel wool
- Magic-eraser-style aggressive scrubbing
- Powdered abrasive cleaners
- Harsh bleach soaking
- Drain chemicals sitting on the finish
- Suction-cup bath mats
- Dropping heavy bottles or tools into the tub
For more upkeep tips, see 5 DIY bathtub renewal hacks.
Frequently Asked Questions About DIY Bathtub Resurfacing Tutorial
What is the difference between bathtub reglazing, refinishing, and resurfacing?
In most homeowner conversations, they mean nearly the same thing.
- Refinishing = the full restoration process
- Reglazing = often the topcoat or coating stage
- Resurfacing = another broad term for renewing the tub surface
If you are searching online, all three terms may be used for the same service or tutorial.
How long does the refinishing process take and when can the tub be used again?
Most DIY jobs take about:
- 3 to 5 hours of active work
- 1 to 3 days total including curing
You should usually wait 24 to 72 hours before using the tub again. In humid Florida bathrooms, a full 48 to 72 hours is the safer target.
Can you resurface a bathtub that has already been refinished once?
Sometimes, yes, but only if the old finish is sound. If the previous coating is peeling, bubbling, or flaking, it needs to be removed first. Applying a fresh layer over a failing one usually leads to another failure.
If the tub has already been refinished multiple times, adhesion becomes less reliable and replacement may make more sense.
Conclusion
A good DIY bathtub resurfacing tutorial can save you serious money, give your bathroom a cleaner look, and buy years of extra life from a tub that is still structurally sound.
The main lesson is simple: prep matters more than people think. If you remove the old caulk, clean thoroughly, sand correctly, repair damage, ventilate well, and let the finish cure fully, your results can be surprisingly good. If you rush any of those steps, the tub will let you know.
DIY resurfacing is ideal for cosmetic problems, tight budgets, rental updates, and bathroom refreshes. But if your bathtub has leaks, deep cracks, rust-through, or repeated coating failures, professional help or replacement is the smarter path.
At All Surface Refinishing, we have completed more than 14,000 resurfacing projects across South and Southwest Florida over the past 30+ years. If you decide you would rather skip the fumes, sanding, and bathtub yoga, we are here to help.
For the next step, here is more info about bathtub services.
