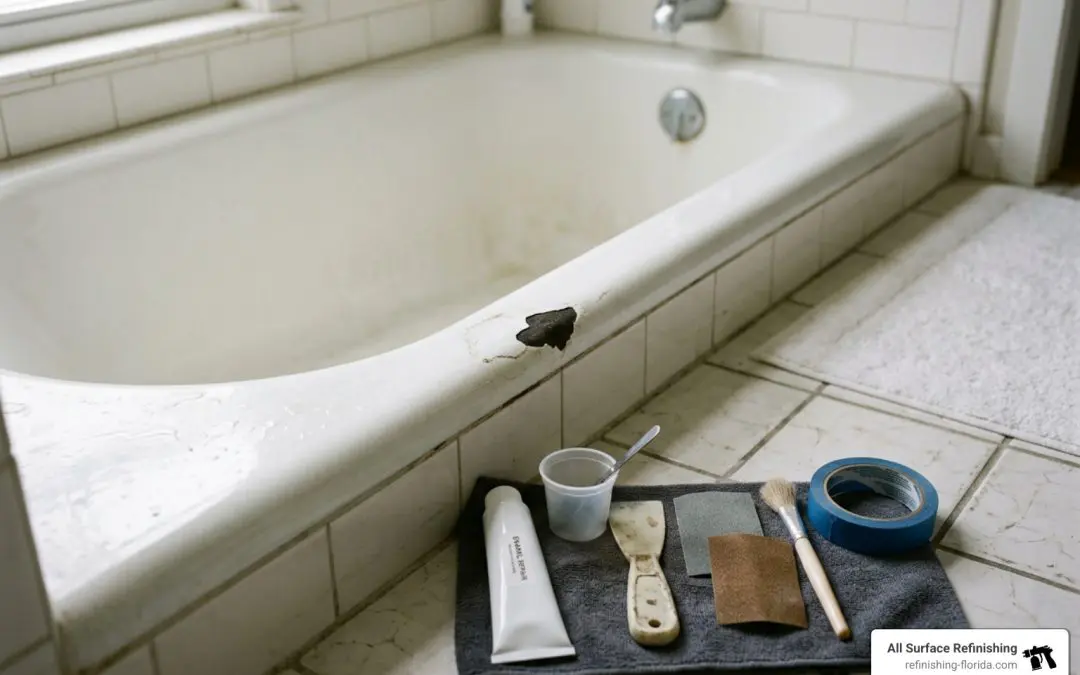
A Chipped Tub Doesn’t Have to Ruin Your Bathroom
Repairing bathtub enamel is something most homeowners can tackle on a budget — without ripping out the whole tub.
Here’s the short answer if you just need the basics:
- Clean the damaged area thoroughly (remove all soap scum, oils, and loose enamel).
- Sand the edges of the chip lightly to create a surface the repair compound can grip.
- Apply a two-part epoxy filler or porcelain repair kit in thin layers.
- Let it cure — most DIY kits need 24 to 72 hours before water exposure.
- Seal with a clear topcoat to protect the repair.
For small chips and scratches, a DIY repair kit costing $30–$200 can do the job. For larger damage, peeling, or rust, professional refinishing ($330–$630) is the smarter move — and still far cheaper than a full replacement, which averages $6,000.
A chip in your tub is frustrating. But it’s almost never a reason to replace the whole thing. Most enamel damage — chips, small cracks, surface rust — is fixable. The key is knowing how bad the damage really is and choosing the right approach before you spend a dime.
I’m Frank Hernandez, President of All Surface Refinishing, and I’ve been repairing bathtub enamel and restoring bathroom surfaces across South Florida since 2011. In this guide, I’ll walk you through exactly what to do — step by step — so you get a clean, durable result without overspending.
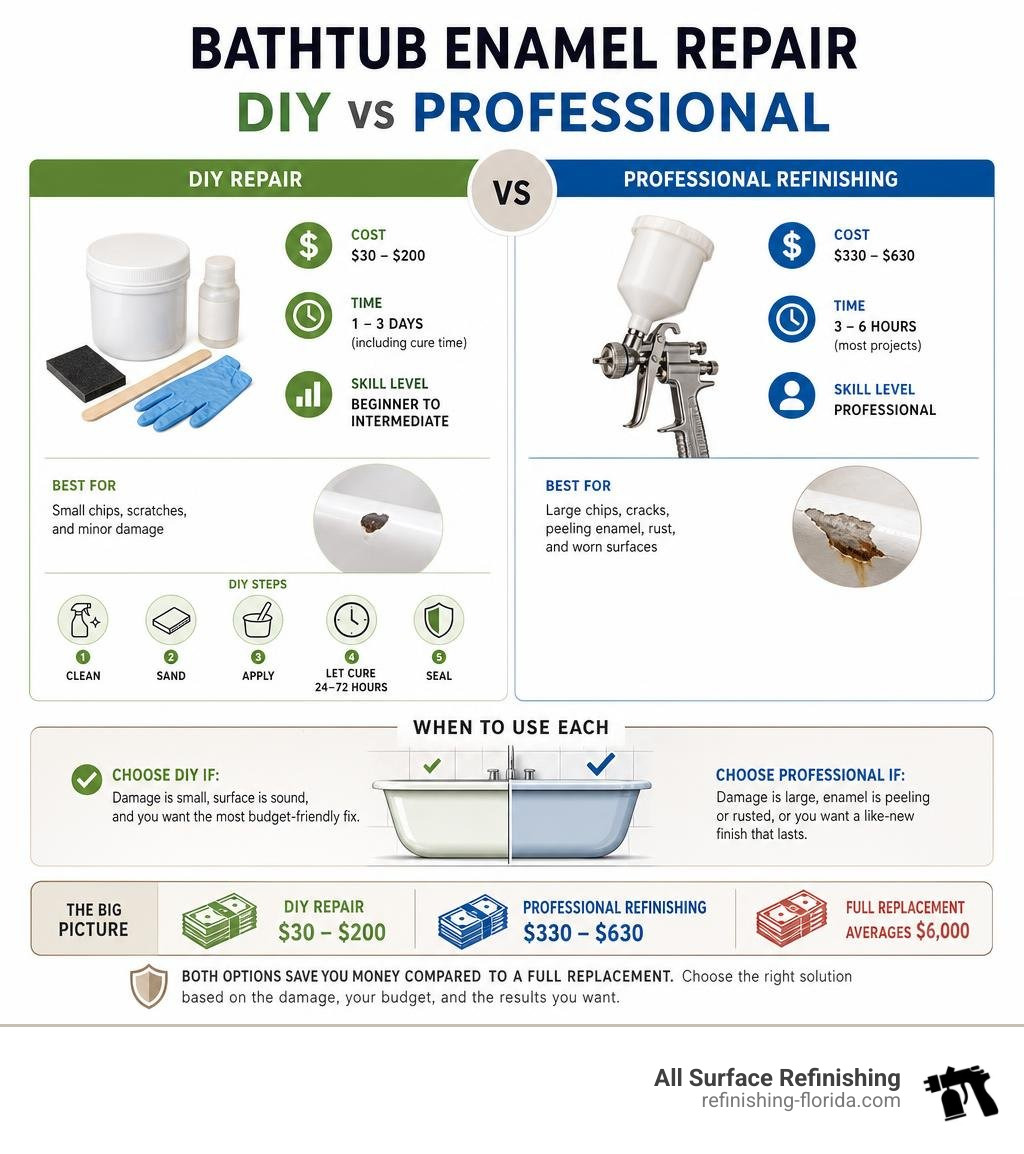
Quick repairing bathtub enamel definitions:
Assessing the Damage: Is Repairing Bathtub Enamel the Right Choice?
Before we run to the hardware store or mix any chemical compounds, we need to carefully evaluate the state of our bathtub. Not all damage is created equal, and trying a quick cosmetic fix on a structural problem will only lead to frustration, wasted money, and potential water damage later.
To help you navigate this process, we recommend checking out our Bathtub Repair Complete Guide to understand the full scope of what can be saved.
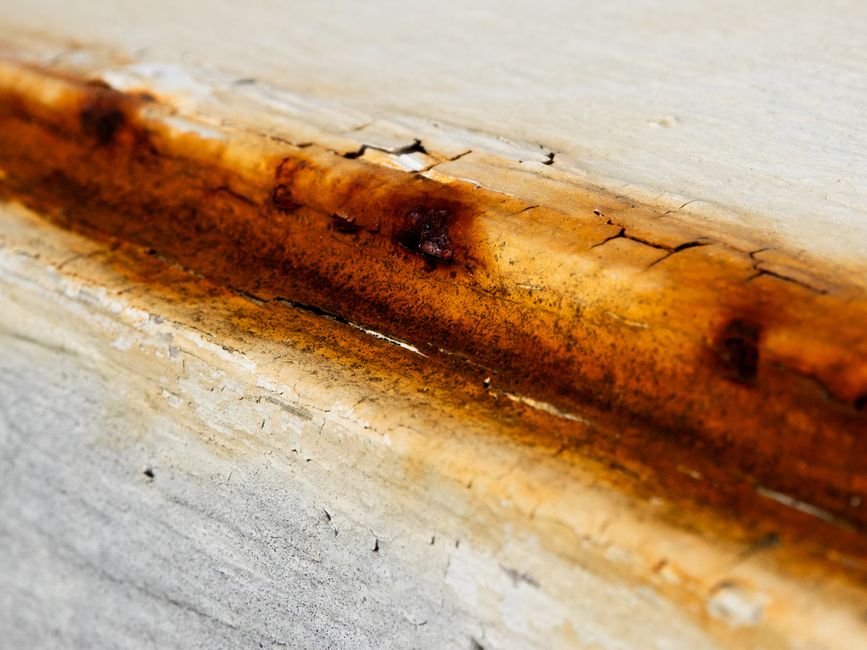
When we look at a damaged tub, we generally see four levels of issues:
- Cosmetic Chips: Small, localized areas where the top enamel layer has flaked off, but the underlying metal or cast iron is still structurally intact. These are perfect candidates for a quick budget repair.
- Hairline Cracks: Tiny, web-like fractures in the glaze. While they look minor, they can act as pathways for water to seep beneath the surface, leading to rust.
- Peeling or Bubbling: If your tub was previously painted or refinished with a low-grade DIY product, you might notice the coating curling back. If you are dealing with this, our guide on Bathtub Coating Peeling Off Quick Fixes Long Term Solutions offers deeper insights into stripping and re-coating.
- Exposed Metal and Rust: When moisture hits raw steel or cast iron beneath chipped porcelain, rust forms. This requires immediate rust conversion treatment before any enamel repair can succeed.
For a detailed walkthrough on diagnosing your tub, you can also consult the Easy How to Fix Enamel Bathtub: Repair Guide.
Common Causes of Bathtub Enamel Damage
Understanding why your tub chipped in the first place is the best way to prevent it from happening again. In our 30+ years of experience restoring bathrooms across South Florida, we have found that most enamel damage stems from a few usual suspects:
- Dropped Objects: Heavy shampoo bottles, metal shower caddies, or dropped hand tools during a light bathroom upgrade are the number one cause of sudden, deep chips.
- Abrasive Cleaners: Bleach, harsh scouring powders, and steel wool wear down the protective glossy glaze over time, making the enamel thin, porous, and highly susceptible to cracking.
- Chemical Wear: Acidic cleaners or strong hair dyes can chemically degrade the enamel matrix.
- Thermal Shock: Rapidly switching from freezing cold water to scalding hot water causes the metal base and the glass-like enamel layer to expand and contract at different rates, leading to micro-cracks.
- Age: Over decades of daily use, the bond between the enamel and the cast iron or steel naturally weakens.
DIY Spot Repair vs. Professional Bathtub Refinishing
If you have a couple of small chips from a dropped perfume bottle, a DIY spot repair kit is incredibly cost-effective. However, if your tub has extensive staining, spiderweb cracks, or peeling paint across the bottom, spot repairs will end up looking like a messy mosaic.
Let’s look at how DIY spot repairs stack up against professional reglazing:
| Feature | DIY Spot Repair Kit | Professional Bathtub Refinishing | Full Bathtub Replacement |
|---|---|---|---|
| Average Cost | $30 – $200 | $330 – $630 | $1,565 – $10,420 (Avg: $6,000) |
| Time Investment | 2 – 4 hours of work | 1 – 2 days (4–6 hours labor) | 3 – 7 days of construction |
| Expected Lifespan | 1 – 3 years | 10 – 15 years | 20+ years |
| Aesthetic Result | Visible “patch” lines | Seamless, factory-like shine | Brand new fixture |
| Best For | Isolated, minor chips | Worn, stained, or peeling tubs | Structural failures or remodels |
As you can see, choosing professional refinishing is highly cost-effective compared to the massive headache and expense of a full bathroom demolition. For a deeper breakdown of these financial trade-offs, check out our guide on Bathtub Refinishing Cost 101.
Essential Tools and Materials for DIY Tub Restoration
If you decide to tackle a minor chip repair yourself, gathering the right supplies beforehand is half the battle. Trying to hunt down a specific sandpaper grit while your epoxy is rapidly hardening is a recipe for disaster.
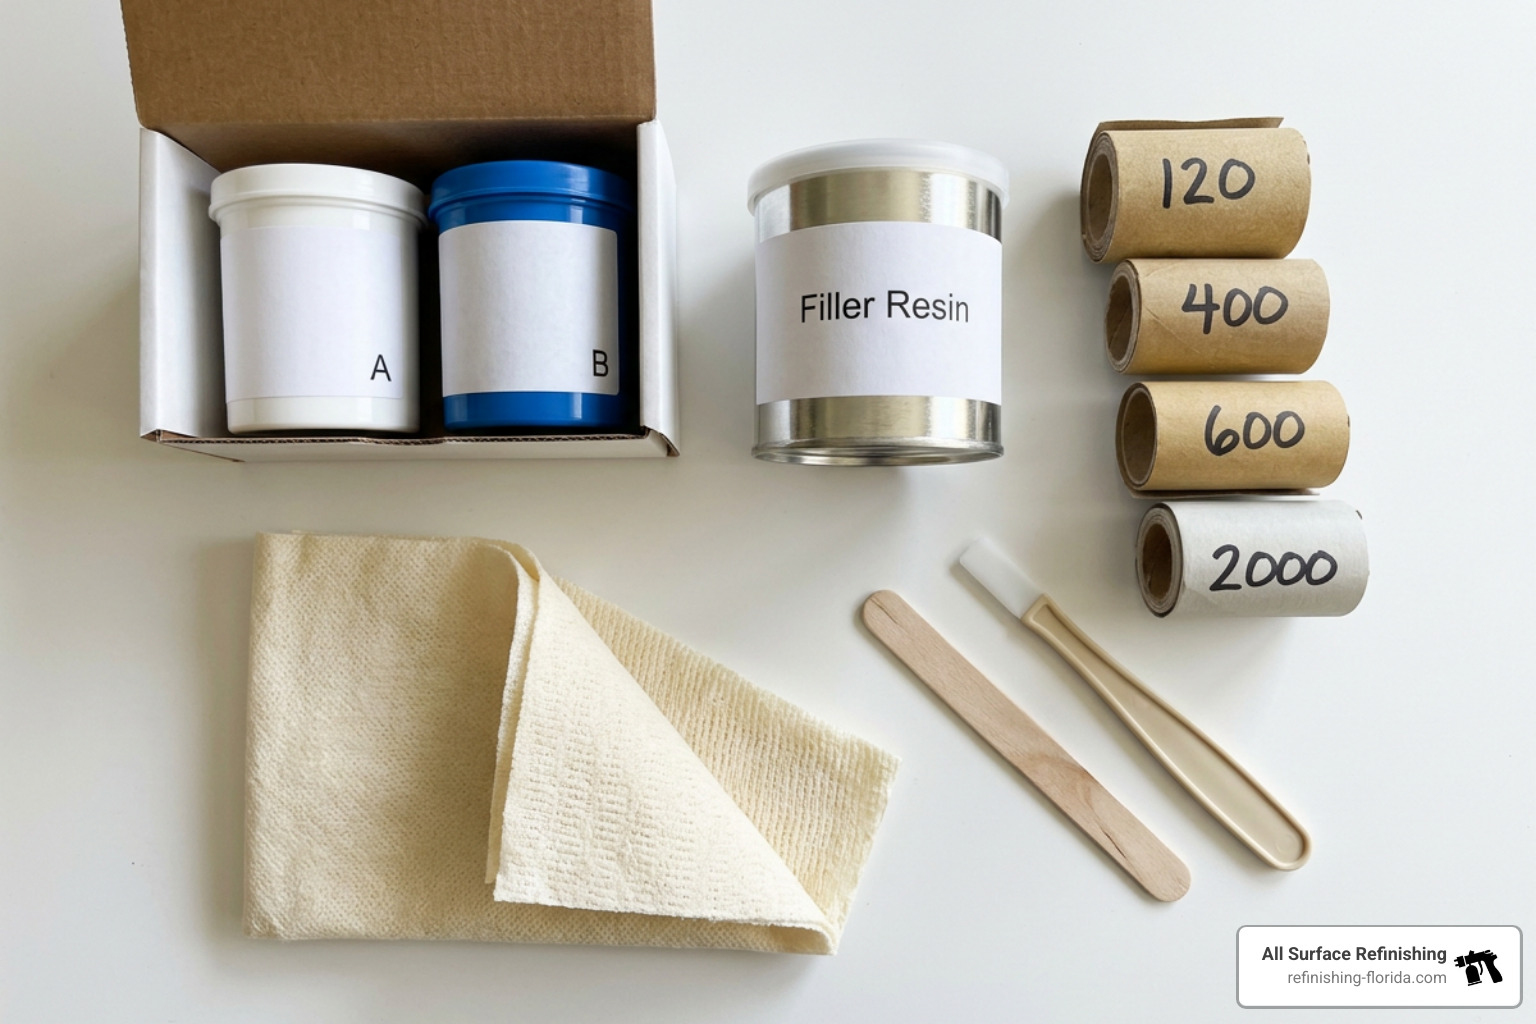
Here is your master shopping list for a successful DIY repair:
- Two-Part Epoxy Putty or Resin: The structural core of your repair.
- Polyester Resin Filler: Excellent for deep gouges because it shrinks very little as it cures.
- Wet/Dry Sandpaper: You will need a progressive range of grits, specifically 120-grit (for rough shaping), 400-grit, 600-grit, and 2000-grit to 3000-grit (for ultra-smooth blending).
- Tack Cloth: A sticky microfiber cloth designed to pick up microscopic sanding dust without leaving lint behind.
- Applicator Brush or Precision Spatula: For laying down the repair compound smoothly.
- Masking Tape & Drop Cloths: To protect the surrounding tub and tile surfaces.
- Isopropyl Alcohol or Acetone: For final surface degreasing.
Choosing the Right Kit for Repairing Bathtub Enamel
When shopping for products, you must ensure the repair compound is chemically compatible with your tub’s material. A kit designed for acrylic or fiberglass will not bond correctly to a heavy cast iron or enameled steel surface.
For porcelain or enameled steel tubs, we highly recommend a two-part epoxy or waterproof polyester resin system. These materials undergo a chemical cross-linking process during curing, which creates a far harder and more water-resistant barrier than simple one-part paints.
A great budget-friendly starting point is a specialized Tub Repair Kit White, Tub Chip and Bathtub … , which provides the essential resin and hardener needed for small touch-ups.
Tip on Color Matching: “White” isn’t just white. Bathtub manufacturers have used dozens of shades over the decades, from bright white to biscuit, almond, and bone. Look for a kit that offers tinting agents or multiple color swatches so you don’t end up with a glaringly obvious bright white spot on an off-white tub.
Safety Gear and Ventilation Requirements
We cannot stress this enough: safety must come first. The chemical compounds used in epoxy resins and enamel fillers release volatile organic compounds (VOCs) that can cause headaches, dizziness, and lung irritation in enclosed spaces.
Furthermore, historical data highlights the extreme dangers of industrial-strength refinishing chemicals. According to OSHA and health databases, at least 14 worker deaths since 2000 have been directly linked to overexposure to methylene chloride (a chemical stripping agent often found in low-end DIY paint removers) in poorly ventilated bathrooms. While you likely won’t be using methylene chloride for a minor chip repair, it underscores how dangerous bathroom chemical fumes can be.
Always equip yourself with the following safety gear:
- A NIOSH-approved respirator mask rated for organic vapors (standard dust masks will not stop chemical fumes).
- Heavy-duty chemical-resistant nitrile gloves.
- Safety goggles to protect your eyes from sanding dust and chemical splashes.
- A high-powered exhaust fan placed in the bathroom window to actively pull fumes out of the home.
The DIY Restoration Process: Step-by-Step
Once you have your safety gear on and your tools laid out, it’s time to begin the actual repair process.
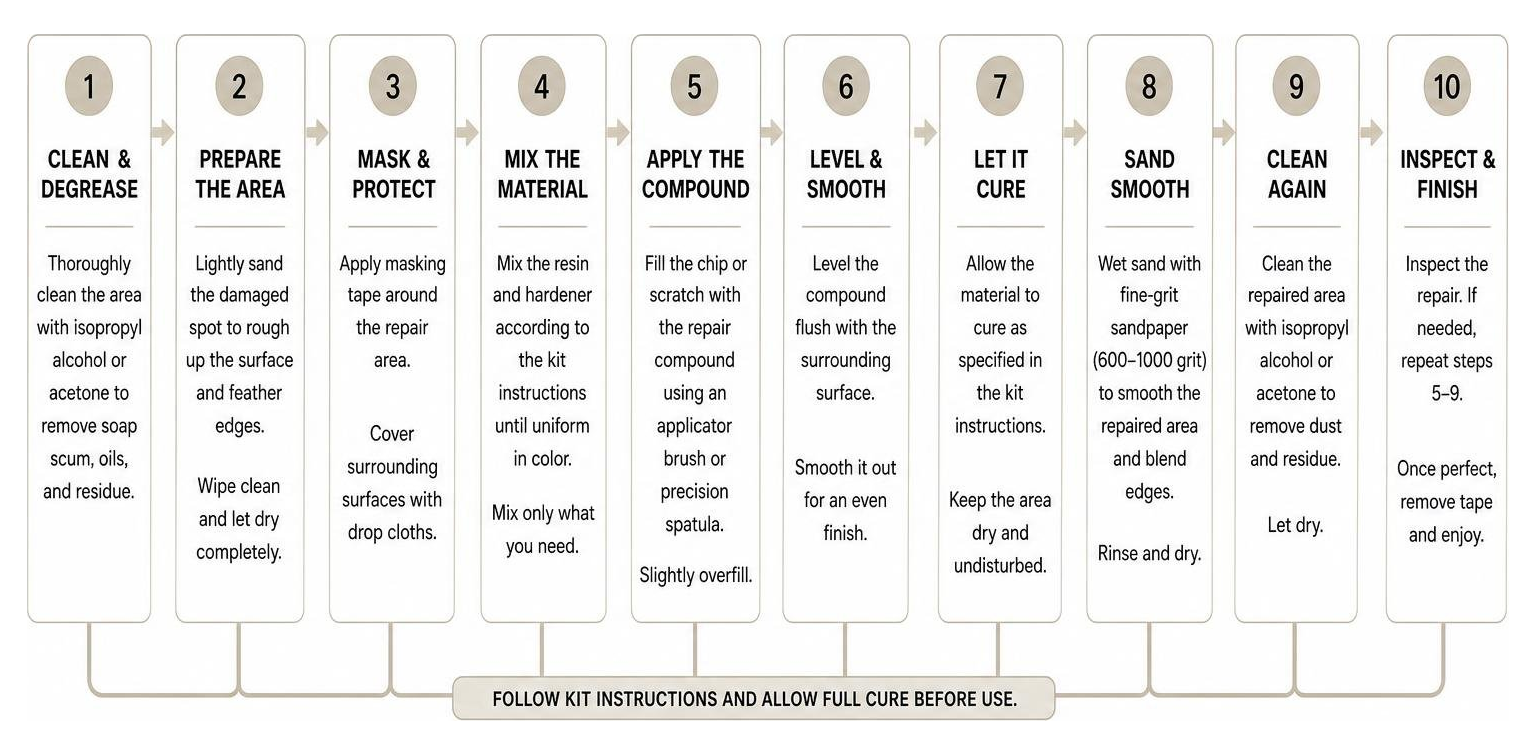
To ensure a flawless bond that won’t peel away the first time you take a warm bath, follow our detailed guide on How to Restore Bathtub Surface the Right Way.
Preparing the Damaged Surface
The absolute number one cause of DIY repair failure is poor surface preparation. If there is even a microscopic trace of soap scum, body oil, or moisture trapped under your repair compound, the epoxy will peel off within weeks.
- Deep Clean: Scrub the entire area around the chip using a heavy-duty, non-abrasive degreaser or a vinegar and water solution. Rinse thoroughly and let it dry completely.
- Remove Loose Enamel: Use a utility knife or a razor blade to gently scrape away any loose, flaking, or bubbling enamel around the edges of the chip.
- Treat Rust: If you see exposed metal or dark rust spots, you must address them immediately. Sand the rust down to bare metal and apply a rust converter. For a deeper look at tackling rust, read our guide on Patching Rusty Bathtub Spots From Surface Rust to Pitting.
- Create a Mechanical “Tooth”: Lightly sand the exposed chip and the immediately surrounding enamel with 400-grit wet/dry sandpaper. This creates tiny micro-scratches (a mechanical “tooth”) that allow the epoxy to physically lock onto the slick porcelain.
- Final Wipe: Clean the area with isopropyl alcohol or acetone to remove any remaining sanding dust or skin oils, then wipe dry with a lint-free tack cloth.
Applying the Compound for Repairing Bathtub Enamel
Now that your surface is perfectly clean and dry, we can apply the repair compound.
- Mix the Epoxy: Carefully measure and mix Part A (resin) and Part B (hardener) according to the manufacturer’s exact weight or volume specifications. Mix thoroughly for at least two minutes.
- Apply in Thin Layers: Using a small spatula or the applicator brush provided in your kit, apply the compound to the chip. Do not try to fill a deep chip in one single, thick layer, as this can trap air bubbles and cause uneven curing. Instead, apply multiple thin layers, allowing each to set slightly before applying the next.
- Avoid Overlapping: Try to keep the repair compound strictly within the boundaries of the chip. Overlapping too much onto the surrounding healthy, glossy enamel can cause the edges of the patch to curl and peel over time.
- Level It Out: Leave the final layer slightly higher than the surrounding tub surface. We will sand it down flush once it is completely cured.
Sanding, Sealing, and Curing
Patience is key during this phase. Even if the repair looks dry to the touch, the chemical cross-linking process takes time to reach full structural strength.
- Respect the Curing Window: Keep the bathroom dry and do not use the tub for at least 24 to 72 hours (refer to your specific kit’s instructions). High humidity can delay curing times, so running a dehumidifier or fan is highly recommended.
- Wet Sanding: Once fully cured, wrap 600-grit wet/dry sandpaper around a wooden sanding block. Wet the sandpaper and the tub surface, then gently sand the repaired area in a circular motion until it sits perfectly flush with the surrounding enamel.
- Progressive Grits: Graduate to 2000-grit and finally 3000-grit wet sandpaper to polish away any fine scratches and blend the patch seamlessly into the original glossy finish.
- Apply Sealant: Wipe the area clean and apply a thin coat of specialized enamel sealant or clear topcoat to protect the repair from water penetration and UV yellowing.
Long-Term Maintenance: Protecting Your Restored Tub
Congratulations! Your tub looks incredible, and you saved a bundle. Now, let’s make sure that repair lasts for years to come.
A repaired tub surface is slightly more sensitive than the original factory-baked porcelain enamel. To keep it looking pristine, follow these guidelines:
- Ditch the Abrasives: Never use scouring powders, steel wool, bleach, or highly acidic cleaners on your tub. Instead, clean the surface using a mild dish-soap degreaser (like Dawn) and warm water.
- Say No to Suction Cups: Avoid using rubber bath mats with suction cups. The constant pulling action of the suction cups can easily break the bond of your repaired enamel, causing it to peel. If you are struggling with peeling paint, check out our professional tips on How to Stop Your Painted Bathtub from Peeling for Good.
- Prevent Water Pooling: Ensure your shower head and faucet do not drip. Standing water pooling on a repaired surface will eventually weaken the epoxy bond.
- Regulate Water Temperature: Avoid filling the tub with boiling hot water, as rapid temperature shifts can cause expansion cracks around the patch.
Frequently Asked Questions about Bathtub Repairs
How long does a DIY enamel repair last?
A carefully applied DIY spot repair typically lasts between 1 to 3 years, depending on how often the tub is used and how well it is maintained. Because DIY epoxies are applied by hand and cured at room temperature, they lack the molecular density of original factory-baked enamel or professional-grade chemical coatings. Over time, exposure to warm water and cleaning products will cause the edges of the patch to wear down.
Can I repair a rusted cast iron tub?
Yes, but you must treat the rust first. Applying an enamel repair kit directly over active rust is like painting over a termite-infested piece of wood — the rust will continue to eat away at the metal underneath, eventually bubbling up and ruining your new finish.
You must sand the rust down to bare, shiny metal, apply a chemical rust converter (which turns iron oxide into a stable, paintable compound), and use a high-adhesion metal primer before applying your epoxy filler. For severely rusted or antique fixtures, we highly recommend reading our guide on Cast Iron Bathtub Refinishing to see how we restore these heavy-duty tubs to last another 15 years.
What are the safety hazards of DIY refinishing chemicals?
The primary hazard comes from volatile organic compounds (VOCs) and chemical solvents. Many low-cost retail stripping agents and spray-on epoxy coatings contain toxic chemicals like methylene chloride or heavy solvents. Overexposure in small, unventilated bathrooms can cause severe respiratory distress, dizziness, and central nervous system damage.
Always work with open windows, use active exhaust ventilation, and wear a properly fitted NIOSH-approved respirator mask. If you want to learn more about industry safety standards and chemical handling, you can read the Wikipedia page on Bathtub refinishing.
Conclusion
Repairing bathtub enamel on a budget is entirely achievable for minor cosmetic chips and scratches. With a $30 touch-up kit, a bit of sandpaper, and a healthy dose of patience, you can successfully hide unsightly blemishes and protect your tub from rust.
However, if your bathtub is dealing with extensive spiderweb cracks, major rust pitting, or peeling paint across large areas, a simple DIY spot repair will not provide the smooth, long-lasting finish you deserve. In those cases, professional refinishing is the smartest, most cost-effective path forward.
At All Surface Refinishing, we bring over 30 years of hands-on experience and more than 14,000 completed projects to every bathroom we restore. We serve homeowners across South and Southwest Florida, including Boca Raton, Broward County, Fort Lauderdale, Miami, Palm Beach, and West Palm Beach.
If you are ready to skip the chemical fumes, the endless sanding, and the worry of a mismatched paint job, contact us today to learn more about our professional bathtub refinishing services and get your free consultation!
