Essential Preparation and Supplies for Cabinet Projects
To achieve a smooth, durable finish on kitchen cabinets, follow five core steps: remove all doors, drawer fronts, and hardware; clean surfaces with a heavy-duty degreaser; scuff-sand to profile the finish; apply a high-adhesion bonding primer; and apply two thin coats of urethane-modified enamel. Gathering the proper tools beforehand ensures clean lines and prevents premature peeling.
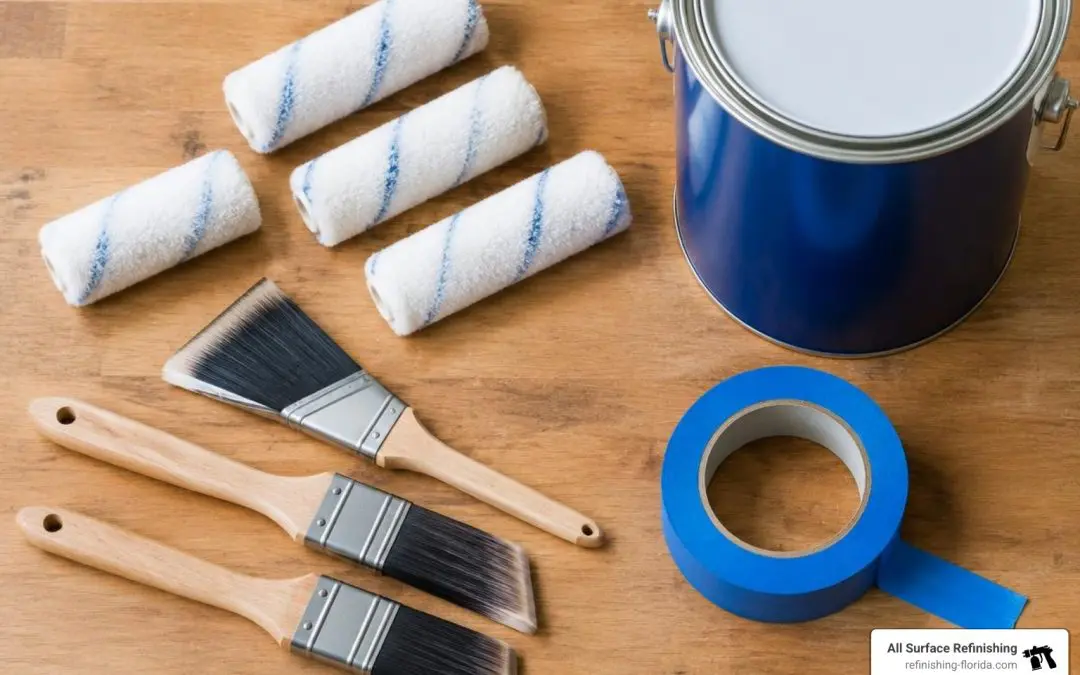
Here is the essential checklist for your project:
- Cordless drill or hand screwdrivers for hardware removal
- Painter’s tape and plastic masking film to protect counters, walls, and flooring
- Heavy-duty degreaser or TSP substitute
- Fine-grit sanding sponges and 220-grit sandpaper
- Tack cloths and microfiber rags
- Wood filler or high-grade spackle for repairing dings
- 2-inch or 2.5-inch nylon-polyester angled sash brushes
- 4-inch mini microfiber or high-density foam rollers (3/8″ or 1/4″ nap)
- Drop cloths to protect your workstation
Learning how to paint kitchen cabinets the right way requires viewing the setup as half the entire job. Taking the time to properly protect your surrounding space ensures clean lines and zero accidental overspray or splatter on your countertops and appliances.
Hardware Removal and Deep Degreasing
Never attempt to paint cabinets while the doors and drawer fronts are still hanging on the frames. Removing everything allows you to lay the surfaces completely flat, preventing paint runs, drips, and pooling around hinges.
As you remove each door and drawer, create an organized numbering system. Place a piece of painter’s tape with a number inside each cabinet box and match it with a corresponding piece of tape on the door or drawer opening. Place hinges, screws, and pulls into labeled plastic bags. If you think a cabinet is just a simple box, you have never experienced the puzzle of trying to rehang twenty slightly different doors with mismatched hinges!
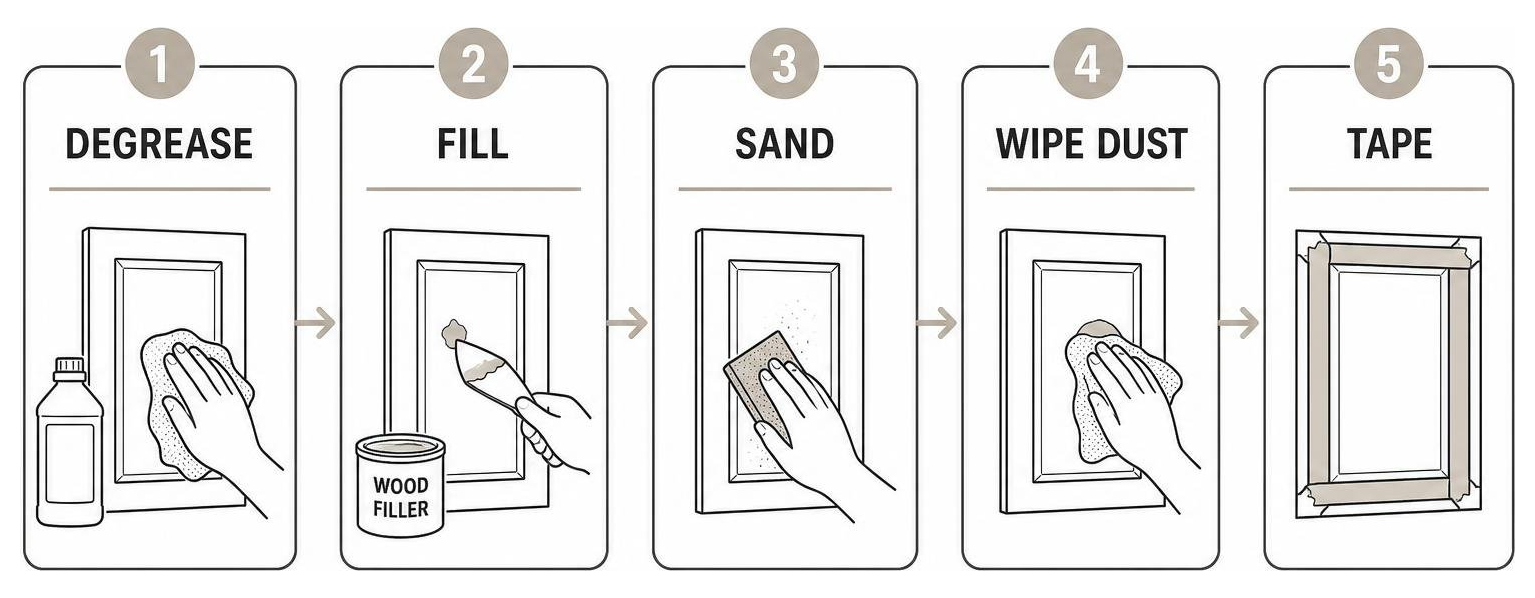
Once disassembled, deep cleaning is mandatory. Kitchen cabinets collect an invisible film of cooking oils, hand grease, and aerosolized residue, especially around stovetops, vent hoods, and high-touch door handles. Clean every square inch thoroughly using a heavy-duty degreasing cleaner or TSP substitute. Rinse the surfaces with a damp cloth to remove any leftover cleaning chemical residue, and allow everything to dry completely before moving to the next stage.
Sanding, Patching, and Surface Profiling
After the grease is gone, inspect your cabinet surfaces for dents, deep scratches, or old screw holes. Fill any imperfections with a quality wood filler, slightly overfilling each spot to account for minor shrinkage as it dries.
Once the filler is hard, use 220-grit sandpaper to sand the patches flush with the wood. Next, perform an overall “scuff sand” across all door fronts, backs, and cabinet face frames. The goal here is not to strip the wood down to bare timber, but to de-gloss the existing clear coat or factory finish. This creates microscopic mechanical grooves—a surface profile—that gives your primer something secure to bite into.
After sanding, vacuum the entire area thoroughly and wipe down all surfaces with a tack cloth or lint-free microfiber rag to lift away every speck of dust.
Choosing the Best Primer, Enamel, and Sheen
Selecting the proper chemistry is critical for kitchen cabinetry. Kitchens undergo rapid temperature shifts, high humidity, steam from dishwashers, and frequent physical impact. For homeowners painting cabinets, Sherwin Williams enamels and high-adhesion primers are widely recognized options for achieving a resilient finish. Product references below are purely for educational and informational purposes, as All Surface Refinishing does not sell paint.
Understanding the differences between basic wall coatings and specialized enamels ensures your hard work doesn’t chip after a few months. For an in-depth breakdown of performance coatings, consult our guide to durable commercial grade cabinet paint. Whether you are painting cabinets Sherwin Williams style with a brush and roller or hiring a professional sprayer, the right primer and enamel combination makes all the difference in long-term durability.
Primer and Product Selection for Painting Cabinets
Never skip the primer. A quality bonding primer acts as the bridge between your existing cabinet material—whether natural oak, maple, MDF, or thermofoil—and your topcoat.
- Bonding Primers: High-adhesion bonding primers are formulated to adhere tenaciously to slick, hard-to-stick surfaces, ensuring maximum adhesion.
- Stain-Blocking Primers: If you are painting over raw wood with open grain (such as oak) or high-tannin woods, a stain-blocking shellac- or oil-based primer prevents wood tannins and previous stains from bleeding through light paint colors.
- Cabinet Enamels: For the topcoat, standard wall paint will not hold up. A water-based urethane-modified acrylic enamel delivers the smooth leveling, hardness, and durability of a traditional oil-based enamel, but with the low VOCs and easy soap-and-water cleanup of a water-based product. Urethane-modified enamels remain the gold standard for high-use cabinet doors.
Sheen Selection and Trending Color Palettes
The sheen you select impacts both aesthetics and maintenance:
- Satin: Provides a subtle, velvety luster that minimizes the appearance of minor surface imperfections while still offering dependable scrubbability. It is currently the most popular choice for modern, transitional, and coastal kitchens.
- Semi-Gloss: Offers a brighter reflection and superior moisture resistance. It makes wiping down pasta sauce and grease splatters effortless, though its higher reflectivity can highlight surface flaws if the prep work wasn’t completely smooth.
- Flat/Matte: Generally avoided on kitchen cabinets because it absorbs oils and cannot withstand repeated scrubbing.
When selecting colors, consider lighting and architectural flow. Bright whites and warm whites deliver an open, timeless feel. Soft neutrals and grays offer subtle depth, while deep navies and coastal greens are favored for contrasting kitchen islands and lower cabinets across South Florida homes.
Master Step-by-Step Guide to Painting Kitchen Cabinets
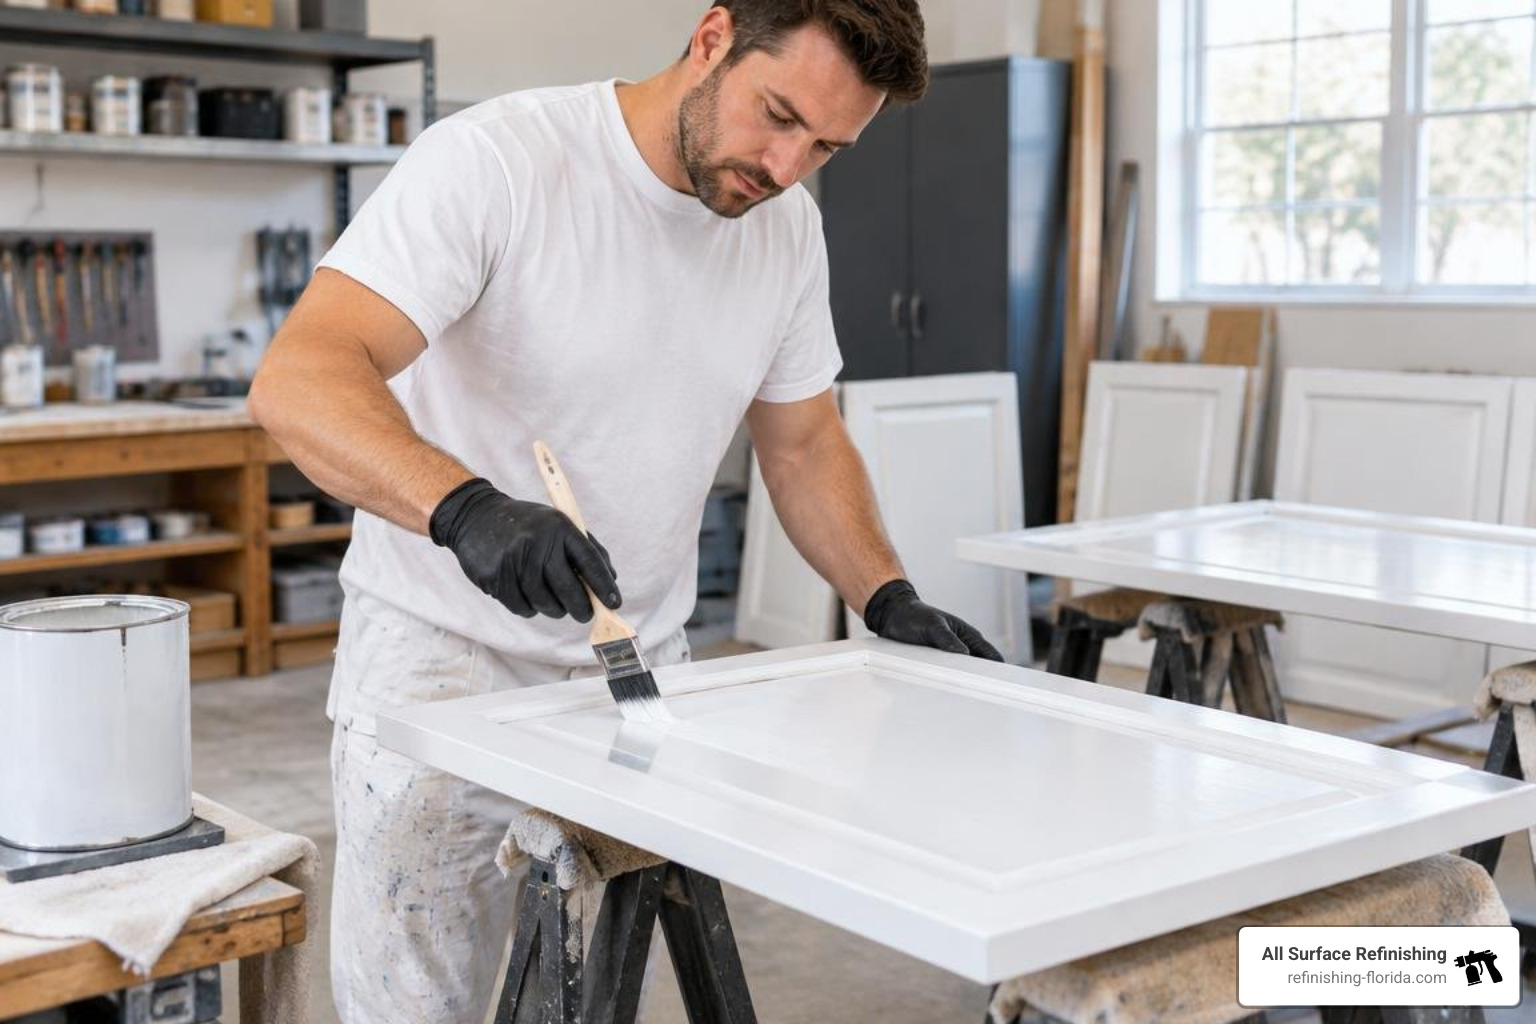
Achieving a smooth, brush-mark-free finish requires careful application technique and strict adherence to recoat windows. Following a structured guide like this step-by-step cabinet painting tutorial ensures you get dependable results.
Spray and Brush Techniques for Painting Kitchen Cabinets
If you have access to professional equipment, utilizing an HVLP (High Volume Low Pressure) or fine-finish airless sprayer provides an ultra-smooth, factory-like result. For an overview of how spray technology achieves seamless coverage, explore our insights on spray painting cabinets for a smooth finish.
If you are using manual tools, you can still achieve a beautiful finish by following these rules:
- Work Flat: Always paint doors and drawer fronts laying flat horizontally on sawhorses or elevated cups. This allows self-leveling enamels to settle flat before drying, eliminating gravity runs.
- Cut In Recesses First: Use a 2-inch premium angled sash brush to coat interior corner profiles, shaker recesses, and raised molding details.
- Roll Flat Panels: Immediately follow your brushwork by rolling the larger flat stiles, rails, and center panels using a 4-inch mini microfiber or high-density foam roller.
- Maintain a Wet Edge: Work quickly across each section, blending rolled edges into brushed details before the paint begins to tack up.
- Apply Thin Coats: Two or three thin coats will always cure harder, look smoother, and resist chipping far better than one thick, heavy coat.
Recoat Windows, Hardware Reinstallation, and Cure Times
Allow your primer coat to dry thoroughly (typically 4 to 24 hours depending on humidity and product instructions). Once dry, give the primer a light scuff with 220-grit sandpaper or a fine sanding sponge to knock down any raised grain or dust nibs, then wipe clean.
Apply your first coat of cabinet enamel and let it dry for at least 4 hours. Lightly sand again between topcoats with ultra-fine abrasive pads to maintain total smoothness. Apply the second topcoat and let the doors dry undisturbed.
Understanding the difference between dry time and cure time is vital:
- Dry time (24–48 hours): The paint is dry to the touch and doors can be carefully moved.
- Assembly time (48–72 hours): You can safely reattach hinges and reinstall doors using your numbered hardware bags. Always install clear silicone bumpers on the back corners of doors to prevent the fresh paint from sticking to the cabinet frames.
- Full cure (21–30 days): While the kitchen can be used gently after a few days, the enamel takes up to a month to reach its full chemical hardness and chip resistance. Avoid aggressive scrubbing or harsh cleaners during this initial month.
Frequently Asked Questions About Kitchen Cabinet Painting
Can I paint kitchen cabinets without sanding first?
While true gloss surfaces should always be scuff-sanded for optimal bonding, you can paint without extensive heavy sanding if you use a high-adhesion specialty bonding primer over thoroughly degreased, clean surfaces. For slick laminate or melamine cabinets, a chemical liquid deglosser paired with a dedicated bonding primer helps achieve reliable adhesion without aggressive machine sanding.
How long should I wait before reinstalling cabinet doors and hardware?
Wait at least 48 hours before reinstalling doors, drawer fronts, and hardware. Even though the paint may feel dry to the touch within 4 hours, the paint film remains soft and susceptible to gouges, fingerprints, and hinge pressure. Handling the pieces carefully and applying protective bumper pads prevents dents during early reassembly.
What is the most durable paint for high-traffic kitchens?
A water-based urethane-modified acrylic enamel provides top-tier durability. It cross-links as it cures to create a hard, impact-resistant finish that mimics traditional oil-based paints while providing superior resistance to yellowing, household chemicals, and frequent scrubbing.
Conclusion
A cabinet painting project can completely revitalize your home, elevating the heart of your house at a fraction of the price of full cabinet replacement. With proper surface decontamination, dedicated bonding primers, and high-performance enamels, you can achieve a finish that stays beautiful for years.
While a DIY approach is a rewarding weekend endeavor, achieving that mirror-smooth, factory-sprayed finish without spending weeks on your knees requires specialized spray equipment and deep technical expertise. If you would prefer to skip the tedious sanding, masking, and drying times, consider checking our cabinet painting cost estimate to see how straightforward a professional upgrade can be.
With over 30 years of experience and more than 14,000 successful transformations completed, our team at All Surface Refinishing delivers durable, high-end results for homeowners throughout Miami, Fort Lauderdale, Boca Raton, West Palm Beach, and surrounding South Florida communities. Explore our expert cabinet refinishing and painting services to get your kitchen project started today.
