Is DIY Cabinet Resurfacing Worth It? Here’s What You Need to Know First
Do it yourself cabinet resurfacing is one of the smartest ways to refresh a tired kitchen or bathroom without spending thousands on full replacement.
Here’s the quick answer if you’re in a hurry:
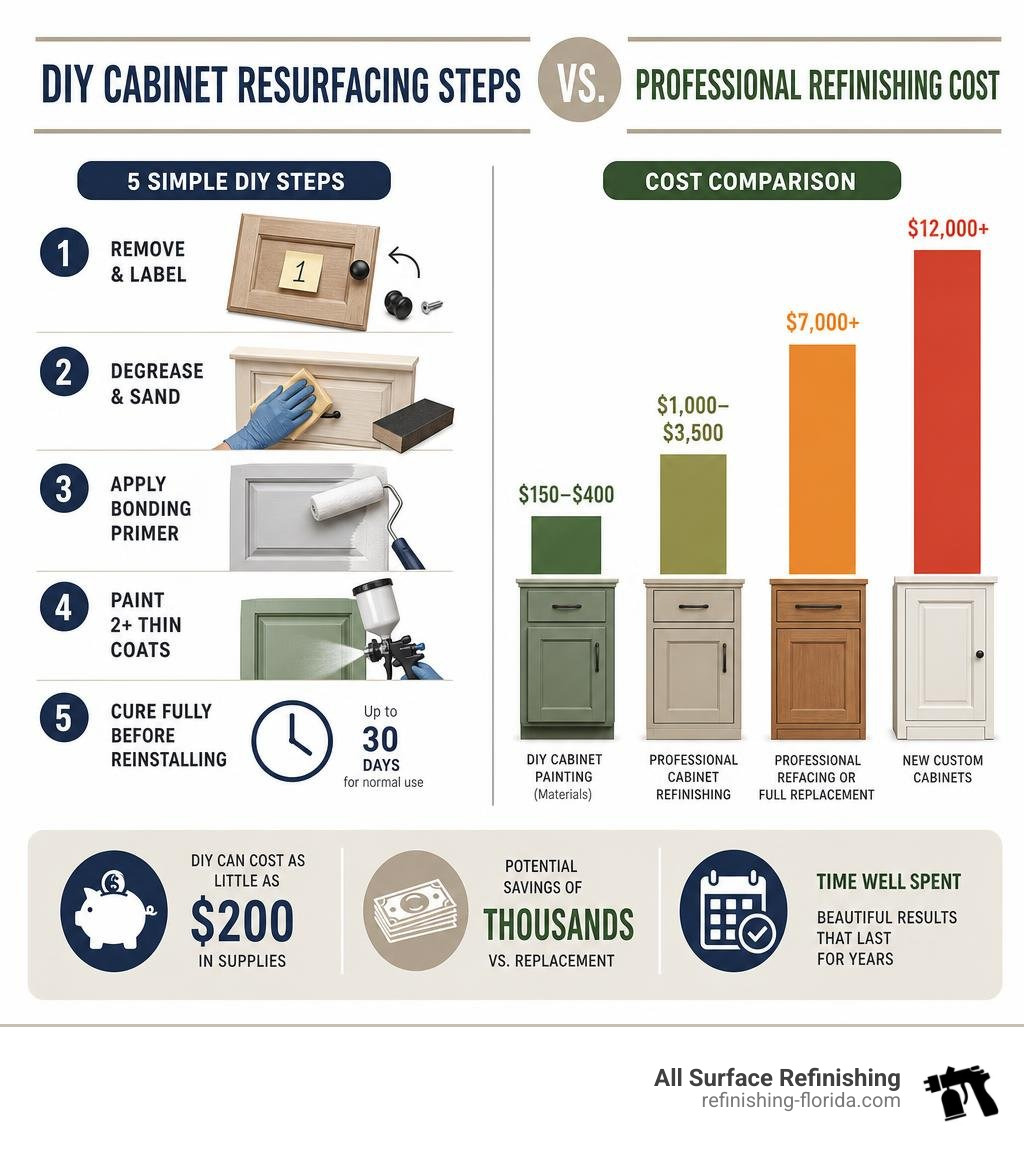
DIY Cabinet Resurfacing at a Glance
| What you want | Best approach |
|---|---|
| Cheapest option, some effort | DIY cabinet painting ($150–$400 in materials) |
| Best DIY finish quality | DIY cabinet refinishing with primer + alkyd paint + HVLP sprayer |
| Factory finish, zero hassle | Professional cabinet refinishing ($1,000–$3,500) |
| Completely new look, new doors | Full cabinet replacement ($12,000+) |
The core process for DIY resurfacing involves five stages:
- Remove and label all doors, drawer fronts, and hardware
- Degrease and sand every surface thoroughly
- Apply bonding primer suited to your cabinet material
- Paint with two or more thin coats of cabinet-grade paint
- Cure fully before reinstalling — up to 30 days for normal use
New custom cabinets can easily start at $12,000, while a solid DIY resurfacing project can cost as little as $200 in supplies. That’s a gap worth paying attention to.
The catch? Prep work makes or breaks the result. Skipping degreasing or rushing the cure time are the two most common reasons DIY cabinet projects fail within months.
I’m Frank Hernandez, President of All Surface Refinishing, with over 25 years of hands-on refinishing experience across South Florida — and I’ve seen where do it yourself cabinet resurfacing projects succeed and where they fall apart. In this guide, I’ll walk you through exactly what it takes to get a result you’ll be proud of for years to come.
What is Do It Yourself Cabinet Resurfacing?
When homeowners talk about updating their kitchens, the terminology can get confusing. You might hear terms like painting, refinishing, and resurfacing thrown around as if they mean the same thing. They don’t!
To understand do it yourself cabinet resurfacing, it helps to know exactly what we are—and aren’t—doing to your kitchen or bathroom cabinets.
- Cabinet Painting: This is the process of applying a fresh coat of paint over your existing cabinet surfaces. It is highly cost-effective but can look amateurish if you simply slap wall paint on with a cheap brush.
- Cabinet Refinishing: This involves a more technical approach. We clean, repair, sand, prime, and apply specialized, durable cabinet-grade coatings (often using a sprayer) to the existing doors, drawer fronts, and cabinet boxes. This preserves your current layout and doors but completely changes their color and sheen to a smooth, factory-like finish.
- Cabinet Resurfacing: For the purposes of this DIY guide, resurfacing is the complete renewal of your cabinet surfaces using advanced cleaning, priming, and painting techniques. It is the ultimate way to Refinish Old Kitchen Cabinets without tearing out the underlying structures.
By focusing on refinishing and resurfacing rather than a total kitchen demolition, you save an incredible amount of money, keep functional materials out of Florida landfills, and avoid living in a construction zone for months.
| Method | Average DIY Cost | Average Professional Cost | Time to Complete (DIY) | Expected Lifespan |
|---|---|---|---|---|
| DIY Cabinet Painting | $150 – $300 | $900 – $2,000 | 2 – 3 Weekends | 3 – 5 Years |
| DIY Cabinet Refinishing | $300 – $600 | $1,500 – $3,500 | 2 – 4 Weekends | 8 – 12 Years |
| Professional Refinishing | N/A | $1,000 – $3,500 | 3 – 5 Days (Inside Home) | 10 – 15 Years |
Planning Your DIY Cabinet Resurfacing Project
Before you run to the home improvement store in Fort Lauderdale, Miami, or Boca Raton, you need a plan. Cabinet resurfacing is not a project you can successfully “wing” on a Sunday afternoon. It is a highly systematic process where patience is your greatest asset.
First, consider your timeline. A realistic DIY timeline for a medium-sized kitchen (about 30 doors and drawer fronts) is two to three weekends.
- Weekend 1: Prep, cleaning, sanding, and priming.
- Weekend 2: Painting (two to three thin coats) and starting the curing process.
- Weekend 3 (or later): Reassembly, mounting, and final adjustments.
Second, think about the unique South Florida climate. High humidity in places like West Palm Beach, Davie, and Boynton Beach can significantly affect paint drying and curing times. If you are working in an unconditioned garage, the moisture in the air will slow down your dry times. Always aim to prep and spray in a climate-controlled environment (between 65°F and 75°F with moderate humidity) if possible, or allow extra drying time between coats.
To get your creative juices flowing, take a look at painted kitchen cabinet ideas to see what colors and styles are trending. Once you have a vision, you can use our Cabinet Painting Cost Estimate guide to map out your budget down to the penny.
Essential Tools for Do It Yourself Cabinet Resurfacing
To achieve a smooth, professional-grade finish, you need the right gear. Don’t skimp on your tools – high-quality applicators are the difference between a kitchen that looks brand new and one that looks like a high school art project gone wrong.
Here is your ultimate shopping list:
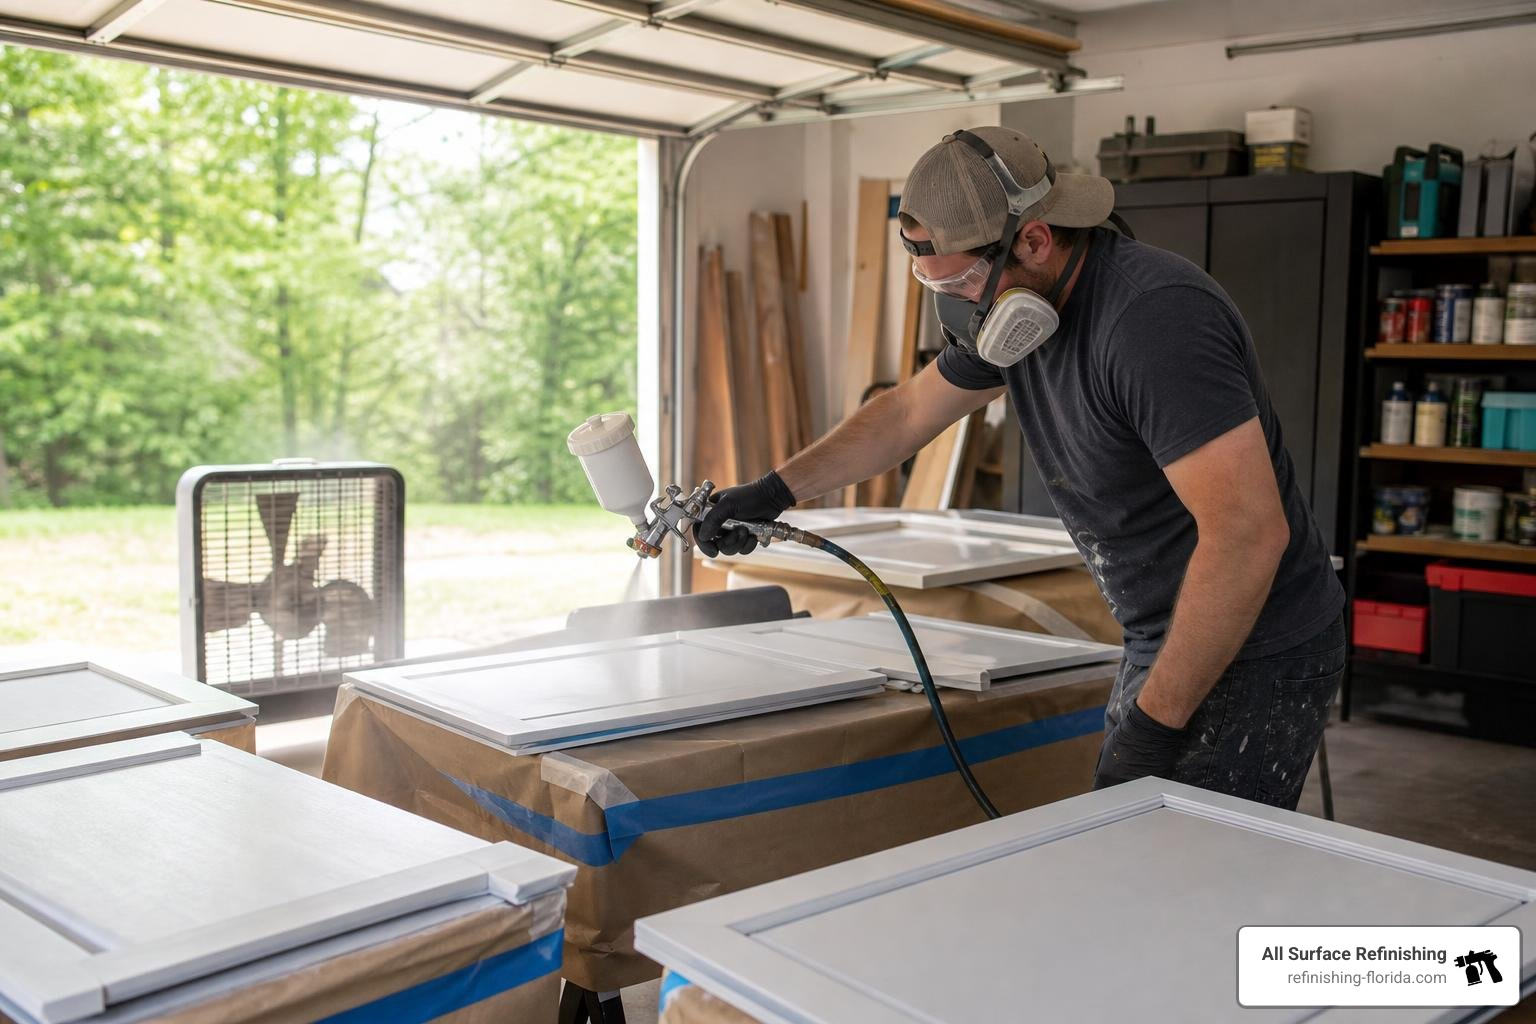
- HVLP (High Volume Low Pressure) Paint Sprayer: While you can use a high-quality brush and roller, renting or buying a budget-friendly HVLP sprayer is the only way to get a perfectly smooth, brush-stroke-free finish.
- Degreaser / Cleaner: TSP (Trisodium Phosphate) or a heavy-duty degreaser like Krud Kutter is non-negotiable. Cooking grease is the number one enemy of paint adhesion.
- Sanding Blocks and Sandpaper: You will need 120-grit sandpaper for scuffing up the old finish and 220-grit (or finer) for smoothing out primer and paint coats.
- High-Quality Bonding Primer: We highly recommend a specialty bonding primer. For wood or MDF, a waterborne bonding primer works beautifully. For laminate, thermofoil, or oil-based finishes, a shellac-based primer (like Zinsser BIN) is essential to block stains and guarantee adhesion.
- Painter’s Tape and Rosin Paper: To mask off your kitchen walls, countertops, floors, and the interiors of your cabinet boxes.
- Safety Gear: A proper respirator mask (not just a dust mask), safety glasses, and nitrile gloves.
For a visual walkthrough of how professionals handle these tools, check out this guide on cabinet prep and coating techniques.
Choosing the Right Paint and Finish
Do not use standard latex wall paint on cabinets! It is too soft, remains rubbery, and will peel off the moment you scrub a grease splatter or bump it with a frying pan.
Instead, look for specialized cabinet-grade coatings:
- Waterborne Alkyd Urethanes (Hybrid Paints): These are the darling of the DIY world. They apply as easily as water-based paints and clean up with soap and water, but they dry to a hard, leveling, durable alkyd finish that mimics old-school oil paints. Benjamin Moore Advance and Sherwin-Williams Emerald Urethane are excellent examples.
- Acrylic Polyurethane Coatings: Extremely tough, scratch-resistant, and highly resistant to moisture – perfect for humid Florida bathrooms and kitchens.
For sheens, we recommend Satin or Semi-Gloss. Flat paint is too porous and nearly impossible to clean, while High Gloss highlights every single minor imperfection in your wood or prep work. If you want a deeper look at color selection, read our guide on How to Change Kitchen Cabinet Color Like a Pro.
Step-by-Step Cabinet Resurfacing Guide
Now that you have gathered your tools and selected your paint, it is time to get to work. Follow these steps meticulously. Remember: 80% of cabinet resurfacing is preparation. The actual painting is just the victory lap.
Step-by-Step Do It Yourself Cabinet Resurfacing Process
Step 1: Remove and Label Everything
Do not try to paint your cabinets with the doors still hanging. You will get drips, runs, and missed spots. Take the doors and drawer fronts off.
Pro Tip: Label every single door and its corresponding cabinet opening. Write a number on a piece of painter’s tape and stick it inside the hinge cup or on the back of the door, and place a matching numbered piece of tape inside the cabinet box. Keep all screws and hinges in labeled plastic baggies. Trust us, trying to guess which door goes where at the end of the project is a nightmare!
Step 2: Clean and Degrease
Kitchen cabinets are coated in a microscopic layer of cooking grease, steam residue, and hand oils. Paint will not stick to grease. Scrub every square inch of the doors, drawer fronts, and face frames with a heavy-duty degreaser or TSP substitute. Pay close attention to the areas around the handles. Rinse with clean water and let dry completely.
Step 3: Repair Minor Damage
Inspect your cabinets for dents, deep scratches, or chipped corners. Fill these imperfections with a high-quality wood filler or a two-part polyester wood patch. Once dry, sand the patched areas flush with the surrounding surface. If you are changing your hardware style and need to move the handles, fill the old screw holes now.
Step 4: Sand the Surfaces
You do not need to sand down to bare wood, but you must “scuff” the surface to remove the glossy sheen. This creates a microscopic texture (or “tooth”) for the primer to grip. Use a 120-grit or 220-grit sanding sponge. Once finished, vacuum up the dust and wipe down every surface with a tack cloth to remove every last speck of debris.
If you are looking to save some elbow grease, you can read about How to Paint Cabinets Without Sanding in Florida, but keep in mind that a light scuff-sanding is always the safest bet for long-term durability. For the gold-standard method, refer to How to Paint Kitchen Cabinets the Right Way.
Step 5: Apply the Bonding Primer
Apply your primer using your HVLP sprayer or a high-quality brush and roller. If you are painting a dark wood (like oak) with a light color, or if you are dealing with laminate, a shellac-based primer is your best friend. It prevents wood tannins from bleeding through your beautiful new paint. Let the primer dry overnight.
Step 6: Sand the Primer and Paint
Once the primer is dry, lightly run a 220-grit sanding block over it to knock down any dust nibs or brush marks. Wipe away the dust with a tack cloth.
Now, apply your first coat of cabinet-grade paint. If spraying, keep the gun about 8 to 10 inches from the surface and use smooth, overlapping passes. If brushing, use a high-quality synthetic brush and don’t “over-work” the paint—let its self-leveling properties do the work. Apply a second coat after the recommended drying time (usually 16 to 24 hours for hybrid paints).
Reassembly and Finishing Touches
Once your final coat is dry to the touch, do not rush to hang them!
- Understand the Cure Schedule: There is a massive difference between paint being “dry” and paint being “fully cured.” While your cabinets might feel dry within a few hours, specialized cabinet paints can take 7 to 14 days (and up to 30 days) to reach their maximum hardness. Handle them with extreme care during the first week.
- Install Felt Dampers: Before hanging the doors, stick small, clear felt or rubber bumpers on the inside corners. This prevents the freshly painted doors from slamming hard against the face frames, which can cause the paint to stick or chip.
- Reinstall and Align: Carefully screw your hinges back into place. Hang the doors using your original labeled guide. Use a screwdriver to adjust the hinge alignment screws until the gaps between your doors are perfectly even and level.
Common Mistakes to Avoid During DIY Cabinet Resurfacing
Even seasoned DIYers can run into trouble when tackling cabinets. To ensure your kitchen looks like a million bucks, keep an eye out for these common pitfalls:
- Skipping the Degreaser: This is the absolute number one cause of paint failure. If you skip this step, your paint might look great at first, but within a few months, it will start peeling off in sheets around the handles and stove area.
- Painting in Place: Leaving the doors on the hinges while painting leads to ugly paint build-ups around the hinges, drips along the bottom edges, and uneven coverage.
- Applying Thick Coats: It is tempting to try to cover the cabinets in one thick coat of paint to save time. Don’t do it! Thick coats run, sag, trap solvent bubbles, and take forever to dry. Two or three thin coats will always yield a harder, smoother, and more professional finish.
- Ignoring the Wood Grain: If you have heavy-grained oak cabinets and want a smooth, modern look, you must apply a grain filler after priming. Otherwise, the deep, textured oak grain will show right through your paint.
- Rushing the Reassembly: Hanging doors too early will cause the paint to stick together where the door meets the cabinet frame, pulling the finish right off when you open the door.
For an exhaustive checklist of what to watch out for, take a look at our Cabinet Refinishing Complete Guide.
Frequently Asked Questions about Cabinet Resurfacing
How long does a DIY cabinet resurfacing project take?
For a typical kitchen, expect to spend 20 to 30 hours of active physical work. When you factor in drying times between cleaning, priming, and multiple coats of paint, the project will realistically span two to three weekends. If you are looking for a detailed breakdown of costs and timelines, check out our Kitchen Cabinet Refinishing Cost Guide.
Can you resurface laminate or thermofoil cabinets?
Yes! You can absolutely resurface laminate or thermofoil cabinets, but your choice of primer is critical. Standard primers will slide right off these slick, non-porous surfaces. You must use an ultra-adhesion bonding primer (like INSL-X Stix or a shellac-based primer like Zinsser BIN) to create a secure bond. Keep in mind: if your thermofoil is already peeling, bubbling, or cracked away from the underlying MDF, you must heat-strip the damaged plastic backing off down to the bare MDF before priming and painting.
When should I hire a professional instead of doing it myself?
While do it yourself cabinet resurfacing is highly rewarding, it is also incredibly labor-intensive. You should consider calling in a professional if:
- You do not have a well-ventilated, dust-free space (like a garage or covered patio) to spray and lay out 30+ doors to dry.
- You cannot afford to have your kitchen out of commission or cluttered with curing doors for several weeks.
- You want a flawless, factory-grade finish but don’t feel comfortable operating an HVLP paint sprayer.
- Your cabinets have extensive water damage or structural issues that require specialized carpentry repairs.
Conclusion
Resurfacing your cabinets is one of the most impactful home improvement projects you can undertake. By taking your time, prepping thoroughly, and using high-quality cabinet-grade materials, you can completely transform your kitchen or bathroom for a fraction of the cost of new cabinetry.
However, if the thought of sanding, priming, spraying, and living with your cabinet doors laid out across your home for three weeks feels a bit overwhelming, we are here to help.
At All Surface Refinishing, we have over 30 years of experience and have completed more than 14,000 successful projects across South and Southwest Florida—including Miami, Fort Lauderdale, Boca Raton, West Palm Beach, Davie, and Boynton Beach. We can deliver a flawless, durable, factory-fresh finish in just a matter of days, completely hassle-free.
Ready to give your kitchen the upgrade it deserves? Get a Professional Cabinet Transformation with All Surface Refinishing today!
