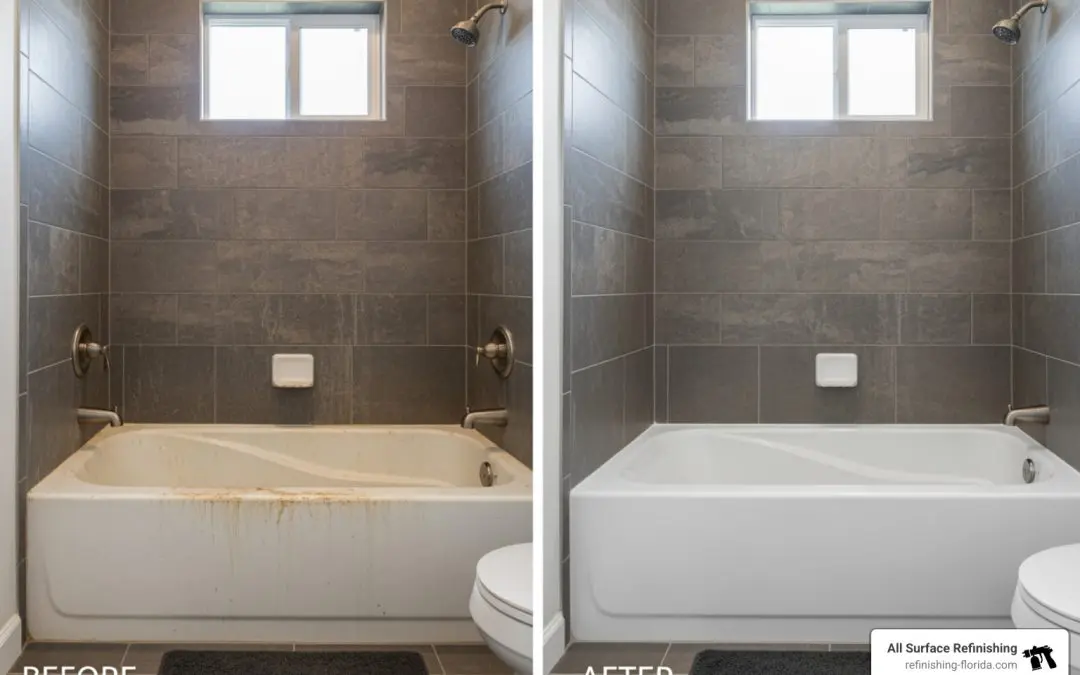
Is Your Fiberglass or Acrylic Tub Worth Saving? (Yes — Here’s Why)
Plastic tub refinishing is the process of restoring a worn, stained, or discolored fiberglass or acrylic bathtub to a like-new condition — without tearing it out and replacing it.
Here’s what you need to know at a glance:
- What it is: Cleaning, repairing, and recoating the tub surface with a durable epoxy or acrylic enamel finish
- Who it’s for: Homeowners and property managers with cosmetically damaged tubs that are structurally sound
- Cost: DIY kits run $75–$200; professional service typically ranges from $330–$900 — compared to $3,000+ for full replacement
- Time: 3–5 hours of active work, usable again within 24–72 hours
- How long it lasts: Up to 10–15 years with proper care
That yellowed, scuffed tub in your bathroom? It probably doesn’t need to be replaced. Most plastic tubs — whether fiberglass or acrylic — lose their shine over time due to body oils, soap scum, and hard water buildup. The surface wears down, stains set in, and suddenly the whole bathroom looks dated.
The good news: the tub itself is almost always structurally fine. What’s failed is just the outer coating — and that can be restored.
Refinishing is faster, cleaner, and dramatically cheaper than replacement. There’s no demolition, no contractor scheduling chaos, and no weeks of a torn-up bathroom. For property owners who need results without the disruption, it’s often the smartest move available.
I’m Frank Hernandez, President of All Surface Refinishing, and I’ve been refinishing plastic, fiberglass, and acrylic tubs across South Florida since 1996 — giving me decades of hands-on experience with every kind of plastic tub refinishing challenge you can imagine. In this guide, I’ll walk you through everything you need to know to get it done right.
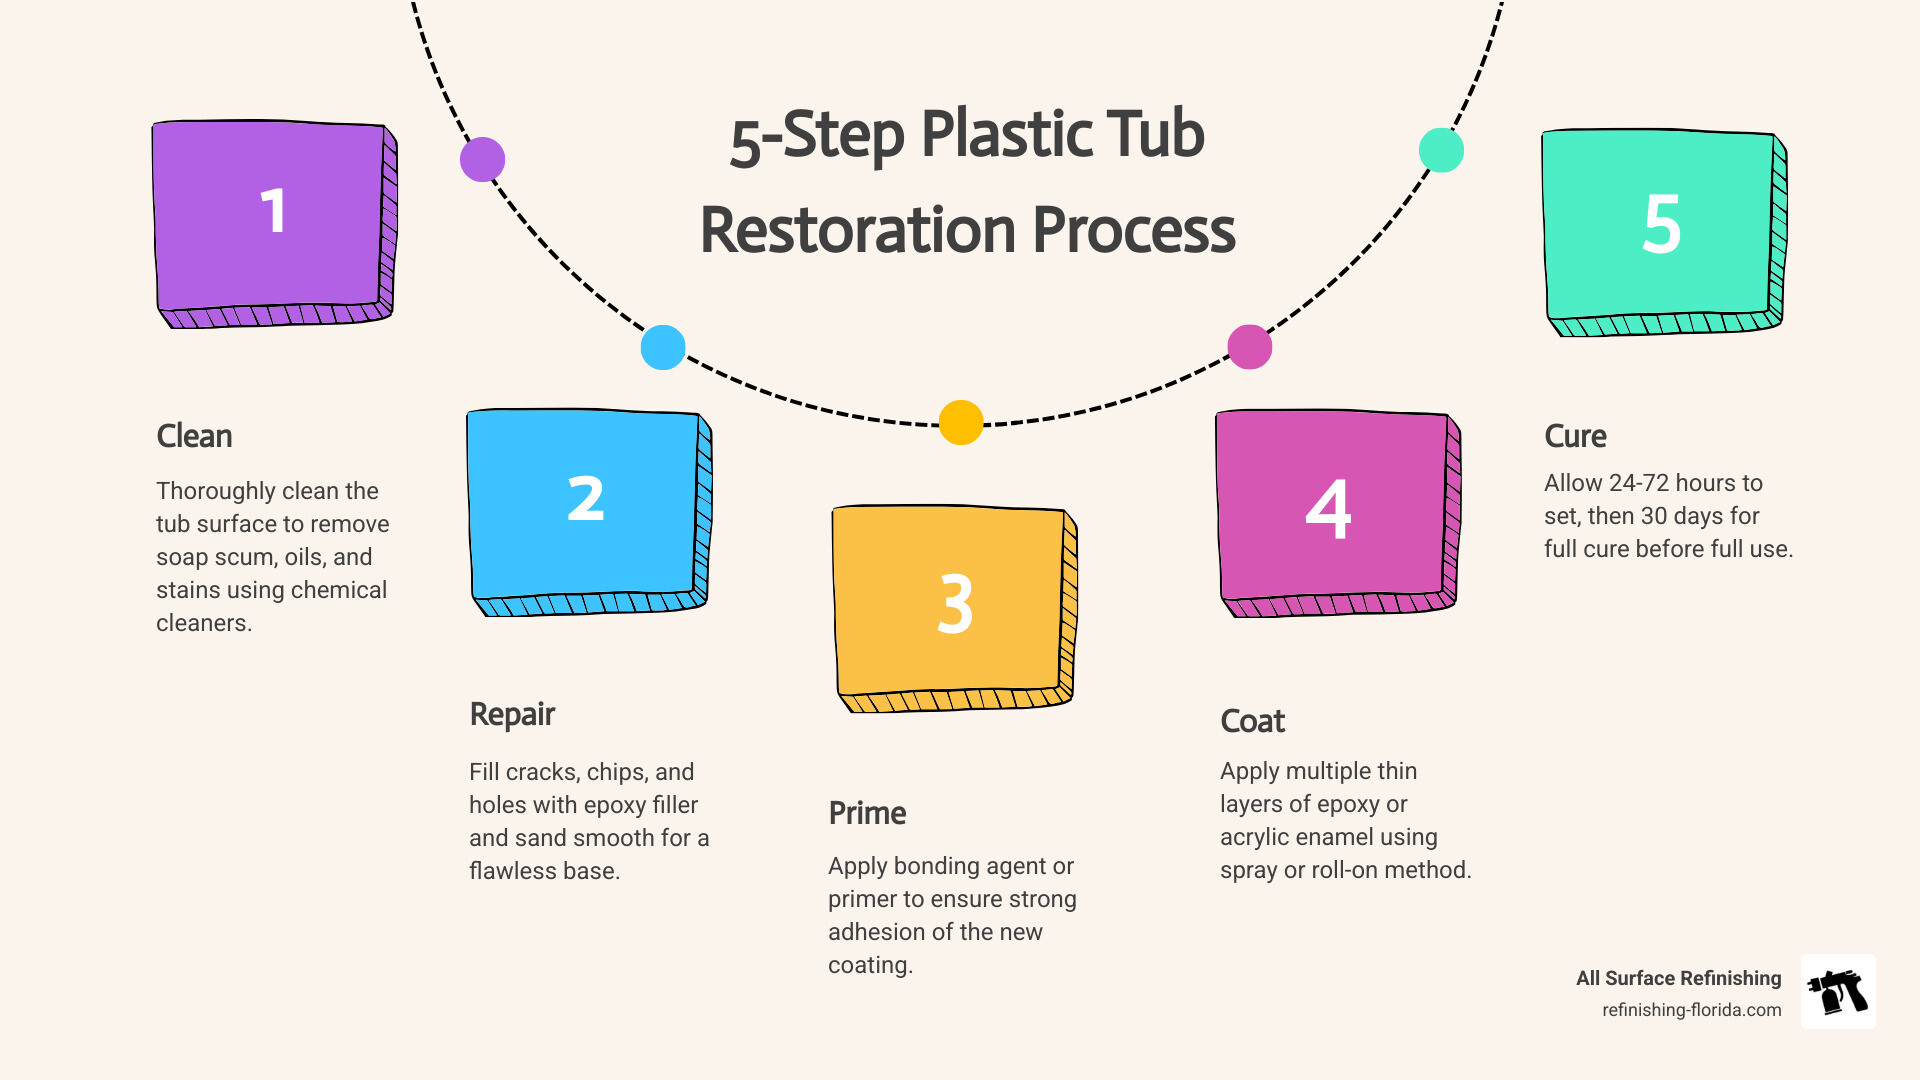
Plastic tub refinishing terms explained:
The Benefits of Plastic Tub Refinishing in 2026
As we move through 2026, the trend in South Florida home improvement is all about “smart restoration” rather than “wasteful replacement.” Whether you have a modern acrylic soaking tub in Miami or a classic fiberglass unit in a Boca Raton condo, the benefits of refinishing are undeniable.
First and foremost is the financial impact. Full bathtub replacement is a nightmare of a project. You aren’t just buying a new tub; you’re paying for a plumber, a tile setter to repair the walls, and a crew to haul away the heavy debris. Total costs often exceed $3,000. In contrast, professional plastic tub refinishing is roughly 75% cheaper.
Beyond the money, refinishing is an eco-friendly choice. Every tub we save in Fort Lauderdale or West Palm Beach is one less bulky piece of plastic sitting in a Florida landfill for the next 500 years.

With expert Fiberglass Bathtub Resurfacing, you gain a surface that can last 10 to 15 years. You also gain the freedom of color customization. If your current tub is a dated “almond” or “biscuit” from the 1990s, we can transform it into a crisp, modern white or even a sleek grey to match your new decor.
Common Materials Used in Plastic Tub Refinishing
To get that factory-fresh look, we use specialized materials designed to bond with non-porous surfaces. Standard paint won’t work here; it will peel off the moment it gets wet.
The industry standard involves a two-part epoxy or a high-tech acrylic enamel. These materials are chemically engineered to withstand constant water exposure and temperature fluctuations. A critical component is the bonding agent — often called a primer — which acts as the “glue” between the old plastic and the new finish. Following the correct Steps To Refinish A Plastic Tub ensures these materials create a rock-hard, high-gloss polyurethane topcoat that feels smooth to the touch.
Why Refinish Instead of Replace?
The biggest “win” for our clients in Coral Gables or Delray Beach is avoiding the demolition. Replacing a tub means days of noise, dust, and having your primary bathroom out of commission. Refinishing offers a 24-hour turnaround.
If your tub has scratches but is otherwise solid, you should Stop The Scratches A Guide To Acrylic Tub Repair rather than starting from scratch. This is especially vital for commercial bathroom updates in hotels or rental properties where downtime equals lost revenue. We can refresh an entire floor of tubs while keeping the rooms available for guests within a day or two.
Essential Preparation and Surface Repair
In plastic tub refinishing, the finish is only as good as the preparation. You can’t just spray over soap scum and expect it to stick.
We start with an intensive chemical cleaning. This removes years of body oils, mineral deposits, and grime that standard household cleaners leave behind. Once the tub is chemically stripped, we move to mechanical preparation. This involves sanding the entire surface with 120-grit to 220-grit sandpaper. The goal isn’t to remove the plastic, but to “scuff” it, creating a microscopic texture that the new coating can grab onto.

After sanding, we use a tack cloth to remove every single microscopic dust particle. If even a tiny bit of dust remains, it will create “nibs” or bumps in your final finish.
Safety Precautions for DIY Plastic Tub Refinishing
If you are attempting a DIY project, safety cannot be an afterthought. The epoxies and solvents used in this process are highly flammable and emit strong Volatile Organic Compounds (VOCs).
You must wear a high-quality respirator mask (not just a paper dust mask) to protect your lungs from chemical fumes. Nitrile gloves and eye protection are also mandatory. Ensure the bathroom is extremely well-ventilated; use exhaust fans and open any nearby windows. As noted in this guide on How to Refinish Plastic Bathtubs | ehow, managing these fumes is the most challenging part of the DIY process.
Fixing Cracks and Chips Before Coating
A new coat of paint won’t hide a structural crack. In fact, the moisture trapped in a crack can cause the new finish to bubble and peel. We use specialized epoxy fillers to bridge any chips or spiderweb cracks.
For many Florida homeowners, finding Cracked Panel Diy Solutions For Your Plastic Bath Surround is the first step in the restoration journey. We often use structural reinforcement techniques to ensure the repair is stronger than the original material. Whether it’s a minor chip or a more significant break, following The Ultimate Guide To Patching Fiberglass Tubs And Showers or a Beyond The Break A Diy Guide To Acrylic Shower Repair is essential before the first drop of topcoat is applied. Once the filler is cured, we sand it perfectly flush so the repair “disappears” under the final coating.
Step-by-Step Guide to the Refinishing Process
Once the tub is cleaned, repaired, and taped off to protect your tiles and fixtures, the real transformation begins. We remove the drain hardware and overflow plate whenever possible to ensure the coating reaches every edge.
The application method you choose will dictate the final look. Professionals typically use an HVLP (High Volume Low Pressure) sprayer for a glass-like finish, while DIYers often choose between pour-on and roll-on kits.
| Feature | Pour-on Resin | Roll-on Epoxy |
|---|---|---|
| Texture | Very smooth, self-leveling | Can have “orange peel” texture |
| Thickness | Thick, high-build | Thinner, may need multiple coats |
| Difficulty | Moderate (requires careful pouring) | Easy (like painting a wall) |
| Working Time | Short (30-45 minutes) | Moderate (1-2 hours) |
Applying the Topcoat for Maximum Shine
The secret to a professional-grade shine is the “wet edge” technique. This means applying the next section of coating while the previous one is still wet, allowing them to melt together seamlessly.
Whether you are using a sprayer or a high-quality foam roller, the goal is thin, even layers. If you apply it too thick, you’ll get “runs” or sags. For those working on shower bases, Fix That Floor Repairing Your Acrylic Shower Base Like A Pro emphasizes the importance of a consistent finish to prevent water pooling.
Curing Times and Initial Use
Patience is your best friend here. While the tub might feel dry to the touch in 10 hours, it is nowhere near ready for a hot bath.
- 24 Hours: The finish is “set.” You can usually remove the masking tape and carefully reinstall hardware.
- 72 Hours: Light use (brief showers) is generally okay, provided you don’t drop heavy shampoo bottles on the surface.
- 30 Days: This is the “full cure” window. During this time, the resin is still reaching its maximum chemical hardness.
Keep your bathroom between 72-75°F during the first 24 hours. High humidity — a common issue here in South Florida — can slow down the curing process or even dull the shine, so keep the A/C running!
Maintaining Your Refinished Plastic Tub
Congratulations, your tub looks brand new! To keep it that way for the next decade, you need to change your cleaning habits. The “old” way of scrubbing with abrasive powders (like Ajax or Comet) is now forbidden. These grit-based cleaners will create microscopic scratches that eventually dull the finish.
Instead, use non-abrasive, spray-on cleaners and a soft microfiber cloth. Routine rinsing after every use is the best way to prevent soap scum buildup.
One critical tip from our experience: Avoid suction-cup bath mats. The suction cups create a vacuum that can eventually pull the finish away from the plastic substrate. If you need slip protection, ask us about permanent slip guard additives that we can incorporate directly into the finish during application. For more maintenance hacks, check out Restoring Your Plastic Bathtub: Tips And Tricks | ShunPoly.
Professional vs. DIY: Costs and Service Areas
Is plastic tub refinishing a DIY project? It can be, but there are risks. A DIY kit like Rust-Oleum or Ekopel will cost you between $75 and $200. However, about 25% of our professional work involves stripping off failed DIY attempts where the paint started peeling after just a few weeks.
Professional service typically ranges from $330 to $900 depending on the size of the tub and the extent of the repairs needed. With a pro, you get a multi-year warranty, professional-grade HVLP equipment, and the peace of mind that comes with 30+ years of expertise.
At All Surface Refinishing, we serve the entire South Florida region, including:
- Miami-Dade: Miami, Coral Gables, Aventura, Hialeah, and Homestead.
- Broward County: Fort Lauderdale, Hollywood, Pembroke Pines, and Coral Springs.
- Palm Beach County: Boca Raton, Boynton Beach, Delray Beach, Jupiter, and West Palm Beach.
We also specialize in commercial bathtub services for hotels and apartment complexes from Key West up to Vero Beach.
Frequently Asked Questions about Plastic Tub Refinishing
How long does a refinished plastic tub last?
With professional application and proper care (no abrasive cleaners!), you can expect your refinished tub to last 10 to 15 years. It is a long-term solution, not just a quick fix.
Can I change the color of my yellowed fiberglass tub?
Absolutely. In fact, changing an outdated “almond” or “yellowed” tub to a bright, modern “high-gloss white” is our most requested service. We can match almost any decor palette.
When is it better to replace the tub instead of refinishing?
Refinishing is for cosmetic issues. If your tub has a hole you can put your foot through, or if it is leaking into the floorboards and causing structural rot, it’s time for a replacement. Refinishing can fix surface cracks, but it cannot fix a failing subfloor.
Conclusion
At All Surface Refinishing, we believe you shouldn’t have to spend a fortune to have a bathroom you love. With over 30 years of experience and 14,000+ successful projects under our belt, we are South Florida’s trusted experts in cost-effective transformations. Whether you’re in Jupiter or Kendall, we’re ready to bring your fiberglass or acrylic tub back to life.
Ready to save thousands on your bathroom remodel? Get more info about our bathtub services or call us today for a free quote. Your “miracle” makeover is just 24 hours away!
